• Untitled Document

    The 2024-2025 Fund Raising Season has Opened!

    EricsonYachts.org has opened the season for raising funds to support the expenses of the site. If you would like to participate, please see the link below for additional information.

    Thanks so much for your continued support of EricsonYachts.org!

    2024-2025 Fund Raising Info

Fuel tank pull on E33RH

K2MSmith

Sustaining Member
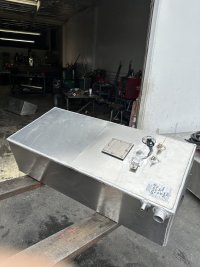
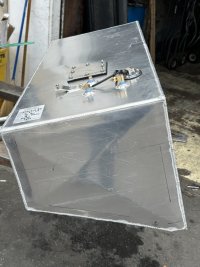
I pulled my diesel tank a few years ago and haven't gotten around to re-installing it yet. With tank is out, it's pretty handy to re-work battery cables and other wires that are hard to access in the forward tank compartment. I rigged a temporary, plastic fuel tank while the aluminum one is out.

Last night, I finally got around to cutting inspection ports and begin cleaning the tank. There was about 3/4" of sludge in the bottom corner of the tank. The fuel pick-up tube sits about 1.5-2" above this bottom corner, so I can see how sediment contamination could become an issue on a long journey in churning seas. I didn't have any tank leakage, but I'm debating having that lower corner of the tank replaced, or, maybe having a second layer of aluminum welded on top of the existing layer.

View attachment 49161 View attachment 49162 View attachment 49163

I'm putting in Seabuilt access plates. Luckily, I bought them a few years ago. I think they were about $190. Now they run about $300!

View attachment 49170
Took my tank to Berrys tanks n LA for replacement on the weekend. It’s going to be made of 1/8” aluminum with same fittings but welded pickup tubes , two baffles, inspection port . I thought about reducing size to 30 gallons but decided to keep original capacity of 40 gal . Hopefully install is plug and play . I asked him to keep layout of pickup/return and filler / vent hoses .
 

K2MSmith

Sustaining Member
New fuel tank complete. Work-of art in 1/8” aluminum. All new h/w and sensor . I had given him the old tank so it’s a plug-in replacement. He pressure tested when I picked it up in Santa Ana.
 

Attachments

  • IMG_1343.jpeg
    IMG_1343.jpeg
    132.7 KB · Views: 11
  • IMG_1342.jpeg
    IMG_1342.jpeg
    122.2 KB · Views: 11
Last edited:

K2MSmith

Sustaining Member
Ughhh , the fuel tank is about 2” too long and doesn’t fit . It has to go between two bulkheads . Another drive for San Jose to the shop in Costa Mesa . I keep telling myself this is all part of the sailing hobby..hopefully will get the tank fixed while I wait . The good part is owner seemed very interested in making me a happy customer.
 

Christian Williams

E381 - Los Angeles
Senior Moderator
Blogs Author
Yeah but if he copied the old tank, why's it too long?

But I agree, this is all part of sailing, and a year later you forget. Which is good.
 

K2MSmith

Sustaining Member
Yeah but if he copied the old tank, why's it too long?

But I agree, this is all part of sailing, and a year later you forget. Which is good.
I brought the tank back to Orange County ( from San Jose ) . We measured the tank and it was 1” longer than the old tank but all other dimensions ok . I didn’t bother to check measurements when I picked it up . The owner was very accommodating ( he met me there on a Saturday) . He told me he could make a new tank and ship if back free of charge or cut the tank shorter if I came back in 2 hours. I decided on the latter and went to visit my old sailing club in Newport Beach and toured a 54’ catamaran while I waited . I don’t know how accurate this is but they weee telling me slip rates down there are up to 3K/mo for a 40’ boat . I couldn’t believe it .
 

Christian Williams

E381 - Los Angeles
Senior Moderator
Blogs Author
A good outcome.

But, ugh. You probably noticed that the elaborate tanks of Tally Ho, custom made in plastic, leaked after a long wait for delivery. An entire new set of tanks was ordered--this time, not plastic.
 

K2MSmith

Sustaining Member
A good outcome.

But, ugh. You probably noticed that the elaborate tanks of Tally Ho, custom made in plastic, leaked after a long wait for delivery. An entire new set of tanks was ordered--this time, not plastic.
I’m hoping it is sound . He did a 2psi pressure test while I was there . Doesn’t sound like a lot of pressure but I guess that is standard for an aluminum tank .
 

K2MSmith

Sustaining Member
The vent hose seems to be routed upward toward the deck with the filler hose. Anyone know where the vent hose would ultimately go ? I have not tried to unscrew the deck filler fitting , but from what I can tell from the parts catalogs, this part should just have the filler hose connected to it with a clamps.
 

Christian Williams

E381 - Los Angeles
Senior Moderator
Blogs Author
where the vent hose would ultimately go

On the 32-3 and 381, the fuel vent is high on the transom near the fuel fill. It has to be external, because fuel spurts out when topping off.

fuel vent.jpg
 

K2MSmith

Sustaining Member
Can someone answer this question pls..
when I reconnect the fuel line to the new tank and put fuel in it , does the fuel system need to be primed in some way ? - or should the pump be able to suck fuel from the new tank ? I’m about ready to test things out Friday .
 

Christian Williams

E381 - Los Angeles
Senior Moderator
Blogs Author
Well, when I change fuel filters I have to prime the system by filling the bowl* and bleeding air. So I wouldn't be surprised.

But the pump is designed to draw fuel, so the issue will likely be not the tank, but the path from filter to fuel pump to injectors.

I'd expect to just have to make the filter seal good and then bleed at the injectors.

*I happen to have an electric fuel pump installed only to fill the Racor 500 (my 5432 engine has a mechanical pump). If you have a screw-on cannister filter, filling it with fuel before installation speeds things up.

.
 

Frank Langer

1984 Ericson 30+, Nanaimo, BC
I did not have to bleed the fuel system after replacing and filling the tank, but I was prepared to bleed it if necessary. It wasn't.
Frank
 

Prairie Schooner

Jeff & Donna, E35-3 purchased 7/21
I’ll have to figure out to do this . Maybe a bleed screw near the filter ?
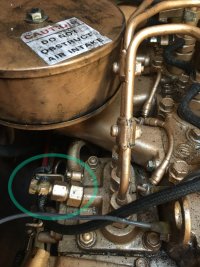
Ours has a bleed valve that feeds back into the fuel tank. When I change fuel filters I'll fill some diesel in each and install them. Then, with the battery off, I'll turn on the ignition switch in the cockpit. Back down by the engine, I open the valve and turn the battery on to operate the electric lift pump. (Thank you @Christian Williams for this maneuver) When I feel like it's had a chance to push all the air through, I turn the battery switch off. No fuel spills, no trying to catch overflow with rags. Pretty slick. Some people leave the valve cracked open all the time. We don't. I guess the injectors are downstream from this valve. I've never had to bleed them.

We were dogged by fuel problems our first year with the boat. Someone in it's previous ownership had twisted the knob off the bleed valve so I didn't know what it was supposed to look like. I thought it was bled by opening the nut at the end which didn't do anything. Scrounging around the internet I finally found some pictures of a complete unit. We were able to find a replacement through a Westerbeke dealer. IIRC, it was a Westerbeke part. I couldn't find a picture of our new valve installed, so the image below shows the old one.

fuel bleed E35-3 M25 a.jpg fuel bleed E35-3 M25 b.jpg

Replacing this valve coincided with the engine working properly, but I can't say definitively that's what fixed it.

Cheers,
Jeff
 

Pete the Cat

Sustaining Member
Just a reminder....remember to turn the fuel off to the tank (usually there is a valve between the filter and the tank at some point) before you remove the filter for replacement. This will hold a column of fuel in the feed line so that when you try to start it after replacement, the pump will have less to do. Much of the time this can eliminate or greatly reduce the time needed for bleeding. FWIW.
 

K2MSmith

Sustaining Member
The story is not over ..,

My installation went well . Engine started immediately. I had an impeller problem in the raw water pump , but fixed that and engine runs beautifully, but after a week , I noticed a small amount red diesel in my bilge ( maybe a few ounces ) .

I’m about ready to cry or open a bottle of Jamesons ( or both. ) ..

So my wife , who is much more linear and analytical in her thought process than I suggests that it is unlikely a leak in the new tank . It must be coming from somewhere else or probably just residual fuel from the installation. ( although I did check for fuel running out of the disconnected lines when I installed ) . I put about 5 gallons in the tank . I cleaned / dried the bilge , so waiting a few days to see if any more appears.

any other suggestions ? I did check for any obvious signs of leaks at the engine with it running. Nothing apparent. There is a white absorbent pad ( diaper ) in the engine well . It does have some old drips of red fuel on in it but I don’t think it’s enough to cause the fuel showing in the bilge . Maybe I should replace the pad and watch that also . I’m reluctant to add more fuel into the new tank until I can verify it doesn’t leak .
 

Loren Beach

O34 - Portland, OR
Senior Moderator
Blogs Author
Anecdotal evidence, but perhaps useful. After I had a pinhole leak repaired in our tank, a couple seasons later I noticed diesel in area directly under the end of the tank that had been repaired. Not very much, but it would keep reappearing a while after I mopped it up with a paper towel.
I could barely get a hand under that end of the tank and would keep finding a little bit of fuel along the bottom seam. I was considering pulling that tank out, again, and then checked the return line fitting above that area at the top of the side of the tank.

It had a drip. And upon closer inspection, I had slightly split the end of the return line/hose that last time I installed it, and this allowed a little bit of fuel to escape down the side of the tank which was also just above the exit firing and shutoff valve (and also the area of the repair).

Lucky me - just enough slack in the return line hose to cut off an inch and properly reattach it. No more leak/seepage.
Use your slenderest arm, with a dry paper tower, and feel all around for the tank exits and hoses, etc.
Good Luck!
 
Top