• Untitled Document

    The 2024-2025 Fund Raising Season has Opened!

    EricsonYachts.org has opened the season for raising funds to support the expenses of the site. If you would like to participate, please see the link below for additional information.

    Thanks so much for your continued support of EricsonYachts.org!

    2024-2025 Fund Raising Info

Marina ice coverage

bigd14

Contributing Partner
Blogs Author
the two scuppers closest to the center line of the boat are plumbed together with hose and then run, as a single hose, to a sea cock under the galley sink
This was the same configuration in my 30+. When I first got the boat I couldn’t close the seacock and trying to move the lever induced a steady drip that couldn’t be stopped. The boat was 6 hours from me and I spent several stressful weeks imagining the drip turning into a torrent before it could be moved closer. Luckily the leak remained constant and I decided then to separate the scuppers and the sink drain. I am very happy I did that and I never have to leave any seacocks open now.

I’m still worried that a hose may have split somewhere so I will be checking carefully when I have more time and daylight. I am also scheming to install an adaptor to allow easy engine winterization. https://www.groco.net/products/valves-seacocks/accessories/ssc-series-service-adaptor
 

Kenneth K

1985 32-3, Puget Sound
Blogs Author
Anyone who owns (or owned) a E32-3 will know that the two scuppers closest to the center line of the boat are plumbed together with hose and then run, as a single hose, to a sea cock under the galley sink.
Yep, that center scupper drain is a winter liability. I do something similar to what you do: Remove the scupper grates, cover one of the scuppers, blow air into the other scupper while the seacock is open (to blow the water out through the thru-hull), then close the scupper. Fill the blown-out line with anti-freeze, then put rubber stoppers in the scupper holes.
 

Kenneth K

1985 32-3, Puget Sound
Blogs Author
I am also scheming to install an adaptor to allow easy engine winterization. https://www.groco.net/products/valves-seacocks/accessories/ssc-series-service-adaptor
Doug,

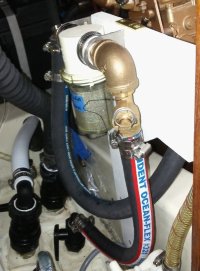
I added one of those valves when I put a strainer on my raw-water intake. I winterize with it every year. While it's a big improvement over no valve, it has some problems: That little plug starts to get stuck in the body after a few years. I had to grind mine down with a file, and still have to use pliers to remove it. And, because the hose fitting that takes its place only screws in 1/4 turn, sometimes it comes loose when you attach a hose to it and try to work the hose into an anti-freeze jug.

20170920_110204.2.jpg

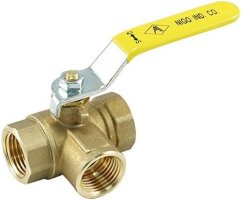
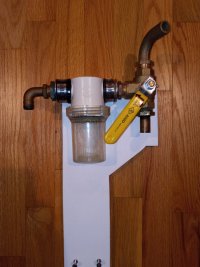
My recommendation would be to just install a Tee-valve instead. In fact, I bought one of these from Amazon, and just haven't installed it yet. About 1/5 the price of the Groco valve: https://www.amazon.com/gp/product/B07413ZLCG/ref=ppx_yo_dt_b_asin_title_o05_s00?ie=UTF8&th=1
valve.jpg

Added: Note that any type of valve installed above the thru-hull still traps raw (freezable) water in the hose between the thru-hull and the valve. The fix for this is to blow through your access valve with the thru-hull open, to purge it of water. Then fill the line with antifreeze before/after running anti-freeze through the raw-water circuit.
 
Last edited:

bigd14

Contributing Partner
Blogs Author
My recommendation would be to just install a Tee-valve instead
Ok I like this approach. Question, would the three way valve allow full flow? Seems like the flow might be restricted a bit. I suppose a standard T fitting with the ball valve on the 90 would work just as well and maintain full flow. With a plug on the end just in case! Thanks for sharing your experience with the Groco valve.
 

Kenneth K

1985 32-3, Puget Sound
Blogs Author
Question, would the three way valve allow full flow? Seems like the flow might be restricted a bit.
I think since the valve is labeled as "full flow," as this one is, the interior opening is not restricted. Check out the dimensions page (3rd photo) on the Amazon link. Also, if worried about brass and dissimilar metals issues, just use brass hose barbs with the T-fitting and isolate all the brass with a short hose segment before the next bronze fitting in your system.
 

Kenneth K

1985 32-3, Puget Sound
Blogs Author
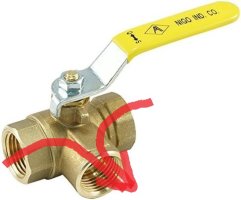
If installing a Tee-valve, note that there's no "straight-through" plumbing option like on the Groco valve. The common port is the side port, so the Tee-valve would likely need to be installed horizontally rather than vertically.

valve.jpg
 

bigd14

Contributing Partner
Blogs Author
Yeah I was worried about that. I think I will just go with regular tee oriented for straight through flow so as not to introduce too many restrictions or potential snags in front of the sea strainer. I’ll put the ball valve on the 90. I’m thinking I could use a quick connect hose fitting on the other side of the ball valve to easily connect a pre-made bilge dewatering hose or antifreeze supply hose.
 

Kenneth K

1985 32-3, Puget Sound
Blogs Author
Yeah, right, a regular tee and a ball valve work fine because the raw water side already has its own shutoff.

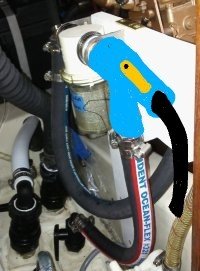
Still, I'm considering installing the 2-way valve, since I already bought it. Something like this:
39692-89faf4a6e6eaae15b3ad4dd00e3dfad0~3.jpg
 

bigd14

Contributing Partner
Blogs Author
Yeah, right, a regular tee and a ball valve work fine because the raw water side already has its own shutoff.

Still, I'm considering installing the 2-way valve, since I already bought it. Something like this:
View attachment 49079
Oh, you are plumbing it directly to the strainer. I hadn't though of that but it makes sense. Still, I think I will put it right on the seacock. My strainer is in a location where the shutoff valve would partially block access to the front of the engine.
 

Kenneth K

1985 32-3, Puget Sound
Blogs Author
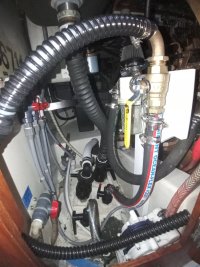
Finally got around to rebuilding the strainer apparatus--removed the Groco SSC valve and replaced it with a 3-way valve. The thought is that I can now do a fresh-water flush whenever I shut the engine down. Going out to install it today.
20240524_225723.jpg
 

Kenneth K

1985 32-3, Puget Sound
Blogs Author
Here's the finished installation with permanent flush-out/winterization hose attached. Should allow for instant switching from raw (sea) water to fresh water while the engine is running. I couldn't do that with the Groco SSC valve.

20240525_194304.jpg
 

Kenneth K

1985 32-3, Puget Sound
Blogs Author
Hey, thanks. Engine has about 2300 hrs, but it was pretty clean when I got it. I repainted the engine when I had it apart for the alternator bracket change in 2017.

Every Forespar valve and hose in that under-galley area has been changed out. I try to clean the gelcoat and painted parts of the hull with mineral spirits and acetone before putting all the parts back in.
 

Kenneth K

1985 32-3, Puget Sound
Blogs Author
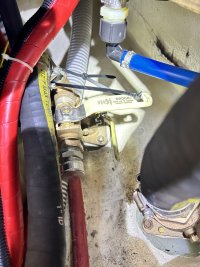
Looks great! What’s the seizing wire for?
The end the 3/4" hose was a bit stretched out from the old hose barb. It was a pretty loose fit on the new hose barb so I didn't know if it was actually going to hold. I need to get a new & slightly longer piece of hose. But, not having one, I put a third hose clamp lower down on the hose and the wire loop to catch it if it starts to slip off the fitting.
 

bigd14

Contributing Partner
Blogs Author
Smart thinking. I have all the parts for a similar mod but it will have to wait for this fall after I recover from a broken shoulder. No sailing for awhile :(
 

bigd14

Contributing Partner
Blogs Author
Finally installed the emergency intake/winterizing valve combo. What a great setup for easy winterizing! I just remove the cap, attach a garden hose to the fitting and switch off the raw water thru hull and open the new valve and drop the hose in a bucket of antifreeze and it’s done. It’s a little hard to see in the photo but it’s simply a tee connected to the thru hull with a male-male nipple. The old 90 degree hose fitting comes out the top of the tee and goes to the raw water filter. The new valve connects to the middle of the tee with another male-male nipple and a garden hose adapter on the other end of the valve. I was able to source it all in bronze except for the garden hose fitting which is stainless. I zip tied the winterizing valve closed so nobody confuses it with the thru hull valve. Unfortunately the thru hull valve is now a bit more difficult to reach.

IMG_6875.jpeg
 
Last edited:
Top