You are using an out of date browser. It may not display this or other websites correctly.
You should upgrade or use an alternative browser.
You should upgrade or use an alternative browser.
38-200 aft keel bolt access
- Thread starter EricHasAnEricson
- Start date
Reefpoints
Member I
I had some corrosion on one of the eight primary 1" keel bolts visible from the bilge that had me concerned, so I wanted to take a peak and see the condition of all the bolts - they looked good. I used Sika 291 LOT (long open time) for rebedding. The cost of the rebedding job was minimal since I did most of the surface/prep work and have a good relationship with the marina.Nice job. What prompted the decision to drop the keel? And can you give a rough estimate of cost these days, and your choice of bond or sealant.
Mine was built around 1985 when the dubious keel/hull bonding was happening. Sure enough, once the boat was lifted about 3" (with the nuts off), it only took about 15 to 30 seconds of hanging time for the keel to start to separate, then all at once it just pulled off a few moments later. Large portions of the old bedding easily pulled off the fiberglass-underside of the "shoe" or whatever you call the hull-side mating surface to the lead ballast. That gelcoat was as fresh and pristine/polished as any I've ever seen. It appears that the factory put in absolutely no effort effort to scuff the surface for bonding and I'm speculating that they didn't even rinse off any type of amine blush or mold release wax. (One note, part of the prep-work for separation was to use an oscillating tool (aka multimaster) to slice through the outer fairing putting at the hull/keel joint. I didn't go deep, probably just took about 15 or so minutes at maybe an 1/8" or so of depth.)
If no bolt-repairs are needed you don't necessarily have to fully separate the keel to re-bed. One could have the boat lifted about 1" or 1.5" and then clean off the old surfaces with a die-grinder and or high-pressure (gas-powered) pressure washer. (Those sling systems have VERY fine control if you have an experienced operator, FYI). I will say re-aligning the bolt-holes (bottom of boat) to bolts is extremely stressful. Wind was moving the boat in the slings much more than I was comfortable with! So that's an option to keep in mind.
A buddy of mine with an E28 actually lifted his hull off the keel just using 8 - 10 jackstands (one turn at a time on each) and got about 3/4" to 1" separation. He spent a good while cleaning up and prepping the mating surfaces and threads as best he could, then squeazed in the new bedding and brought the boat back down with the stands. I definitely DO NOT think the jack-stand approach is appropriate with a E34, E35, larger, but with a lighter boat like the 28 it turned out ok.
Last edited:
EricHasAnEricson
Member I
Oh my. This is a not-pleasant trip down memory lane. Back when we were shopping hard for our next/big boat in early 1994, we spent a day looking over a brokered P-10M docked at Newport OR. Price was in line, but after spending some time inside and outside, we were not so sure about the "early IOR" hull design, and then we checked the stanchion bases and found that this was one of the Pearson's that had used a rubber gasket under each base rather than properly sealing the bolts. I still recall flexing s stanchion and having moisture bubble out around the deteriorated gasket. (!)
I was warned about this by a surveyor and could readily imagine what would happen to the coring all along the deck.
Overall, it was a decent design from a NA, and relatively well built, in general. But having to re-core the deck on a 20 year old boat was a deal killer.
Back... to your future/present... I hope that there is nothing but a little surface rust on those keel bolt threads. Which is all we found when we had that maintenance don
Ugh, indeed, under every stanchion I ended up digging out rotten core, and refilling the void with thickened epoxy. That Pearson was a crash course in boat repair.
A surprisingly nimble boat though for its size and heft. I had several overnight passages where we averaged near 7 knots.
To give the factory some little slack, when they were trying to control/lower costs on a production boat, I always have imagined so many times when the factory "decision makers" were treated to long lunches with paid-for steaks and drinks by a smiling vendor rep.Pearsons are notorious for deck issues. I looked at a few different 80's models and they all had soft decks. Hard to believe such an oversight by them.
Cynical observation, yes. But I also recall my dad's stories about his department head at a huge metal refining plant being taken out to long lunches by vendors pushing materials and systems. Worse yet, that particular guy had a predilection for alcohol abuse.
Whoever sold Pearson those bunches of rubber stanchion-base gaskets likely paid for all the *drinks.... and also provided an enthusiastic spec sheet about the wonderfulness/durability of their product..... and it did save some measurable ($) time in fitting out the new hulls.

*Fun trivia: one major industrial supplier that dad did deal with had a firm policy of employing ONLY Mormons for their field sale rep jobs because they were not (supposedly) drinkers!

EricHasAnEricson
Member I
Update: I can indeed access the keel bolts under the engine using a universal joint. I splurged and bought a torque wrench with a 15° pivoting head - good idea. I can get the torque wrench under the engine, at an angle, and clip it into the universal joint without asking it to make to tight of a bend.
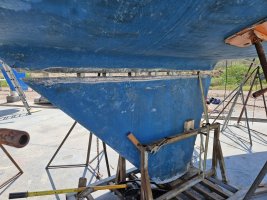
I've also begun sanding back the keel-hull joint and believe it will be worth the effort to complete this project.

I've also begun sanding back the keel-hull joint and believe it will be worth the effort to complete this project.
EricHasAnEricson
Member I
Update on the keel project:
Dropping the keel was nowhere as simple as I had hoped. I've removed material along the joint using an oscillating multi tool to about 1" deep. Keel still will not drop.
I have the boat back in stands, and plan to continue removing material from the joint. I suspect the sealant around the bolts going up into the cabin are what is holding it together.
If I'm unable to get the keel off, I will have to backfill the joint with thickened epoxy, and then perhaps a thin layer of fiberglass and G-flex around the joint perimeter.
For those who advised not to do it... You were right.
Pete the Cat
Sustaining Member
Be careful grinding that lead. It is health threat to you. I assume you are using a respirator, disposable suit, and gloves. And to get fiberglass or barrier coat to bond to it, you need to lightly sand it just before applying it. I lost the use of one lung likely due to carelessness in the boatyard over the years.
Reefpoints
Member I
1" should be plenty deep to allow for separation.
Are you 100% absolutely sure you got ALL the keelbolts off? I say this because the E35-3 has a single sneaky little 1/2" keel bolt farther aft of the main bilge, under the cabin sole's "trashbin". (It's about a foot or so behind the main bilge area over the part of the keel that narrows toward the trailing edge.) In general the E35-3 has pairs of keelbolts side by side (port/stbd) but at each end of the keel (forward and aft) there is a single bolt along the centerline. So, I'm wondering if there's another bolt farther forward or further aft under your engine or elsewhere? Maybe inspect with a cheapy phone-based usb endoscope camera?
When you tried to separate it, how was the boat elevated - in slings, placed in an elevated cradle, or other?
EricHasAnEricson
Member I
@Pete the Cat - I do have a respirator, but often forget to use it. That's a valuable reminder, thank you.
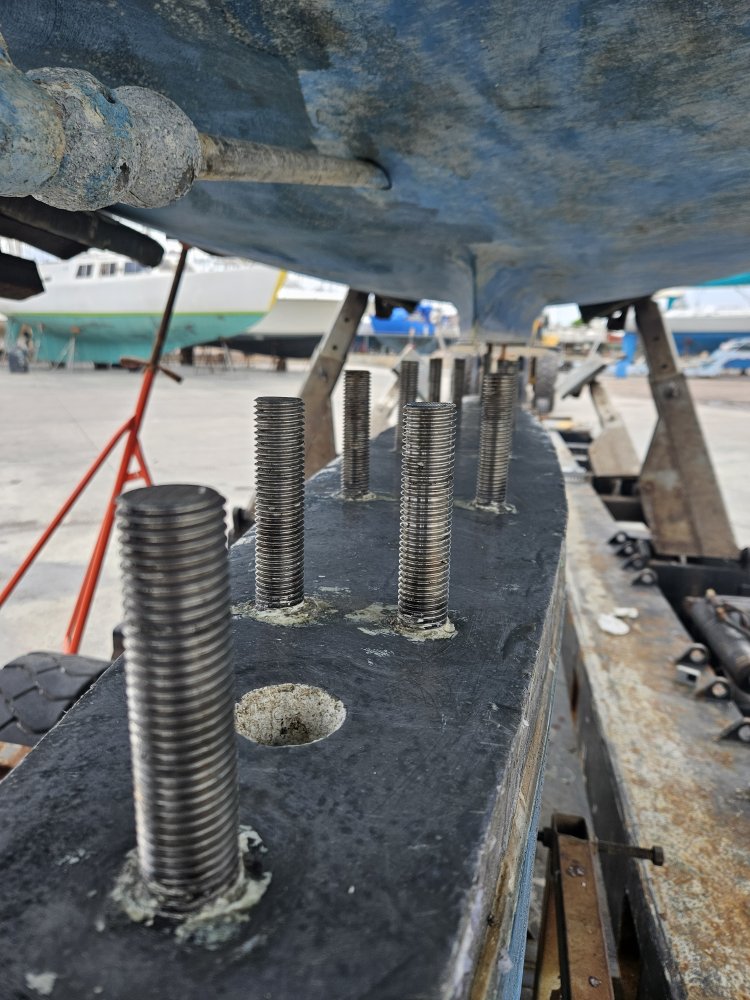
@Reefpoints - spot on. I had a sneaky 13th keel bolt, just in front of the transmission and nearly inaccessible. It was buried under debris and I only learned about it after only the front of the keel separated.
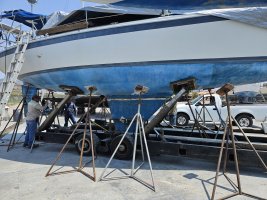
They don't have travellifts here, only hydraulic trailers. Photo attached. I got the keel to separate this morning while I was on jack stands. I put up about a dozen of them to help spread the load, because the keel did need to hang for this to work. No snaps, pops, or bulges in the hull so I think the plan worked.
Getting the keel to separate required pounding in some chisels to start a gap, then wooden wedges to keep growing the gap. Hearing the sealant release was a beautiful sound.
Plan now is to clean up both surfaces. On the bottom I'll seal the shiny lead with plain 105 epoxy. I'll cover that thin layer with packing tape and a thin layer of grease, then spread thickened epoxy and drop the hull down into it. Once it cures it should separate readily and then I'll have a nice pair of smooth mated surfaces on which to apply sikaflex.
Will document and upload the whole process once it's done.
Also, viva Mexico. So far I've only spent $500 for 4 hours of lift time, and $150 on replacement nuts and washers. Fingers crossed that I can keep this project to $1000 or less.
@Reefpoints - spot on. I had a sneaky 13th keel bolt, just in front of the transmission and nearly inaccessible. It was buried under debris and I only learned about it after only the front of the keel separated.
They don't have travellifts here, only hydraulic trailers. Photo attached. I got the keel to separate this morning while I was on jack stands. I put up about a dozen of them to help spread the load, because the keel did need to hang for this to work. No snaps, pops, or bulges in the hull so I think the plan worked.
Getting the keel to separate required pounding in some chisels to start a gap, then wooden wedges to keep growing the gap. Hearing the sealant release was a beautiful sound.
Plan now is to clean up both surfaces. On the bottom I'll seal the shiny lead with plain 105 epoxy. I'll cover that thin layer with packing tape and a thin layer of grease, then spread thickened epoxy and drop the hull down into it. Once it cures it should separate readily and then I'll have a nice pair of smooth mated surfaces on which to apply sikaflex.
Will document and upload the whole process once it's done.
Also, viva Mexico. So far I've only spent $500 for 4 hours of lift time, and $150 on replacement nuts and washers. Fingers crossed that I can keep this project to $1000 or less.
Attachments
-
 20240727_144551.jpg320.8 KB · Views: 22
 -
 20240726_111028.jpg310.1 KB · Views: 22
Vtonian
E38 - Vashon
We salute you. Way to persevere on a job everyone dreads.@Pete the Cat - I do have a respirator, but often forget to use it. That's a valuable reminder, thank you.
@Reefpoints - spot on. I had a sneaky 13th keel bolt, just in front of the transmission and nearly inaccessible. It was buried under debris and I only learned about it after only the front of the keel separated.
They don't have travellifts here, only hydraulic trailers. Photo attached. I got the keel to separate this morning while I was on jack stands. I put up about a dozen of them to help spread the load, because the keel did need to hang for this to work. No snaps, pops, or bulges in the hull so I think the plan worked.
Getting the keel to separate required pounding in some chisels to start a gap, then wooden wedges to keep growing the gap. Hearing the sealant release was a beautiful sound.
Plan now is to clean up both surfaces. On the bottom I'll seal the shiny lead with plain 105 epoxy. I'll cover that thin layer with packing tape and a thin layer of grease, then spread thickened epoxy and drop the hull down into it. Once it cures it should separate readily and then I'll have a nice pair of smooth mated surfaces on which to apply sikaflex.
Will document and upload the whole process once it's done.
Also, viva Mexico. So far I've only spent $500 for 4 hours of lift time, and $150 on replacement nuts and washers. Fingers crossed that I can keep this project to $1000 or less.
Prairie Schooner
Jeff & Donna, E35-3 purchased 7/21
Congratulations on your success! Great documentation. How do plan to make sure the keel aligns square to the boat?
Reefpoints
Member I
From my (admittedly very limited) experience, it's going to go back on exactly the way it came off. Before the job I had been worried about having to try and use jack stands to twist the keel relative to the boat for alignment or something like that. In practice it went on nicely aligned. Maybe others have had a different experience? I don't think I'd fret about that aspect again.Congratulations on your success! Great documentation. How do plan to make sure the keel aligns square to the boat?
@EricHasAnEricson Congrats!!!!
EricHasAnEricson
Member I
If anyone stumbles across here and is thinking about dropping their keel, I've made a blog post with all the dirty details and lessons learned:
 ericsonyachts.org
E38-200 - Rebedding the Keel
Preamble I had heard of my vintage of E38's (1986) having poor keel-stub adhesion due to the factory not removing the mold release wax before fitting the keel. For this reason, and also having experienced crevice corrosion in my previous boat, I...