• Untitled Document

    Join us on April 26th, 7pm EST

    for the CBEC Virtual Meeting

    All EYO members and followers are welcome to join the fun and get to know the guest speaker!

    See the link below for login credentials and join us!

    April Meeting Info

    (dismiss this notice by hitting 'X', upper right)

Bilge Wars: The Jammed Hose Menace.

Stuart 28-2

Member II
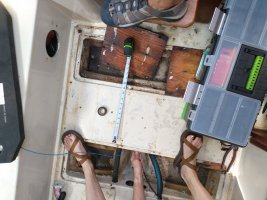
IMG_20210821_123228454.jpg1988 Ericsson 28-2. What do you all think of cutting an access hole 8" x 8" basically where the black electrical tape is, and, the likely integrity of the fibre glass repair work afterward?
I posted about this on Aug 8th " Clog in bilge hose".
We are now into our 3rd consecutive weekend - both days and 7-8 evenings after work. Despite coming up with new plans, loss if blood, bruising, and strained muscles, we have gotten nowhere.
Neither the bilge hose or the hose for the shower sump will budge. We did manage to get out a section of the hose for the manual bilge that covers the jam point but it hasn't helped in getting the others free.
I believe the jam occurred when we made the mistake of trying to pull the hose out with brut force before knowing they take two close to 90 deg turns. Where you see the hole for the battery selector they are jammed under the low section below that.
We removed the water tank under the starboard settee which gave me access where I can get one hand on the hose through an access port there and the other hand on the hose through the hole for the battery selector ( that's how we got the manual hose out). Neither will budge pulling in either direction, one is starting to tear if we pull in direction toward bilge.
So, I am thinking the next plan is cut an access hole but I don't want to ruin the structural integrity of the floor system and worried patch and repair on the fiber glass won't be good enough.
 

goldenstate

Sustaining Member
Blogs Author
I think the hose is jammed because it is "supposed" to be jammed as a function of the construction.

The grid in the bottom of the boat was formed upside down. Then the factory installed the hoses and electrical wires on the rough side while the grid was still separate from the hull. They used screw in zip ties to affix the hoses to the hidden side of the grid, so non-destructive service is impossible.

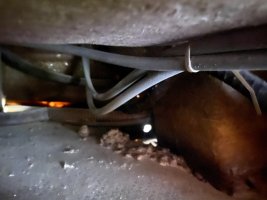
See how everything is pinched up to the grid? This is great for when the factory flipped the grid over and lowered it into the hull. But it's essentially impossible to change now.

IMG_2217.jpg

I figured this out when I was trying to replace my impeller inlet hose. I did this while my engine pan was cut open. If I had not been able to reach inside of a 12"*18" hole that the boatyard guys were going to repair properly, I could not have even removed my old impeller hose.

I think you are right to be concerned about weakening the grid. I would abandon the old hoses in place, and try to drill new limber holes and run new hoses parallel to your old ones. That you are having trouble pulling your old hoses is not your fault and there is no magic trick to fix it. Better to drill new smallish holes and run a new line.

The boat was simply not designed to have the original hoses replaced in the same routes etc..

$.02,

Tom
 

Stuart 28-2

Member II
I think the hose is jammed because it is "supposed" to be jammed as a function of the construction.

The grid in the bottom of the boat was formed upside down. Then the factory installed the hoses and electrical wires on the rough side while the grid was still separate from the hull. They used screw in zip ties to affix the hoses to the hidden side of the grid, so non-destructive service is impossible.

See how everything is pinched up to the grid? This is great for when the factory flipped the grid over and lowered it into the hull. But it's essentially impossible to change now.

View attachment 39959

I figured this out when I was trying to replace my impeller inlet hose. I did this while my engine pan was cut open. If I had not been able to reach inside of a 12"*18" hole that the boatyard guys were going to repair properly, I could not have even removed my old impeller hose.

I think you are right to be concerned about weakening the grid. I would abandon the old hoses in place, and try to drill new limber holes and run new hoses parallel to your old ones. That you are having trouble pulling your old hoses is not your fault and there is no magic trick to fix it. Better to drill new smallish holes and run a new line.

The boat was simply not designed to have the original hoses replaced in the same routes etc..

$.02,

Tom
Thank you! Extremely helpful!
 

Nick J

Sustaining Member
Moderator
Blogs Author
Has anyone come up with a good solution to the problem of zip tied hoses? Is there a tool to cut the zip ties.? If access ports were cut, how big and where? I'm trying to figure out how to replace bilge and fresh water hoses on my 35-3.
 

Loren Beach

O34 - Portland, OR
Senior Moderator
Blogs Author
If you can get a hand in, use some small side-cutting pliers. Tie a string to the pliers in case they fall out of your fingers. The factory did this in several very-hard-to-see places in our boat also.
 

goldenstate

Sustaining Member
Blogs Author
Has anyone come up with a good solution to the problem of zip tied hoses? Is there a tool to cut the zip ties.? If access ports were cut, how big and where? I'm trying to figure out how to replace bilge and fresh water hoses on my 35-3.

Hole saw, crossed finger guesswork as to location, diagonal pliers to clip the zip ties.


Hole has to be large enough for bovine obstetrician-style access.
 

Christian Williams

E381 - Los Angeles
Senior Moderator
Blogs Author
If it were me, I'd saw out a circular access hole, save the sawed-out piece, and then just epoxy it back where it was afterwards.

I think you'll find the TAGF there very thick indeed, probably 1/2" to 3/4".

I doubt the structural integrity will be compromised at all, even with quite a big hole. Even if not repaired.

The revelation of potential hidden cable ties has been a new one for me (thanks, forum), and since I plan to replace original bilge hoses eventually, a big heads-up.
 

Nick J

Sustaining Member
Moderator
Blogs Author
I knew there was a post about that. Thanks Tom!

It's strange how different the 32, 35, and 38 grids are from one another. The mystery to me is what's happening under the engine bed. I was thinking I would need to cut access holes in the side of the bed to free the hoses there. I think the 35-3 doesn't have the large flat area like the 32-200 does in your pic. I searched for TAFG pics of the 35-3 and remembered @treilley had a great post on his personal blog (tkronaboat.com). Here's the best pic showing the grid and hoses:

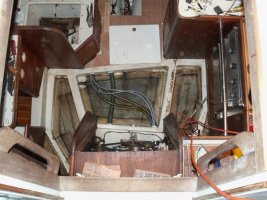
TKRon Sole repair.jpg

This looks more like the bends in the hoses are what's keeping me from pulling them out. It also leads to think I would need to pull the sole if I really want good access, but I'm not sure I can handle that project in addition to everything else going on at the moment. I wonder if the holes entering and exiting the grid are conduits or just holes and they are fastened to the underside of the grid.

this pic does solve my question on where the limber hole/tube from the shaft log goes. Mine is clogged and when I fish a coat hanger down I couldn't free it. I assumed the tube ended inside the gird, but the pic shows it ends in the void at the bottom of the stairs which means my coat hanger just wasn't long enough to reach the end. I can only imagine what's waiting for me to find under the sole.
 

Christian Williams

E381 - Los Angeles
Senior Moderator
Blogs Author
I assumed the tube ended inside the gird

I concluded that on my model, the drain tube from aft of the engine compartment requires two 90-degree elbows in order to step down and discharge into the low saloon bilge. That's why I can't put a snake through it.
 

Nick J

Sustaining Member
Moderator
Blogs Author
Ah, I didn't even think about the use of 90s in that run, but that makes sense.
 

Loren Beach

O34 - Portland, OR
Senior Moderator
Blogs Author
This looks more like the bends in the hoses are what's keeping me from pulling them out. It also leads to think I would need to pull the sole if I really want good access, but I'm not sure I can handle that project in addition to everything else going on at the moment
Different model of "Ericson" but I can confirm that once you remove the sole piece (hopefully intact) you can put it back with an access plate. I did that for the large/wide piece of T&H sole at the foot of our companionway. It makes a huge difference in future access to clean up the area or just to remove some water. It's a matter of "measure 4 times and cut once" to end up with a piece of the sole with teak strips on all four sides, and matching teak trims on the sides of the exposed sole. Finished, it looks 99.9% like it came from the factory that way.
Yup, it was a winter project.
 
Top