Bolo
Contributing Partner
I did a post about this subject earlier this month but decided to re-post a new thread so that any Ericson owners with the same problem will have an easier time of finding a solution. So I hope this was OK for me to do rather then tack it on the end of the old thread.
The Problem:
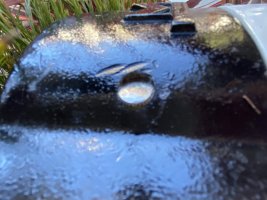
Late last summer I noticed several curved shaped pieces of white plastic in the cockpit. Piecing them together I soon realized that the fragments were what used to be a sheave. The nearest sheave to the cockpit are the reefing sheaves in the Outhaul Assembly (boom end casting). Sure enough, one sheave was gone except for the brass bushing. The other was still there but obviously well worn.
The Removal:
After using info from this site and doing some additional research on-line for a parts supplier I decided to do the fix myself especially after asking the yard about doing it. More on that later. I live about 2 hours from the boat but check on it every month during the winter months. So I was prepared for a struggle in getting the boom end off because it's a "good olde boat" and things sometimes don't want to come apart easily. But it turned out to be easy on my E-32-3. First pull out the reefing lines, ease out the topping lift to drop the boom and then disconnect the topping lift. It helps to have a second pair of hands to hold the boom (my wife in my case) and I dropped the boom onto the dodger framing. Three screws, one on each side and one on the bottom, and then use a rubber mallet to tap (not pound) the end out from the boom.The insert is 1-1/2" into the boom. Easy.
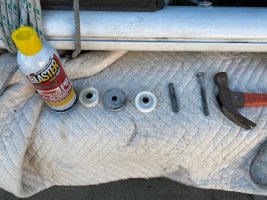
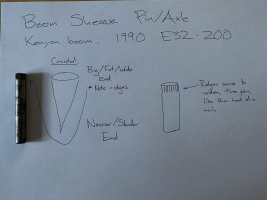
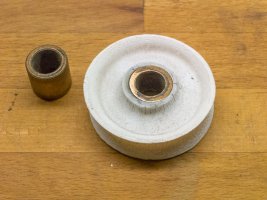
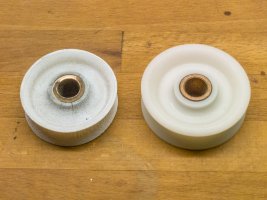
Back home with the boom end on the work bench carefully look at the axle/pin that holds the sheaves in the casting. You may even want to use a magnifying glass to locate which end of the axle has a knurled end. In my case the knurled end was on the starboard side of the outhaul assembly. Then squirt, several times, anything like "PB Blaster" which is what I use to unfreeze stubborn bolts. Patience is the word here when doing this part. Squirt some around the axle end and allow it to soak in and then turn it over and do the same on the other side. Then repeat a few more times. I then put the outhaul assembly into my big vise (You can never have a vise thats too big) with the non-knurled end of the axle pointing DOWN. Use a drift pin or some other sturdy metal rod that you can use to tap out the axle FROM THE TOP. I used a rod that was part of my socket set with turned out to be a smaller diameter then the hole and long enough to tap the axle all the way out. Here is what I found after getting the rod out. One bushing (what was left of the shattered sheave) and one very worn sheave. In the next photo you can see how the old sheave compares to a new one. The old one actually has a smaller diameter! :0
The Parts:
This site gave me info for two parts supplies, Zepherworks and Rig-Rite. I chose Rig-Rite because they had OEM parts of my Kenyon boom. The Rig-Rite site ins't what I would call "user friendly" but I was able to identify my boom and parts for it. Here is the web page that I found for the sheaves I needed: http://www.rigrite.com/Spars/Kenyon_Spars/3550-Boom.php
After some time on the site I found that my boom section is a "3550" type and the outhaul assembly is part number K-11472. Referring to the web page you'll see that there are also parts for the assembly including the reefing sheaves, among other things, and the number for that is K-10347. Only way to order parts is to call so I ended up talking to Megan who set me up with two reefing sheaves. The parts (and shipping) which I received in less then two days came to $91. Seems like a lot but the sheaves were a exact match and came quickly.
The Fix:
So with the new sheaves in-hand I cleaned up the knurled axle and applied some oil. The center metal topping lift sheave was in good shape even though it has some wear on the outside surfaces so I re-used it.
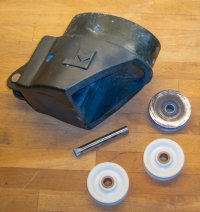
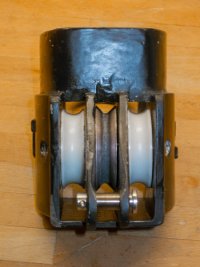
Clamping the outhaul casting in the vise again I positioned the sheaves in place in the casting. Then inserting the non-knurled end of the axle in first I tapped the axle through the casting. Here is a shot of the casting with two of the three sheaves in place and the axle pin in and ready for tapping.
The Problem:
After I tapped the pin home I noticed that one of the reefing sheaves was very difficult to turn. So I tapped the axle out again and "slightly" sanded down the center brass bushing and some of the surrounding center part of the sheave. I did this with my Dremel tool. Re-intalled the axle and sheave and checked to make sure all the sheaves turned free.
The Finish:
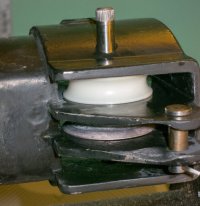
All that is left to do is another trip to the boat to re-install the outhaul assembly, reeve the reefing lines over the new sheaves and attached the topping lift. All in all from the removal to the re-install this fix will probably total about one hour. When I originally noticed the problem I called the yard at my marina to take a look and give me an estimate. They said that they could not give me and estimate because they didn't know what sort of "problems" they might encounter and this is the RIGGING department! They wanted to charge at time ($150/ hour) and materials. :0 Another reason to learn how to fix your own boat no matter how much money you have or how inexperienced you might think you are to carry out this sort of work. Here's a look at the final fix before re-installing it on the boat.
The Problem:
Late last summer I noticed several curved shaped pieces of white plastic in the cockpit.
The Removal:
After using info from this site and doing some additional research on-line for a parts supplier I decided to do the fix myself especially after asking the yard about doing it. More on that later.
Back home with the boom end on the work bench carefully look at the axle/pin that holds the sheaves in the casting. You may even want to use a magnifying glass to locate which end of the axle has a knurled end. In my case the knurled end was on the starboard side of the outhaul assembly. Then squirt, several times, anything like "PB Blaster" which is what I use to unfreeze stubborn bolts. Patience is the word here when doing this part. Squirt some around the axle end and allow it to soak in and then turn it over and do the same on the other side. Then repeat a few more times. I then put the outhaul assembly into my big vise (You can never have a vise thats too big) with the non-knurled end of the axle pointing DOWN. Use a drift pin or some other sturdy metal rod that you can use to tap out the axle FROM THE TOP. I used a rod that was part of my socket set with turned out to be a smaller diameter then the hole and long enough to tap the axle all the way out. Here is what I found after getting the rod out. One bushing (what was left of the shattered sheave) and one very worn sheave. In the next photo you can see how the old sheave compares to a new one. The old one actually has a smaller diameter! :0


The Parts:
This site gave me info for two parts supplies, Zepherworks and Rig-Rite. I chose Rig-Rite because they had OEM parts of my Kenyon boom. The Rig-Rite site ins't what I would call "user friendly" but I was able to identify my boom and parts for it. Here is the web page that I found for the sheaves I needed: http://www.rigrite.com/Spars/Kenyon_Spars/3550-Boom.php
After some time on the site I found that my boom section is a "3550" type and the outhaul assembly is part number K-11472. Referring to the web page you'll see that there are also parts for the assembly including the reefing sheaves, among other things, and the number for that is K-10347. Only way to order parts is to call so I ended up talking to Megan who set me up with two reefing sheaves. The parts (and shipping) which I received in less then two days came to $91. Seems like a lot but the sheaves were a exact match and came quickly.
The Fix:
So with the new sheaves in-hand I cleaned up the knurled axle and applied some oil. The center metal topping lift sheave was in good shape even though it has some wear on the outside surfaces so I re-used it.

Clamping the outhaul casting in the vise again I positioned the sheaves in place in the casting. Then inserting the non-knurled end of the axle in first I tapped the axle through the casting. Here is a shot of the casting with two of the three sheaves in place and the axle pin in and ready for tapping.

The Problem:
After I tapped the pin home I noticed that one of the reefing sheaves was very difficult to turn. So I tapped the axle out again and "slightly" sanded down the center brass bushing and some of the surrounding center part of the sheave. I did this with my Dremel tool. Re-intalled the axle and sheave and checked to make sure all the sheaves turned free.
The Finish:
All that is left to do is another trip to the boat to re-install the outhaul assembly, reeve the reefing lines over the new sheaves and attached the topping lift. All in all from the removal to the re-install this fix will probably total about one hour. When I originally noticed the problem I called the yard at my marina to take a look and give me an estimate. They said that they could not give me and estimate because they didn't know what sort of "problems" they might encounter and this is the RIGGING department!

Last edited:

