Cabin Sole-how best to remove old sole [Master Thread]

tilwinter

Member III
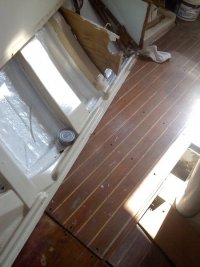
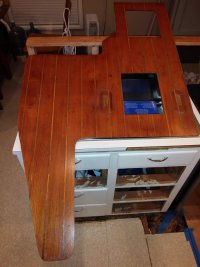
:dunce: Replacing cabin sole on 30+, inspired by all the posts on this site. I am all set to start cutting the replacement pieces. I've got the 4x8 3/8 plywood teak and holly veneer. Plan to use a router to make the cuts.

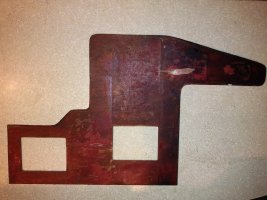
If I could somehow remove the existing sole without tearing it to pieces, I could use it as a template for some of the odd shapes, using a pilot bit on my router.

Those of you who have done this realize the existing sole has been glued and screwed into a fiberglass pan. Initially I was planning on just tearing it up with a pry bar, but I got to thinking about the template option.

Any suggestions?:confused:
 

Randy Rutledge

Sustaining Member
would a heat gun soften the glue? You might be able to start at a crner and apply heat and work a toll under the corner to apply pressure and work your way across the panel.

Remove the screws first heat doesn't work on them.
couldn't resist that last line.
 

tilwinter

Member III
heat gun

a. I like your humor.

b. will give the gun a try, but it may just separate the plywood.

c. What is a "toll" in this context?
 

Geoff Johnson

Fellow Ericson Owner
Good luck! I found that a sharp chisel and a dead blow hammer was the only way to get the OEM sole off (in small pieces and shavings). It took me many hours. You should be prepared (resigned) to making paper or mylar oversized templates that you can shave down with the router.
 

bwb

E/30+ Berkeley, CA
Hey Rod,

How'd this project turn out for you? The sole on my '85 E30+ is serviceable but not in the best cosmetic condition, and I'm considering replacing it at some point soon. What worked for you to get the old sole removed? Did you make templates? How'd you fabricate and mount the new sole?

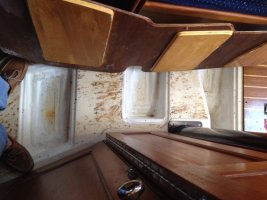
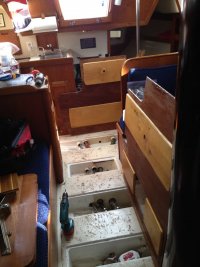
Oh, and do you have any pictures of what the boat looks like with the sole removed?

Thanks,

Brian
 

tilwinter

Member III
sole searching

Thanks for the enquiry.

Just got back from a trip up the California coast, from Ventura to Monterey. Loved it.

My project is completely stuck, for a ludicrous reason. I can't get the d--n engine box removed, and two pieces of the sole reside under this box. I could just cut around the box, but I refuse to give in. I would like to get at the engine for other reason, such as rebuilding the starting motor. The brochure says the box can be removed, but so far there are an infinite number of wood screws holding it in place.

My router skills have improved, and I have perfect templates for the bow portion of the sole, as well as the piece under the table, which was difficult because of the round cut out.

I have the teak and holly plywood, so I just need two more templates and I am ready to cut the plywood.

I spent this summer re-varnishing the hand rails and the hatchboards. Don't use Bristol Finnish.

I would be happy to answer any other questions.
 

Soulemate

New Member
cabin sole replacement question

Rod,

Did the heat gun make getting the old boards up any easier or was it just a hammer and chisel job?

Thanks,

Dave on Soulemate E38
 

Ccaptain

Ccaptain
I removed the sole on my E 34 by removing the plugs. There was no glue holding the pieces down. Prior to removing the sole I made templates. Fortunately we have Homestead Hardwoods within a few miles of us. No shipping expense but 3/4" t & h is $259.00 per 4x8 sheet.

Ccaptain
 

Ccaptain

Ccaptain
attachment.php
A work in progress.
 

Attachments

  • 0707141739.jpg
    0707141739.jpg
    55 KB · Views: 129
  • 0703140842.jpg
    0703140842.jpg
    53.9 KB · Views: 132

Christian Williams

E381 - Los Angeles
Senior Moderator
Blogs Author
I can't get the d--n engine box removed

Naturally, full access to the engine should be available just about instantly. Good thing you are attending to that.


My model had the sole glued down. It is removed by destroying it.

Making a precise template using template material (available from Sailrite.com) is important. On the 32-3, the edge profile is critical, as it fits into the molded glass tri-ax grid.

The thickness of the plywood is also critical on my model.

I screwed down the new sole panels so they could be removed for periodic re-varnishing at home. Many screws are required to get a solid feel--which is why they used glue in the first place (on some models).

Seal all panels with two coats penetrating epoxy. The sole gets wet top and bottom and will have boiling water, oil, trans fluid, bacon grease, blood and champagne spilled on it from time to time.

Five coats of Jet Speed varnish followed by three coats of Schooner varnish finishes the job.

Although all this can be done on the boat it is 40 times easier to do it in a garage, even if you have to borrow a garage for what will be effectively about two weeks time.
 
Last edited:

Christian Williams

E381 - Los Angeles
Senior Moderator
Blogs Author
It varies by boat model. On the 32-3 the sole plywood has to match the TAFG height and the molded-in perimeter. It may be 3/8ths or even thinner. Otherwise the sole will sit proud--which might be all right, but not the original design.

On the 381, the sole is more like 3/4s and the floorboard design entirely different.
 

Filkee

Sustaining Member
It varies by boat model. On the 32-3 the sole plywood has to match the TAFG height and the molded-in perimeter. It may be 3/8ths or even thinner. Otherwise the sole will sit proud--which might be all right, but not the original design.

On the 381, the sole is more like 3/4s and the floorboard design entirely different.
Guess I will have to do a biopsy. :)
 

Christian Williams

E381 - Los Angeles
Senior Moderator
Blogs Author
The replacement sole on my 32-3 was in three or four pieces, screwed down on the perimeter, and therefore easily removed.

There was one inspection hatch over the main bilge pump well which was all that was needed to check the pump, but the ability to pull all sections--either for refinishing at home or for troubleshooting hidden issues--was invaluable.

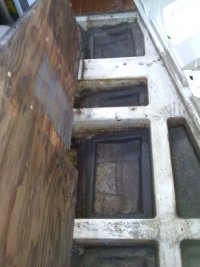
My sole panels had underside reinforcing plates for the TAFG gaps, to give a little more mass to the bridging sections.

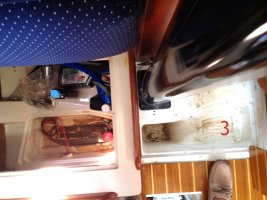
Thelonious forward bilges.JPG...Theonious bilge C.jpg...IMG_2851.JPG
 

Filkee

Sustaining Member
I should be so lucky. It's interesting to see how different we all are. My shower sump pump is in the hole just aft of the mast. Can't wait to get under there and clean everything up. Makes me want to run down to the boat right now but I'm stuck at home fighting the pandemic and I still have another month or two in the water. Thanks again for sharing the knowledge.
 

Kenneth K

1985 32-3, Puget Sound
Blogs Author
It's interesting to see how different we all are. My shower sump pump is in the hole just aft of the mast.

Yeah, I'm intrigued by Christian's picture with the shower bilge/pump located inside the forward settee. Mine (like yours) is directly behind the mast. The bilge-hose conduit enters the chamber from the stbd side of the boat. A small PVC hose at the bottom of the bilge carried the water from the shower drain (until I got rid of it).

1.jpg 20160905_203850.jpg

Since I don't use the shower, and since this bilge compartment collects rainwater from the mast, I sealed up the large opening at the bottom so I can collect more rainwater before needing to pump it out. This prevents rainwater from constantly spreading the the below-TAFG areas and the other bilge compartments.

20191116_132424.jpg

I got "tricked" into thinking my cabin sole would be easy to remove without much damage. The aft section (in front of the engine compartment), seemed to absorb it's share of diesel spills over the years, so the adhesive was very gummy and that section was easy to pry up.
B (2).jpg C (4).jpg

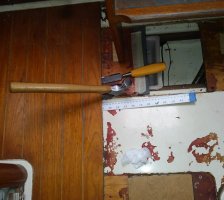
When I tried to remove the adjacent section (in front of the stove), where the glue was still firmly intact, the section was much, much harder to remove. These were the tools of choice.

20190403_171748~2.jpg

I later switched to a wider aluminum yardstick that better tolerated pounding from the hammer. I two small areas, the teak/plywood gave out before the glue leaving small but repairable holes in the sole. It took me weeks of work (1-2 hours at a time) to get the section out in one piece. At this point, I'm considering sanding & refinishing the remaining panels without removing them.

Only other option might be to try prying up small sections (like the picture above), then spraying Marine Formula De-bond underneath the pried up areas. I've used MF De-bond to remove the excesses glue on the panels I was took out, and it seems to dissolve the red-ish Ericson glue quite well.
 
Last edited:

Christian Williams

E381 - Los Angeles
Senior Moderator
Blogs Author
Yes, the dealer's choice of shower sump location is interesting on this run of 32-3s. I don't know which is "better," since I used my shower once, couldn;t see where the shower water was going, and had to listen to the shower sump pump running without knowing if it was actually pumping, then had to dry the whole head with a towel before vowing never to let anybody take a shower in the head again.

(I installed an extended hose for the on/off hand wand, which when passed through the opening port allows showering on deck).

For the record, here's another photo of the sump location on my early-'85 hull (built as I recall at the end of '84)

.1985 E32-3 shower sump location variant.JPG
 
Last edited:

eknebel

Member III
I successfully removed my 30+ sole without destroying it, I did this about 10 years ago, so now the sole is easily removed. The most important tool is patience, the second is a 4-6 foot flexible flat piece of metal sharpened one one end to use as a long chisel, about 1 inch wide seemed good. When you feel like just whacking the Sh*t out of it, take a break. You are local to me, so if you want to come by and make a paper pattern, you are welcome. The sole comes up easily now, just a few screws. You can see the engine hatch open too, or I can send pictures. I have purchased the teak and holly 4x8. but am likely weeks away from that, I am still replacing the 10ft panels under the new ports I am installing in the main cabin. I coated all sides of the sole with clear west system epoxy, which held up well overall. The main long piece has suffered several severe nicks/dents, as well as discoloration from water penetration from the bottom side. This happened at the base of the companionway steps, so I will monitor wear on the bottom side more carefully in the future.
 
Top