• Untitled Document

    The 2024-2025 Fund Raising Season has Opened!

    EricsonYachts.org has opened the season for raising funds to support the expenses of the site. If you would like to participate, please see the link below for additional information.

    Thanks so much for your continued support of EricsonYachts.org!

    2024-2025 Fund Raising Info

Cabin Sole-how best to remove old sole [Master Thread]

Kenneth K

1985 32-3, Puget Sound
Blogs Author
Just another observation and data point—no right or wrong: I like the wooden ‘dam’ somebody built around your mast base to channel the water—it looks better than my caulked-in channel. I noticed yours drains forward, under the TAFG, rather than aft into the “shower” bilge. The only problem with that might be that it’s harder to get water out from under the TAFG than out of the molded bilges.

My mast drains aft into the shower bilge. The first two years I had the boat, the shower bilge had a limber hole at the very bottom. So, after every heavy rain, the shower bilge water would flow under the TAFG and into the next two bilge sections aft (which also have limber holes at the bottom). I spent a lot of time on my hands and knees removing that water.

Last year, I sealed up the old shower bilge limber hole and cut a new one in nearer the top of the bilge. The shower bilge can now hold about 1.5+gal before it needs to be pumped out (to prevent water from entering the limber hole and going under the TAFG). In the Seattle rains, this usually equates to about 2” of rainfall in stormy conditions before the shower bilge is filled. Since this change, I‘ve had dry bilges in winter (other than the shower bilge) for the first time since buying the boat.
 
Last edited:

Filkee

Sustaining Member
While you have the sole removed would be a great time to clean and paint with bilge-kote, you know just to add to mission creep...
Right, so is there some hazmat miracle or active microbe I can release in the black goo or is it just surfactant and repetitive motion stress.
 

Filkee

Sustaining Member
Just another observation and data point—no right or wrong: I like the wooden ‘dam’ somebody built around your mast base to channel the water—it looks better than my caulked-in channel. I noticed yours drains forward, under the TAFG, rather than aft into the “shower” bilge. The only problem with that might be that it’s harder to get water out from under the TAFG than out of the molded bilges.

My mast drains aft into the shower bilge. The first two years I had the boat, the shower bilge had a limber hole at the very bottom. So, after every heavy rain, the shower bilge water would flow under the TAFG and into the next two bilge sections aft (which also have limber holes at the bottom). I spent a lot of time on my hands and knees removing that water.

Last year, I sealed up the old shower bilge limber hole and cut a new one in nearer the top of the bilge. The shower bilge can now hold about 1.5+gal before it needs to be pumped out (to prevent water from entering the limber hole and going under the TAFG). In the Seattle rains, this usually equates to about 2” of rainfall in stormy conditions before the shower bilge is filled. Since this change, I‘ve had dry bilges in winter (other than the shower bilge) for the first time since buying the boat.
Good eye. For years the boat sat on the hard pitched aft so the water would just flow over the dam, spread out and eat the teak. Lots to think about this year.
 

1911tex

Sustaining Member
The price of what’s already in the basement versus buying another jug of something. Now that my sole will be removable, I can clean the bilge any old time.
How did you fit it so as to be removable and not clatter when folks walk on it? I like a removable sole for many reasons including hose/wire as well as clean up.
 

nquigley

Sustaining Member
Mission creep continues. I was going to do just the forward delaminated section around the mast but decided to go all the way because the teak/holly pattern wasn’t going to match.
View attachment 36142
This proved incorrect when the first sheet arrived today (maybe this is the second time around for this task in my old boat) so I have been demoing and then spending a few days recovering from the hammering while squatting effect.
I bet you were glad to find that missing sock ...
 

Loren Beach

O34 - Portland, OR
Senior Moderator
Blogs Author
How did you fit it so as to be removable and not clatter when folks walk on it? I like a removable sole for many reasons including hose/wire as well as clean up.
Replies 10 -14 discuss fastening down the sole. I still like the flush-set bronze square drive screws, many years later.

Our white gel coated bilge areas are still smooth and (usually) free of mild and dirt. It's easy to keep the smooth surface clean, and the closer to 'shiny' that you maintain it, the less chance of anything growing there and causing odors.

BTW, do not be shy about adding to an "older" thread like that one -- the issues discussed are perennially current for all of us.
:egrin:

Picture of our bilge in this blog entry: https://ericsonyachts.org/ie/ubs/new-bilge-hose-april-2016.480/
Note that one photo shows one of our little epoxy rain water 'dams' that directs mast-generated water directly into the bilge. We have avoided rot in the sole sections.
 

JSM

Sustaining Member
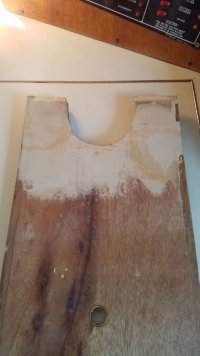
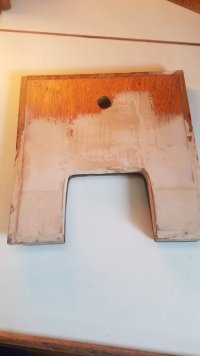
Three years ago I replaced the cabin sole in our 34-2. In order to keep the bilge boards from delaminating I covered the bottoms and edges that sat on the TAFG at the mast base with a paste made of micro balloons and epoxy. Still holding up well.
 

Attachments

  • 20190103_120727.jpg
    20190103_120727.jpg
    74.9 KB · Views: 7
  • 20190103_121104.jpg
    20190103_121104.jpg
    54.9 KB · Views: 7

Filkee

Sustaining Member
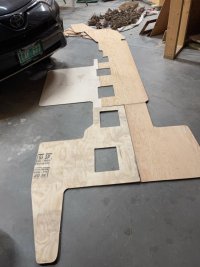
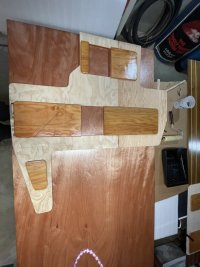
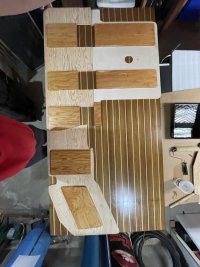
Dear diary....the boards are all up and I've cut a patchwork of templates with various bits of scrap plywood. Mistakes were made, lessons were learned. Now I'm wondering...is there solid logic behind where the breaks between sections are? Opinions appreciated.
IMG_3522D.jpeg
 

Loren Beach

O34 - Portland, OR
Senior Moderator
Blogs Author
Different model, but when I decided to split the large section at the rear of the cabin, I was pleased to be able to lift out one side at a time. That allows me to walk around, with caution, and not step down into the bilge. Our mid cabin sections were already split up the center, which really helps with access as well.
Given the length of your sole, perhaps it would be good to split it so that you could access one section of bilge pump intakes and switches at a time. Then, there is access to the bolts. There may be.... more than one 'right' answer to the quandary.
:)
 

Filkee

Sustaining Member
I’m definitely going to split the long one just aft of the shower sump. Wondering if making the line deeper into the dinette makes sense? There isn’t enough material in a sheet of ply to go all the way but is the existing break point really the right place? Maybe it made it easier to cut the bilge access ports? And I’ve noticed some folks have one long access down the middle rather than five little carpentry projects to deal with. Keep the opinions coming!
 

Kenneth K

1985 32-3, Puget Sound
Blogs Author
Looking great!

Since the new flooring will be removable, I wouldn't bother with making the bilge access ports bigger. I sometimes like to air out individual bilge sections; it would seem a drawback to have to have them all open at the same time.

I'd go with whatever sizing minimizes cuts and material used. And, of course, in flooring, you never want 4 corners coming together in the same point, but to have the joints staggered. You could eliminate a corner (maybe two) by making under-dinette piece narrower, like you mentioned.

Hey, you're still shipping those boards out to Seattle when you're done, right?
 

Filkee

Sustaining Member
Also interested in cutting methods. I’m a hot mess with the router. Having better luck with guided jigsaw.
 

Filkee

Sustaining Member
Looking great!

Since the new flooring will be removable, I wouldn't bother with making the bilge access ports bigger. I sometimes like to air out individual bilge sections; it would seem a drawback to have to have them all open at the same time.

I'd go with whatever sizing minimizes cuts and material used. And, of course, in flooring, you never want 4 corners coming together in the same point, but to have the joints staggered. You could eliminate a corner (maybe two) by making under-dinette piece narrower, like you mentioned.

Hey, you're still shipping those boards out to Seattle when you're done, right?
Happy to of you can learn from them.
 

nquigley

Sustaining Member
Dear diary....the boards are all up and I've cut a patchwork of templates with various bits of scrap plywood. Mistakes were made, lessons were learned. Now I'm wondering...is there solid logic behind where the breaks between sections are? Opinions appreciated.
When I do mine, I'm planning two features:
- definitely adding an access panel above the furthest forward bilge (I think there's a keel bolt in there too),
- will be using some sort of finger-pull turn-to-lock hardware for all floor panels. I don't care if the floor squeaks - I want easy access to all areas of the bilge.

I thought about one long 'all-bilges' access panel (aft of the mast), but I think I'm going to cut one for both of the two main ones (that have bilge pump), one for the aft two space, and one for the forward-most bilge.

Good luck!
 

Christian Williams

E381 - Los Angeles
Senior Moderator
Blogs Author
If the new sole sections are designed to be easy to remove, you may only need one quick-access panel -- for the bilge pump.

That's the way it was on my 32-3, and it worked fine. For big jobs you remove the full floorboards anyhow.
 

JSM

Sustaining Member
Also interested in cutting methods. I’m a hot mess with the router. Having better luck with guided jigsaw.
Having never used a router I didn't think learning on $250 a sheet teak and holly was a good Idea. I ended up using a Ryobi circular saw that was equipped with a laser sight. Had a few missteps but nothing that a belt sander couldn't fix.
Also used a (hand powered ) Japanese pull saw on some of the tight areas.
 

Filkee

Sustaining Member
Welcome to the overthinking portion of the program. The wide variety of scrap I used to make my templates should show where the cuts were on the existing.

I wanted to create a break in the long piece to be able to get the forward section around the mast out more easily because that’s where bad things happen most.

There isn’t quite enough width in the sheet to go full beam at the dinette but I could break the line under the table (and that got me wondering if I could get a square that big through the companionway).

And likewise, I could join the galley and nav station pieces into a single wide piece and eliminate those two bilge access holes if it wasn’t too awkward. ( and maybe make the supports full-width while I’m at it).

here’s a chance to re-draw the puzzle. Who wants to be Will Shortz?


AD31DDB2-58CC-4CF8-B821-0D2DE3E18948.jpeg8D47F0FE-3CA6-42BA-9F21-7AE47C09C117.jpeg
 

wynkoop

Member III
After looking at this thread I am glad my cabin sole is fiberglass. It is getting soft in a couple of places, no doubt from years of water ingress into the boat from various leaks, but it will be easy to take care of with injectadeck in the spring after I finish the upper decks.
 
Top