Cockpit Deck Delamination

Gary Freeburg

Member II
I know that much has been written and tested when it comes to deck delamination. My E27 has had the problem in the cockpit sole for several years and I've just ignored it. The deck is soft and spongy. The softness runs from the forward regions of the cockpit to within a foot of where the tiller plunges through the deck.

The boat is currently in the yard and I'm trying to figure out if this is a good time to bite the bullet or just go sailing?

A friend told me that I should take a plunge with my router and dig into the deck and core running the cuts back and forth over the area affected, let the remaining core dry, once dried, fill with epoxy mixed with West 404 high density filler. Let it cure, sand it, and paint it.

Any comments?

Thanks,

Gary Freeburg
Katmai E 27
 

Emerald

Moderator
I think you'll find that if it's really that large an area and is that spongy and wet, the core is going to be trash and to do the repair right, you should replace the whole area. I'm having a hard time remembering exactly how the underside of my E-27 cockpit was, but I think you can do it from the underside and preserve your non-skid and molded contours etc. above. Not having to have to recreate a pretty finish will save lots of time.
 

Gary Freeburg

Member II
David,

Thank you for your reply. I thought about coming up from below the deck but have no more than perhaps 18" - 20" above the wooden engine cover. I think it would be a nasty job and gravity will not be on my side.

I may think about cutting around the nonskid topsides and hopefully pull the piece of fiberglass decking up in one complete piece. Fair both sides of the cut, replace the core after cleaning the old stuff out, and epoxy the decking back into place. Sounds simple enough but I'm starting to itch just thinking about the job.

Gary
 

Emerald

Moderator
Yep, it is tight, and depending on how you bend and twist, I understand not wanting to go from underneath there. If you pick the right spots, you stand a good chance of being able to do as you're thinking of reusing the top skin. What you may want to do for strength is to do something like 4 layers of layup on your new core tied back in to the surrounding area and then effectively just epoxy the old skin on top. At that point though, are you ready to try molding in some new non-skid? I can't say that I've done it myself, but for not much investment, before you cut it all apart, you could try it on a 2 foot square piece of ply in the garage and see how it goes. Here's a link to a source of supplies for making molds and all sorts of fiberglass type fun:

http://www.shopmaninc.com/

regarding the itching, you may or may not find any relief (?) from checking out a couple of my past fiberglass projects:

mast step/deck recore:
http://home.comcast.net/~independence31/core/looksbad.html

rudder recore:

http://home.comcast.net/~independence31/rudder/rudder-intro.html
 
Last edited:

Sven

Seglare
but for not much investment, before you cut it all apart, you could try it on a 2 foot square piece of ply in the garage and see how it goes. Here's a link to a source of supplies for making molds and all sorts of fiberglass type fun:

http://www.shopmaninc.com/

Is it the mold rubber you are talking about ? Would you press it down on uncured glass ?

We don't have to do it yet but I'd like to store the info in the memory banks :nerd:


-Sven
 

Martin King

Sustaining Member
Blogs Author
=, but I think you can do it from the underside and preserve your non-skid and molded contours etc. above. Not having to have to recreate a pretty finish will save lots of time.

I agree completely. If there is any way to do it from underneath,
that's what I'd be doing. 18-20 inches should be plenty of clearance.
Get yourself a laminate trimmer you can hold with one hand to hog
out the bad core. Run a shop vac in there to suck out the waste and
a trouble light so you can see what you're doing. I think this is way
easier in the long run then trying to do cosmetic repairs
on top. If you want it looking factory, then trust me, leave that
molded-in nonskid alone.

Martin
 
Last edited:

Emerald

Moderator
Hi Sven,

it is the mold rubber type of product I am thinking of. I would have to research which flavor, but the idea would be to make a mold with it from the existing non-skid and then use it recreate the non-skid in an epoxy based finish. However, I'd do everything possible not to cut into my decks from the topsides and be in a situation where I was doing this.
 

Loren Beach

O34 - Portland, OR
Senior Moderator
Blogs Author
A task that really sucks...

I agree completely. If there is any way to do it from underneath,
that's what I'd be doing. 18-20 inches should be plenty of clearance.
Get yourself a laminate trimmer you can hold with one hand to hog
out the bad core. Run a shop vac in there to suck out the waste and
a trouble light so you can see what your doing. I think this is way
easier in the long run than trying to trying to do cosmetic repairs
on top. If you want it looking factory, then trust me, leave that
molded-in nonskid alone.
Martin
"What Martin said!"
I have not (yet) done an upside down cutting/grinding job like that... but have done some extensive grinding on the hull laminate to prep for adding some roving and biaxial cloth. What worked well was using the shop vac. And use a big horsepower version. We had an old Sears monster at the time that was nicknamed "the howler"! We rigged a large cardboard funnel, duct taped to the end of the 3" hose fitting, with my wife holding and guiding the intake. It would pull about 90% of the material right in as it flew off the wheel. Especially the really fine dust that is so hard on your lungs (and all the rest of the interior of the boat).

If I were doing another or a larger project, I would put the vac outside to get the noise away and then used an extension hose thru a port.

Best,
Loren
 

Martin King

Sustaining Member
Blogs Author
"What Martin said!"
I have not (yet) done an upside down cutting/grinding job like that... but have done some extensive grinding on the hull laminate to prep for adding some roving and biaxial cloth. What worked well was using the shop vac. And use a big horsepower version. We had an old Sears monster at the time that was nicknamed "the howler"! We rigged a large cardboard funnel, duct taped to the end of the 3" hose fitting, with my wife holding and guiding the intake. It would pull about 90% of the material right in as it flew off the wheel. Especially the really fine dust that is so hard on your lungs (and all the rest of the interior of the boat).

If I were doing another or a larger project, I would put the vac outside to get the noise away and then used an extension hose thru a port.

Best,
Loren

Grinding glass must rank right up there with head repair on the least
desirable job scale. I had to do similar repairs on my own tub. My
soft spots were all the way forward under the cleats and windlass.
I got to lay on my back with my upper torso shoved up into the
anchor locker while bits of glass and balsa flew around my head-
and there's nothing quite like getting resin dripping all over your
face and hair as you struggle to lay the glass before you can no
longer raise your arms up anymore. Yeah......good times....

I would suggest a new Hepa filter for the shop vac, a tyvek suit
taped at the wrists , and a respirator and eye and hearing
protection to boot before attempting.
 
Last edited:

Emerald

Moderator
Grinding glass must rank right up there with head repair on the least
desirable job scale. I got to do similar repairs on my own tub. My
soft spots were all the way forward under the cleats and windlass.
I got to lay on my back with my upper torso shoved up into the
anchor locker while bits of glass and balsa flew around my head-
and there's nothing quite like getting resin dripping all over your
face and hair as you struggle to lay the glass before you can no
longer raise your arms up anymore. Yeah......good times....

I would suggest a new Hepa filter for the shop vac, a tyvek suit
taped at the wrists , and a respirator and eye and hearing
protection to boot before attempting.


I'm sitting here chuckling thinking white vinegar works for both problems - at least epoxy in the hair and side of the face and all the other neat places you find it when done working upside down. Might also help on the head rebuild as well. :egrin:
 

Gary Freeburg

Member II
Thanks for all your messages!

I've done quite a bit of glasswork before, mostly, inside holds on a 50' fishing boat where we were trying to incapsulate insulation before loading with ice and going after halibut in the Gulf of AK. It was a nasty job (the glassing and the fishing).

How much value do you think I'd lose in my vintage 1973, E 27, if I just pulled up the non-skid , recored the deck and epoxied the non-skid if still useable, back in place? If it doesn't go back together beautifully, I don't think I'd have much of a problem with grinding the remaining nonskid pattern to smooth out entire cockpit sole, paint, and maybe put a teak grate down or possibly even glue a nonskid pattern similar to what Valiant used on their 37' Esprit.

I don't mind crawling into tight spaces to work, especially when I can bang up my knuckles when wrenches slip while upside down in the engine. But, the thought of going back into the pit of despair to recore and renew the underside fiberglass skin causes me to pause. And, there's no way I'll get my wife to hold the vacuum for me... that type of help would cost me dearly around the house for months to come.

Thanks again,

Gary Freeburg
Katmai
 

tenders

Innocent Bystander
That's not a crazy idea at all. With a tool like this:
http://www.amazon.com/Makita-5090DW-9-6-volt-Cordless-Circular/dp/B00004YODY

You could cut an even thinner, more precise line than you could with a router. (The blade is really thin.) You might need carbide bit, though.

I just purchased this tool and used it yesterday to cut out some rotten bulkhead in my '69 32...details to follow on my inverse keystone-shaped repair using G10 once the deed is done.
 

Emerald

Moderator
Well as to the value impact, what's the rest of her (gonna) look like, and do you plan on fishing off her? :devil:

Sounds like you've got the skill to tackle this, and I like the idea of a teak grate as plan B. You can probably pull it off either way without much final price impact if you do it right. So much gets down to the execution.
 

Gary Freeburg

Member II
The boat is actually in very good shape for being 36 years old. Decks are sound, hull is excellent with no blisters and the original gelcoat still buffs up beautifully. My only glaring problem is in the cockpit decking.

I've put the boat on the market but think that the softness in the deck will turn off anyone interested in the whole package.

As for fishing, I've "scaled" back on that after several years of fishing for salmon and halibut in Alaska. These days, I just take my college age daughters on sailing trips in Alaska's Inside Passage. I station them strategically on deck as we come into port and the young fishermen keep us well supplied with seafood.

Thanks for your replies,

Gary Freeburg
Katmai
 

Matey

Member III
I’m into the repair of part of my cockpit sole as well. I found a wet area when I pulled the rudder head for inspection. :esad:
Fortunately my engine and fuel tank are out for repair / replacement so the access is a bit better.<O:p</O:p


My cockpit sole has 2 layers of wood core in the aft area. I guess it supports the rudder shaft and ties the separate cockpits together. So from the top it’s ..<O:p</O:p
  • Glass with nonskid<O:p></O:p>
  • wood core<O:p></O:p>
  • glass<O:p></O:p>
  • wood core<O:p></O:p>
  • glass <O:p></O:p>
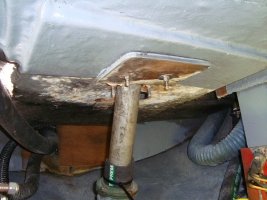
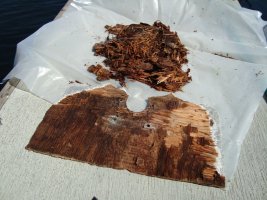
The top piece of wood core was surprisingly dry, but the lower one was soaked under the pedestal and around the rudder shaft entry. I decided to remove & replace the entire lower piece of wood. The upper steering pullies were also being supported by this rotted wood. I pulled the pedestal, steering cables and quadrant<O:p></O:p>
to get better access and replace the cables. Of course with the cables slack, I found that the lower pulley supports glassed into the hull are rusted out. But I’ll leave those for another post. I ground them out after making a jig. <O:p</O:p
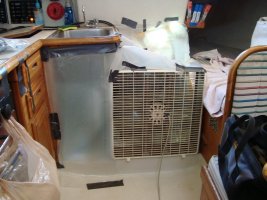
I set up a box fan and taped off and closed up the rest of the boat to create a positive pressure. Then suited up in tyvek with hood and a full face respirator. The full face was the only way to keep crap out of my eyes .. I promise ! With a small router I ground out the glass. Then chipped out the wet stuff with a chisel and finished up with a side grinder and rough wood disk. Awkward at best ..<O:p</O:p
<O:p></O:p>
The replacement is two ½” pieces of a hardwood ply laminated together giving me 18 ply. I drilled the holes oversized and epoxied them to be re-drilled. :nerd:<O:p></O:p>
<O:p></O:p>
Well, that’s where I’m at … and here’s where my life gets stupid. You might appreciate this. :p
<O:p></O:p>
I had promised my Wife I’d tile our kitchen, pantry, dining room and entry the 1<SUP>st</SUP> of June, figuring I’d have my engine already back in the boat. Not with the rotten sole ! So I hired a couple strapping lads and we ripped out 2 layers of linoleum and OSB at the house yesterday. We’ll lay the tile this weekend.
<O:p></O:p>
Last August I helped a good friend deliver his boat from SF to <ST1:pWashington</ST1:p. I committed to help with the return. Well .. he’s ready to move next week. So I’m flying to <?xml:namespace prefix = st1 ns = "urn:schemas-microsoft-com
><st1:City w:st=
</st1:City><ST1:pSeattle next </ST1:pWednesday to bring it down.

<O:p></O:p>
Did I mention I bought another Laser last week and stripped off all the deck fittings to re-bed ?<O:p></O:p>
<O:p></O:p>
Please have a laugh .. I can’t right now<O:p></O:p>
<O:p></O:p>
Regards, Greg<O:p></O:p>
<O:p></O:p>
Sailing is not a sickness .. but perhaps a fetish<O:p></O:p>
 

Attachments

  • steer 015.jpg
    steer 015.jpg
    90.3 KB · Views: 113
  • s_001.jpg
    s_001.jpg
    87.2 KB · Views: 96
  • s_002.jpg
    s_002.jpg
    111.1 KB · Views: 106

Gary Freeburg

Member II
Greg,

It seems we have a lot in common. As I collect materials to take to the boat and begin the delamination repair, I'm building a deck on the back of the house, painting exterior trim, and trying to get cameras and required gear assembled to continue a photo project (begins next week) in Alaska that I've been working on for nearly ten years.

Thanks for the information on your deck repair. What you found is no doubt exactly what I'll be looking at in just a couple of days. My bigger concern is what I'll find as I dig into the project. Like you, if it were only replacing the deck core and glassing over, it would be a project I could prepare for... but, as we know, it's the associated things, steering cables, et. al. that are uncovered that really become the head scratchers.

Thanks again,

Gary Freeburg
Katmai
 

Matey

Member III
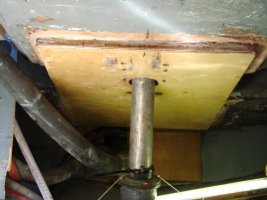
Cockpit sole repaired

I got back to and completed my cockpit sole. I started by test fitting the new 1" board that ties the 2 tubs together underneath. As the bridge deck was the source of the wet sole, so I pulled the pedestal and traveler track and drilled, filled and scarfed in some plywood and epoxy / high density filler mix form underneath.. ugh ! can you say epoxy in the hair ? :confused:
I've gone with a Garhauer traveler .. but that's another post.

Then buttered up the 1" board and it's mating surface up with West Systems and filler (use more than you think you need) and pulled the piece up into place with the mainsheet tackle run down through the hole from the removed pedestal with line around the 2 steering pulley holes..cranked it tight and added some 1/4" melamine strips sprung tight on the bottom between the hull and the board to hold it tight in place. After it set up I layed a fillet around the board top and bottom. Then I re-drilled the holes for the rudder head and steering pulleys and epoxied-re drilled them. I painted everything underneath, re-installed the steering and am on to putting the engine back in. Finally !

Regards, Greg
 

Attachments

  • 2 015.jpg
    2 015.jpg
    71.5 KB · Views: 73

Matey

Member III
Sole repair

Hey Gary,

Glad the pictures helped. Did you get the repair done ? Hope so .. and that it went well.

Regards, Greg
 

Gary Freeburg

Member II
Greg,

I took a small drill bit and drilled through the glass layer and core from underneath the cockpit. My expectation was to find a mushy core but much to my surprise, the core was not wet and there is truly a gap between the core and the upper fiberglass skin of the deck. I sounded out the delaminated area and have drilled a pattern of several holes that correspond to the area from beneath the cockpit.

During the past month I've allowed the the core to breathe and soon will inject epoxy into the gap and hopefully that will solve the spongy problem.

Hope all is well with you and thanks for your help.

Gary
 

Glyn Judson

Moderator
Moderator
Stiffening up your cockpit sole.

Gary, The close quarters under your cockpit sole might just be an advantage at this point. Might I suggest that after injecting the epoxy, you consider propping it all up from below? You might be able to come up with a series of short 2 x 4's wedged up to the underside that should press the plywood up against the underside of the fiberglass of the actual sole. Keep us all posted, Glyn Judson, E31 hull #55, Marina del Rey, CA
 
Top