E-29 Fuel Tank replacement/Repair/Inspection Ports

Don Kerr

Member I
Has anyone had to repair or replace the fuel tank in an early model E-29? Mine is corroded and is fouling the fuel. A mechanic at the Marina where I keep the boat during the off season says that I need t have a tank built to replace the old one for $1,000 plus labor for installation. There has to be a better(less expensive way) to do this.
Is there a fuel bladder that can be installed in the tank? Can the tank be cleaned and reused (sand blasted?).
Any input will be appreciated.

Don Kerr
 
Last edited by a moderator:

Loren Beach

O34 - Portland, OR
Senior Moderator
Blogs Author
Tank sourcing

There are past threads here on tank replacement for several different models. The original EY supplier, Berry Sheetmetal (sp) in SoCal is said to still in business and has most or all of the blueprints for the Ericson tanks.
There are other tank builders around the country. I went with Coastline Marine Tanks in Bellingham, WA.

The original wall thickness in your tank is likely too thin by modern standards, and if it's leaking it is time for a new tank.
Our new custom tank, with its odd shape, hangers, fuel level sender, and all inlets/outlets was about $700.
From comments on this site, Berry can build one for less money yet.

I would not advise a bladder as a "solution" either.

Hopefully other owners of 29's will have first hand information.

Regards,
Loren
 
Last edited:

Glyn Judson

Moderator
Moderator
Get a new tank.

Don, As usual, Loren hit the nail right on the head, contact Berry Sheetmetal here in SoCal at 949.548.3613. They were the OEM for Ericson and have many if not all the drawings still on file. Call them for a price quote, then compare that to other makers. Remember, the guy with the drawings doesn't have to reinvent the wheel in order to complete the job. Good luck, Glyn Judson, E31 hull #55, Marina del Rey CA
 

tenders

Innocent Bystander
ronco-plastics.com has an online catalog with a large number of stock tank designs - I would be surprised if one weren't right for your boat. You specify the size and location of the fittings.

I replaced my fuel tank when I bought the boat in 1991, used a painted steel tank like the OEM, and had to replace it again in 2009. 18 years is a reasonable lifetime for a fuel tank, but it was very alarming to have stepped onto the boat and been hit with the blast of leaking fuel fumes. Perhaps overreacting, I replaced it with stainless tank made by a fellow yacht club member's shop. It's fabulous but OMG it was expensive.

I've come to the view that plastic tanks are pretty good for fuel purposes. They don't corrode, they don't need to be grounded, and they aren't expensive to fabricate or ship. Mild steel tanks like what you have now have only one of those benefits (#3). Stainless and Monel tanks have only one (#1). Aluminum tanks have none.
 

toddster

Curator of Broken Parts
Blogs Author
I for one would be interested in any photos or drawings that you come up with, because I don't know what the original configuration looks like.
One consideration might be whether the tank can be removed without cutting it or the boat. (And therefore, whether a new one can be easily installed.)
Anyway, my boat came to me with a 12-gallon plastic tank that sits on a plywood platform under the aft end of the cockpit. There is a lot of empty, though awkwardly-shaped space beneath it. The tank looks like it could easily slide in and out through the sail locker.
However, while perfectly fine for getting away from the dock for a day sail, the 12 gallons seems woefully inadequate for cruising. On extended trips, so far, I've been wedging a pair of extra fuel cans in the cockpit well, behind the tiller, which is pretty awkward. Another possibility I've looked at is a long, low, removable auxiliary tank that would bridge the back of the cockpit during a cruise and live in the wood shed the rest of the time. Although a bladder that could be rolled up and stored when empty might be nice, I think they're pretty expensive.
Anyway, it would be nice to use some of the large empty space around the fuel tank, but I haven't seen an easy way to do it.
 

erikwfab

Member II
Minor Fuel Tank Repairs

For minor repairs to diesel fuel tanks Marine Tex Grey can be used and is approved for such by the manufacturer.
Aluminum, SS and steel tanks need to be cleaned thoroughly, dried, and a thin layer of Marine Tex applied to the leak area, ie welds, pits in the tank bottom, fill/return fittings, only minor repairs, but a very effective method.
 

ignacio

Member III
Blogs Author
+1 for Berry Marine Fuel Tanks

I removed my old fuel tank and took it to Berry Sheet Metal and Marine Tanks this morning. As I drove up, I saw one guy sitting there with two friendly German shepherds and a large collection of lathes, drill presses, and metal, metal everywhere. It was Cliff, sole owner and employee, who has outlived and inherited the business from his predecessors and worked in the business while they were producing the tanks for Ericson. Great guy Cliff. We discussed the details of my new tank. He's adding a sender and increasing the volume a bit, but he doesn't do inspection ports. "They leak," he says. "But these aluminum tanks will last just as long as that stainless tank you brought in." He spotted right away the diesel return fitting that was later added on my boat when it was repowered with a diesel.

So here I give you, friends, the Berry Sheet Metal and Marine Tanks business card.

Added note: The cost of this tank beats the cost of another manufacturer down the coast near San Diego by a large margin. So yes, I agree that the guy with the original drawings can give a better price.
 

Attachments

  • IMG_2337.JPG
    IMG_2337.JPG
    60.4 KB · Views: 92
  • IMG_2338.JPG
    IMG_2338.JPG
    41.3 KB · Views: 47
Last edited:

Christian Williams

E381 - Los Angeles
Senior Moderator
Blogs Author
Hmmm. I am just about to take on inspection ports, wondering whether to cut them myself or hire somebody.

Surprised to hear a recommendation against them.
 

Glyn Judson

Moderator
Moderator
Another inspection port.

Christian, I replaced our cracked plastic port with a slightly larger aluminum one from Bomar and it doesn't leak a drop. The problem with the factory installed plastic one is that in a diesel environment they crack. The old white one was cracked when we bought the boat so I replaced it like for like, a simple of the shelf item at West Marine. That one soon cracked, turned yellowish and it was then that I got the Bomar, photo attached. The hole was bigger so I weighed my options with a near full 39-gallon tank of diesel. I got out my trusty saber saw and cut a new opening guided by the Sharpie line I drawn. I literally let the aluminum chips fall where they may into the fuel and to the bottom. My plan all along was to suck the chips from the lower corner of the tank using a 12 volt marine fuel pump and a doubled up pair of women's Nylon peds clamped to the output hose. I vacuumed with a long intake hose scouring the bottom for what seemed to be an hour. I'd periodically empty the metal chips from the peds and when I could get no more, called it a day. It all worked like a charm. Want to borrow my saber saw? Glyn
 

Attachments

  • Hull #55, Bomar diesel access plate.jpg
    Hull #55, Bomar diesel access plate.jpg
    99.9 KB · Views: 536

Christian Williams

E381 - Los Angeles
Senior Moderator
Blogs Author
Very encouraging, Glyn. I think I will drain the tank, and will probably have to put in several ports--don't know the baffle layout yet.

The 8" Seabuilt ports Erik cites are $175 ouch--I mean, each.

I wonder if my jigsaw will do it.
 

ignacio

Member III
Blogs Author
Another tank manufacturer I spoke with wanted $150 per inspection port. A couple of ports would have brought the total new tank cost (same manufacturer) to almost $1K. Just wasn't feeling up to shelling out that much with competing budget priorities. I still have lingering doubts about Berry's observation myself, but I'm not going to worry about it much for another few years. With a new tank @ under half that, I figured I wouldn't have to deal with sediment-clogged filters for a few years and could retrofit later when I had more time to install ports if needed.

However, now that I've drained and removed the old 37 year-old tank (no ports), I've added a vacuum gauge to help evaluate how clogged the filter gets, some valves, and an inline 12V fuel pump to bleed the fuel line at filter changes, as well as empty the tank when fuel removal is necessary. I haven't had clogged filters while I've had it (5 years), so not awful for a 37 year old tank. Probably unsuitable for anything beyond day sailing and occasional anchoring out.
 

Christian Williams

E381 - Los Angeles
Senior Moderator
Blogs Author
The PO installed that fuel pump, and I plan to add the vacuum gauge. And you're right, with a new tank you should have no worries for many years.
 

markvone

Sustaining Member
My solution to Fuel Tank access ports

While I agree that the KISS option of no access ports is ideal, if you want or need to get access to your fuel tank compartments you are going to need access ports.

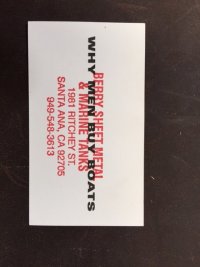
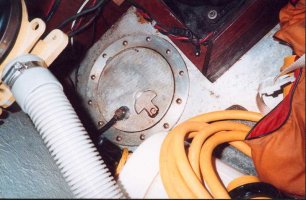
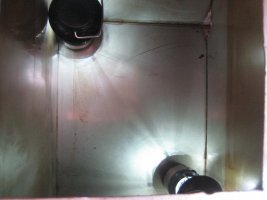
I ran through this scenario just after I bought my boat with a full fuel tank (50 gal) of unknown age and condition. From the engine hours logged, the fuel could have been twenty years old. I read the threads on this site and saw the Seabuilt access covers. My tank is a 1990 Berry Sheetmetal replacement of the 1981 original, built in 18 gauge stainless steel. The fuel tank on the E36RH is under the starboard settee and the top is fully accessible. I really wanted to see inside my four section tank BEFORE I started the engine but I could not justify the cost of the available access port options. I could see some tar deposits in the tank through the fuel sender's 1.5 inch hole but the fuel looked clear and there was no evidence of water. The engine started fine and I ran down the fuel over the next four years with no issues. Last year I sheared the vent fitting off the side of the boat and ingested a bunch of water into the tank over the winter. I had the FULL tank pumped out, for $360, after I had just filled it! :mad: 
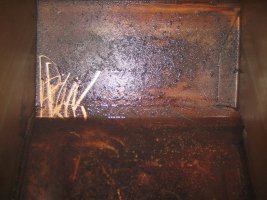
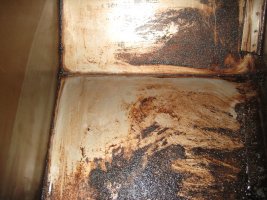
The fuel was so bad they did not recommend filtering it. After pumping out through the fuel sender hole, there was still ~ 1/2 inch of gunky fuel left in the bottom of the tank. Now I really needed to get into the four compartments to see and clean.

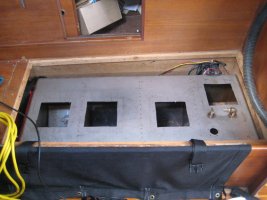
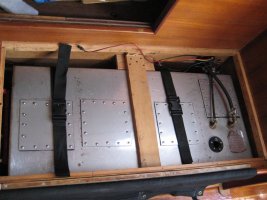
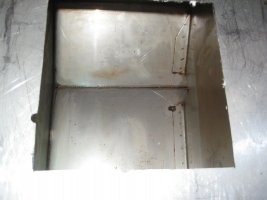
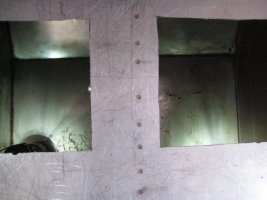
During the previous years I had figured out a way to install the access ports for much less cost than the previous options. My fuel sender is mounted via 5 tapped ss screws and has a Buna-N gasket to seal it to the tank top. It does not leak. Access ports just need enough clamping pressure to seal the gasket. Why wouldn't a single plate on top of a Buna-N sheet gasket held by ss screws tapped into the tank top work? This avoids the plate or backer inside the tank and the nut and bolt to clamp it, plus the hassle of holding the inside fastener during tightening. The #10-32 x 1/2 ss screws are a lot less expensive than larger nuts/bolts/washers. I decided on square 6 x 6 inch access holes with 8 x 8 inch, 0.060 inch thick 304 stainless plates, pre-cut from McMaster Carr, so I would not have cutting of the covers to deal with. I got 3/32 inch thick 12" x 24" Buna-N rubber sheet to use as gaskets and cut it with scissors to 8 x 8. I got a 3/16 hole punch to make the screw holes in the rubber. The total cost for 7 access plates was $125. I got 3 for my stainless water tank.

I cut the tank with my jig saw and 22 tooth metal blades (3 for 7 holes). I needed to drill a few starter holes big enough for the blade. The 88 5/32 inch screw holes required 3 bits. Tapping for the 10-32 screws was easy. The hardest parts were drilling the holes through the thicker cover plates with my little drill press and using a file to enlarge those holes slightly so that all the screws, 16 on each fuel tank cover and 8 on each water tank cover, would align and thread into the tank top. I couldn't drill accurately on the tank tops with my hand drill and the bit would walk off location slightly.

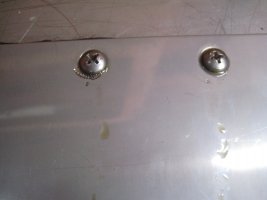
I just finished the water tank this spring. I have sailed with the covers on the fuel tank. The plate gaskets do not leak but I have found that some of the screws weep a very little fuel through the threads. My tank is 18 gauge stainless and there are only 1.5 threads in the tank top. I just bought some small O-rings to seal the screw heads and I am confident they will work. If not, I will add pipe thread sealer.

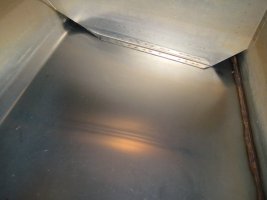
I was able to do all this work with the tanks empty except for the initial 6 x 6 cuts of the fuel tank top. I cleaned up the left over fuel in each compartment and then cleaned all the tar off the inside tank surface with mineral spirits. It came off easily and cleaned up nice. The deposits were not loose and were not going to come off and go into the filter or bother the engine. I vacuumed up all the metal chips after the cutting, drilling and tapping.

Overall, this job was well worth the effort and cost. I would take the same approach if I had a thicker aluminum tank, except use aluminum covers and TeffGel or Thread Sealer for all the stainless screws. My 0.060 cover plates are thicker and stiffer than the tank top. You could use aluminum plates the same thickness as your tank because it is so much stiffer than stainless. I think the additional threads through the thicker aluminum tank top would also eliminate the fuel weeping issue. I would wait to order the O-rings and test sail first. Let me know if you have any questions.

Mark


attachment.php
attachment.php
attachment.php
attachment.php
attachment.php
 

Attachments

  • IMG_1701.jpg
    IMG_1701.jpg
    94.1 KB · Views: 570
  • IMG_1710.jpg
    IMG_1710.jpg
    125.1 KB · Views: 556
  • IMG_1712.jpg
    IMG_1712.jpg
    66.6 KB · Views: 554
  • IMG_1735.jpg
    IMG_1735.jpg
    94 KB · Views: 562
  • IMG_1943.jpg
    IMG_1943.jpg
    49.5 KB · Views: 581
Last edited:

Christian Williams

E381 - Los Angeles
Senior Moderator
Blogs Author
Mark, what are the baffles like? Is there room to reach through them, or just small channels for fuel exchange?

Did you need all four ports?
 
Last edited:

markvone

Sustaining Member
Yes, I needed a port in each compartment.

Christian,

My baffles are stainless sheet with the four corners sniped out. The little triangles for fuel passage are ~1.5 x 1.5 x 2 inches on a side. I can get two fingers through. Not sure what an aluminum baffle would look like.

Note: This is my stainless fresh water tank which has similar baffles and snipes to my fuel tank. It's a little cleaner and shinier than my fuel tank when cleaned up.

Mark

attachment.php
 

Attachments

  • IMG_1970.jpg
    IMG_1970.jpg
    51.7 KB · Views: 420
Last edited:

Rocinante33

Contributing Partner
Mark,

What did you use to get it cleaned out so well? A place I looked into wants $150 to hot tank mine and that seems excessive.
 

markvone

Sustaining Member
Keith,

I used mineral spirits and a few paper towels per compartment. It was very easy. Probably 25 years of sitting in there 1990 - 2015.

Mark

attachment.php
attachment.php
attachment.php
attachment.php
 

Attachments

  • IMG_1696.jpg
    IMG_1696.jpg
    137.6 KB · Views: 224
  • IMG_1704.jpg
    IMG_1704.jpg
    149.3 KB · Views: 232
  • IMG_1706.jpg
    IMG_1706.jpg
    59.1 KB · Views: 232
  • IMG_1709.jpg
    IMG_1709.jpg
    79.3 KB · Views: 226

markvone

Sustaining Member
Follow up on Fuel Tank O-rings

I've sailed for 4 months now with the tank cover O-rings and have had no leakage or weeping through the tank cover screws with the O-rings installed.

Mark
 
Top