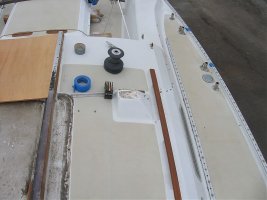
E38 Traveller Upgrade, do I take the sea hood off?

rwthomas1

Sustaining Partner
Hello All,
I am starting to get serious about taking my E38 apart to upgrade the traveller. I previously thought that the traveller was a Schaeffer but now I think just the blocks on it are Schaefer the unit itself appears to be a Ronstan.

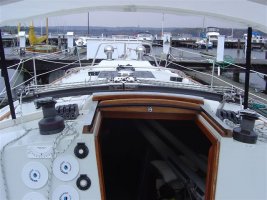
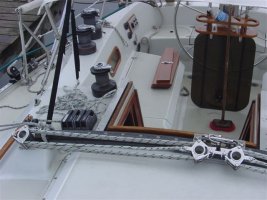
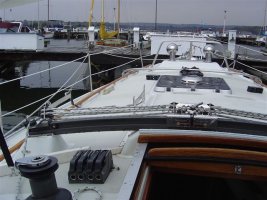
The traveller "track" seems to be installed in an aluminum C-channel which I am guessing strengthens the whole deal. The C-channel and track both bend over the sea hood and attach to raised GRP towers integral to the cabintop.

Access to the bolts in the sea hood is blocked by the sliding top section of the companionway hatch. It appears that to disassemble the whole thing I would have to unbolt the ends of the traveller assembly from the towers and then remove all the screws that hold the sea hood down and remove the sea hood/traveller as one piece. Once the sea hood/traveller is removed it can be flipped over and the traveller bolts addressed.

I am considering replacing the curved traveller with a straight setup. The question is are the GRP integral towers solid enough to support the full loads of the mainsheet? There seem to be plenty of fasteners holding the track to the C-channel and then through the sea hood. Leads me to believe the towers may not be enough on their own? What have others done? Pics would be great.

Is there something I am missing? I don't see how to remove the sliding hatch top so I can access the traveller bolts that pass through the sea hood while its in place. Any ideas here? Thanks, RT
 
Last edited:

Tom Metzger

Sustaining Partner
On my 1987 E-34 I was able to remove the bolts on the seahood to remove the traveler. It did take an impact driver to break them free, but the nuts stayed in place underneath. Not wanting to remove the seahood at that time, I put in flat head machine screws with sealant to seal the holes under the new traveler.
 

Wind River

Inactive Member
did it with the sea hood in place

I managed to take the traveler and the c channel off using a screw driver held with vice grips. All the nuts in the sea hood stayed in place. I used a heat gun to loosen the adhesive under the c channel . Sent the c channel to Garhauer and he matched up the curve and the screw holes. I was concerned about the lack of support as well so I fastened everything as per the original set up. Nice piece of equipment from Garhauer. Here are some pics. George
 

Attachments

  • travelerA.JPG
    travelerA.JPG
    68.9 KB · Views: 179
  • travelerB.JPG
    travelerB.JPG
    58.3 KB · Views: 156
  • travelerC.JPG
    travelerC.JPG
    68.2 KB · Views: 176

hodo

Member III
On my e 38, I am able to lift up on the slider and slide it aft, and it will come clear out. Harold
 

rwthomas1

Sustaining Partner
George,
Thanks so much for the pics. Worth 1000 words as usual. I will be sending my track/channel to Garhauer. They did a very nice job with your traveller.

Thanks to everyone else as well for their responses! RT
 

tdtrimmer

Member II
Related Sea Hood Leaking Issue

When raining, my 1981 E38 leaks around the sliding companionway cover. With the companionway cover closed and the companionway boards in place, water drips in on the ceiling around the inside companionway molding and at the inside base/bottom of the companionway. It must be leaking in under the sea hood somehow. I have been tempted to take off the sea hood but really don't want to remove the cabin ceiling liner to get at the nuts attached to the bolts holding down the sea hood.

Interestingly, it doesn't leak when the dodger is up. This would indicate that it is not a problem with the sea hood but somewhere around the companionway.

Does anybody have the same problem? Has anybody solved the probelm? Has anybody removed the sea hood?

Thanks,
Tom
S/V Mistress 1981 E38
 

Wind River

Inactive Member
Had the same problem

Water would drip from the starboard aft corner of the wood framing inside the companionway and leave a puddle in front of my stove. No problems when the dodger was up. I seemed to have solved the problem by straightening out a coat hanger and digging /pushing out all the crap that was stuck at the back of the sliding cover track. I also had to flush all the dirt out of all the drainage holes around the sea cover. So far, so good.
 

tdtrimmer

Member II
Thanks George,
Did you clean the track with the coat hanger from the top side of the sliding cover or the underside of the sliding cover? It's good to know the problem is solvable without removing the sea cover.
Tom
 

Lawdog

Member III
e 38 traveler

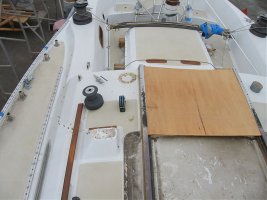
I have a 1983 38 and disassembled the entire top. the only thru bolts were on the ends and the seahood was simply screwed and glued to the cabin top. I have a ton of pictures of it apart. The worst part was scraping the factory caulking out.
 

Attachments

  • Cabin top, Companion way hatch removed 01.jpg
    Cabin top, Companion way hatch removed 01.jpg
    70.4 KB · Views: 165
  • Cabin top, Companion way hatch removed 02.jpg
    Cabin top, Companion way hatch removed 02.jpg
    60.9 KB · Views: 143

tdtrimmer

Member II
I'd appreciate your sending me as many pictures as appropriate to understand how the sea hood is made including the two storage boxes. This might save me from having to take mine off.
tdtrimmer@yahoo.com
thanks,
tom
 

escapade

Inactive Member
Sea (see) hood removal

I have had the sea hood off of my 88 E34. Reinforced the corners due to the traveller causing it to crack as well as the leaks mentioned elsewhere. Not a real big deal. There where 5? 1/4-20 machine bolts as well as a 3/8-16 bolt thru at the back corners. The rest where 1/4 wood screws. Cleaned all the surfaces and rebedded with polysulfide. Cured the leaks and stiffened up the corners tremendously. I believe I posted pictures on this project but will look to see if I can find them if your interested. BTW, I have the Harken track & car & the E34 outer towers are fabricated but basicily the same as the 38's.
Have fun & sail fast
Bud Dankers E34 "Escapade" :cheers:
 

rwthomas1

Sustaining Partner
Well I removed the old traveler today. What a royal b!tch! The bolts through the sea hood either broke off or were seized and the nuts under the sea hood started turning. This is a really poor design. I had a buddy help and we were just able to sneak a ratchet/socket setup up under the sea hood with the slider in the fully closed position. I was then able to back out or break off the screw from above. Slotted screws are also the WRONG fastener for this application. A very large Snap On screwdriver that has a hex fitting so it can be turned with a wrench was indispensable for this task.

The way this is setup you would need to remove the traveler to work on the sea hood or slider. This doesn't make a lot of sense to me. Although I really like the way the curved traveler looks on Georges boat I don't like the idea of making the sea hood so difficult to service.

So this is the question: Will the molded in towers in the cabintop support the full mainsheet load? Does the sea hood HAVE to take some of the load? I know that Garhauer can make me a straight traveler that will handle the load at that span.... If anyone has a straight traveler pics would be great, thanks. RT
 

ted_reshetiloff

Contributing Partner
On my 89' E 38 there is a piece of Teak trim above the slider that when removed yields the nuts and washers which the trav. is bolted through. My 38 also came with a harken traveler though.
 

rwthomas1

Sustaining Partner
No teak strip on mine Ted. I spoke with Guido at Garhauer today and sent the pics of George/Wind River's traveler to him as well. He said no problem as expected so it will be shipped tomorrow or the day after. Going to go with the curved replacement. As much as the design irks me it will be easier to deal with for now. I will likely pull the seahood and rebed everything while I have it all apart. Thanks for all the input! RT
 
Top