Ericson 1970 35-2 - Advice needed

Rhylith

Junior Member
I've recently purchased and have been restoring an Ericson 35-2 and I'm starting into one of the four big projects that this boat needs done. The first one I want to tackle is the freshwater tank.
I don't know too much about ericson's but I have been going through the manual, it looks like this is the original freshwater tank that someone decided to cut into and then coated the interior with an epoxy, which is now disintegrating. Sheets of plexiglass where poorly attached to the top of the tanks and where screwed down into the tank (and apparently constantly leaked).
As for advise, what should I do with this? I've been leaning towards bypassing it and installing a new tank in a different location while possibly turning this one into a dry-storage area. Or would it be easier to fix somehow?
IMG_20110505_202616.jpg
 

rwthomas1

Sustaining Partner
If the tanks are not easily removable to be replaced with new plastic tanks, a simpler solution might be to install flexible bladder tanks inside the old water tanks. Likely you will lose some capacity but this may not be a huge concern for you. RT
 

exoduse35

Sustaining Member
If the tank you speak of is the floor tank under the table, It was an option. The standard tank was a tank that dropped in to the aft center compartment under the forward bunk. Mine has had the same surgery done as well. My boat came with both tanks and the switching and pumps are in the port compartment next to the forward water tank. The floor tank is not removable as it was installed before the sole. The forward one is easily removable, but you may get lucky and find it still there. If not I can take mine out and measure it up for you. A bladder does work or a thorough cleaning and reseal. Dry goods also sounds good . let me know what you decide and I will try to help as I did this same job about 5 years ago. Edd 1970 35-2 # 164..... PS what # is yours? Ours may have met at the factory!:egrin:
 

Rhylith

Junior Member
If the tank you speak of is the floor tank under the table, It was an option. The standard tank was a tank that dropped in to the aft center compartment under the forward bunk. Mine has had the same surgery done as well. My boat came with both tanks and the switching and pumps are in the port compartment next to the forward water tank. The floor tank is not removable as it was installed before the sole. The forward one is easily removable, but you may get lucky and find it still there. If not I can take mine out and measure it up for you. A bladder does work or a thorough cleaning and reseal. Dry goods also sounds good . let me know what you decide and I will try to help as I did this same job about 5 years ago. Edd 1970 35-2 # 164..... PS what # is yours? Ours may have met at the factory!:egrin:

Thanks, both ideas sound good i'll have to check to see if the aft tank is still there.

Yours had the same surgery, how did you seal it up?

I have #108 :egrin:
 

Rhylith

Junior Member
If the tanks are not easily removable to be replaced with new plastic tanks, a simpler solution might be to install flexible bladder tanks inside the old water tanks. Likely you will lose some capacity but this may not be a huge concern for you. RT

I didn't think about doing that, but that is a great idea.
 

exoduse35

Sustaining Member
On mine there was a single access port cut. It is about 10" square. There was a piece of 1/4 " aluminum cut about an inch bigger and smaller than the hole made and then slipped inside. and then 1/8 thick piece 1" wide was placed on top around the hole. Originally it was then screwed together but the screws were failing from corrosion. I resealed it by removing the old screws and then drilling through and bolting with titanium hardware. I used 3M 5200 to seal the the sandwich together. I then re screwed the sheet aluminum hatch to the 1/4 " plate with plain silicone so I could get back in if needed. After 5 years now it still does not leak. It is not a high traffic area as it is mostly under the table. The trick is to make a flange substantial enough to resist flexing then sealing it up good then the cover will stay sealed. Then there is a wood cover where the sole was hacked up. I have carpet in mine and it is hidden underneath. There is a tendency for the side of the engine cover to pop off the hinge if you step in a spot between the hatch for the water intake and the hole. One day I will need to find a fix for that, and would be curious if yours does too. Edd
 

Rhylith

Junior Member
On mine there was a single access port cut. It is about 10" square. There was a piece of 1/4 " aluminum cut about an inch bigger and smaller than the hole made and then slipped inside. and then 1/8 thick piece 1" wide was placed on top around the hole. Originally it was then screwed together but the screws were failing from corrosion. I resealed it by removing the old screws and then drilling through and bolting with titanium hardware. I used 3M 5200 to seal the the sandwich together. I then re screwed the sheet aluminum hatch to the 1/4 " plate with plain silicone so I could get back in if needed. After 5 years now it still does not leak. It is not a high traffic area as it is mostly under the table. The trick is to make a flange substantial enough to resist flexing then sealing it up good then the cover will stay sealed. Then there is a wood cover where the sole was hacked up. I have carpet in mine and it is hidden underneath. There is a tendency for the side of the engine cover to pop off the hinge if you step in a spot between the hatch for the water intake and the hole. One day I will need to find a fix for that, and would be curious if yours does too. Edd


Mine does not seem to have that problem, though the floor itself does have quite a bit of give over most of its surface.

Here, lots of photos of the work I've been doing on the boat, plenty of the interior.

https://picasaweb.google.com/rhylith/35Ericson1970352?feat=directlink
 

exoduse35

Sustaining Member
Checked out your photos... First your threshold for pain is WELL above mine! ( and experience tells me "they always look better in the photo") Second some random musings. I took notes, and have special interest as yours is the closest I have found to my production number. (P= photo) P-1 My sliding hatch is teak. You have no stay sail tracks on the trunk roof. P-4 I have a teak block to mount an oil lamp on the port side of the hatch trim. Also my trim wraps around horizontally as well as inside the opening. P7 Your rack at the bow is from stolen pin rails from the port side of the salon. Also mine has the port side cubby's on both sides and not the cabinets. P10 those ports are not original, nor is the A/C or bookshelf. P-14 Those cabinet doors are teak on mine. Also the nav shelf is only the size of the cubby below. P15 panel is a replacement, I moved mine to under the ladder and put a built-in microwave in that space (I love it!) & my faucets are all along the back wall. P-17 my batteries are in the locker at the bulkhead end of the dinette. I have 6 group 31s in that locker! P-19No clue about that plumbing! p-35 There is a small shelf unit missing where the notch is in the cushion. Also mine has a turned post to the ceiling there as well. I have never seen another there but love it as a hand hold and I added another at the stove wall. The bilge is quite small & will fill fast when running the engine without the pump on. P-45 It looks naked without the grab rails. P-47 my shifter and throttle are on the binnacle P-64 I have no covers the seat back panels P 79 Have any spares? P 85 I extended the counter and added an opening cabinet under the ladder. P-101 My pushpit is all welded and has all vertical posts. I have no swim ladder. P-120 I too get a nest every year! P-149I very much prefer the original mahogany to the white walls! P- 151 Mine and indeed almost all 35-2s have that same repair! P-157 what a mess!!!! P- 165 that stanchion is a replacement with a different bolt pattern than the original. It is interesting to see and compare the two, I am just glad I have mine! Good luck and let me know if I can do ANYTHING to help you with yours. Edd
 

Rhylith

Junior Member
Checked out your photos... First your threshold for pain is WELL above mine! ( and experience tells me "they always look better in the photo") Second some random musings. I took notes, and have special interest as yours is the closest I have found to my production number. (P= photo) P-1 My sliding hatch is teak. You have no stay sail tracks on the trunk roof. P-4 I have a teak block to mount an oil lamp on the port side of the hatch trim. Also my trim wraps around horizontally as well as inside the opening. P7 Your rack at the bow is from stolen pin rails from the port side of the salon. Also mine has the port side cubby's on both sides and not the cabinets. P10 those ports are not original, nor is the A/C or bookshelf. P-14 Those cabinet doors are teak on mine. Also the nav shelf is only the size of the cubby below. P15 panel is a replacement, I moved mine to under the ladder and put a built-in microwave in that space (I love it!) & my faucets are all along the back wall. P-17 my batteries are in the locker at the bulkhead end of the dinette. I have 6 group 31s in that locker! P-19No clue about that plumbing! p-35 There is a small shelf unit missing where the notch is in the cushion. Also mine has a turned post to the ceiling there as well. I have never seen another there but love it as a hand hold and I added another at the stove wall. The bilge is quite small & will fill fast when running the engine without the pump on. P-45 It looks naked without the grab rails. P-47 my shifter and throttle are on the binnacle P-64 I have no covers the seat back panels P 79 Have any spares? P 85 I extended the counter and added an opening cabinet under the ladder. P-101 My pushpit is all welded and has all vertical posts. I have no swim ladder. P-120 I too get a nest every year! P-149I very much prefer the original mahogany to the white walls! P- 151 Mine and indeed almost all 35-2s have that same repair! P-157 what a mess!!!! P- 165 that stanchion is a replacement with a different bolt pattern than the original. It is interesting to see and compare the two, I am just glad I have mine! Good luck and let me know if I can do ANYTHING to help you with yours. Edd

wow thanks for all the comments, yes its great reading/seeing all the differences and changes between the boats.

p15-That sounds like a good idea, but it would require moving all the electrical around, currently under the stairs is a coat rack and a door. Also somewhere behind it is an electrical water heater (Not sure how close it is though.)
p45-sadly the boat came without any, been thinking of putting in stainless steel grabrails
p79 -One or two extra left, given away most of them now, you don't see many of them in subsequent pictures.
P-149 yes the mahogany looks better, but the white walls would be easier to take care of..
p151- ugh wonder what that repair was about, leaking sinks? at least i'm not alone been thinking of building a small corner shelf unit there to hide the uglyness.


actually in p-134 I know its hard to make out but the compression mast has sunk into the fiberglass by about 1/4 of an inch, does your boat have this? or is yours flush with the floor?
p-135-138 are photos from under the floor next to the compression mast as I was worried that the compression mast had sunk and was crushing the wooden block under it, but it seems that the wooden block is fine.
 
Last edited:

exoduse35

Sustaining Member
mine is flush with the floor. and the wood is no bother at all I varnished it with gloss varnish (well that was a bother) but now it just gets damp wiped with everything else. You just need to keep the sun off it. It will discolor (unevenly under photos & stuff). Mine is 5 years old and looks as good as new. The repair is because the chainplate goes through the deck and is bolted through that bulkhead. For some reason, especially on that side it leaked. If you do a search there is always someone on this site doing that repair. From the looks of your wiring it nay not be that much extra work to move the panel than to clean it up. There is a natural shelf behind where yours is from the ice box top. That is where most refrigerator compressors get mounted and there is still room for the m/w. Another advantage is that you then can open the panel while sitting at the nav station instead of crawling into the locker (no fun under way in bad weather while the locker is full!) But you do have a long list of more pressing maters. Oh, I think I have a spare set of stay sail tracks if you are interested. I do not know if you have the halyard for it but if you do you are welcome to it. Edd
 

Rhylith

Junior Member
mine is flush with the floor. and the wood is no bother at all I varnished it with gloss varnish (well that was a bother) but now it just gets damp wiped with everything else. You just need to keep the sun off it. It will discolor (unevenly under photos & stuff). Mine is 5 years old and looks as good as new. The repair is because the chainplate goes through the deck and is bolted through that bulkhead. For some reason, especially on that side it leaked. If you do a search there is always someone on this site doing that repair. From the looks of your wiring it nay not be that much extra work to move the panel than to clean it up. There is a natural shelf behind where yours is from the ice box top. That is where most refrigerator compressors get mounted and there is still room for the m/w. Another advantage is that you then can open the panel while sitting at the nav station instead of crawling into the locker (no fun under way in bad weather while the locker is full!) But you do have a long list of more pressing maters. Oh, I think I have a spare set of stay sail tracks if you are interested. I do not know if you have the halyard for it but if you do you are welcome to it. Edd


Honestly, I'm not sure about the halyard I haven't really looked at the rigging as I received the boat itself for a song as it was slowly rotting away and the owners realized that they simply didn't have the time to put into it.
 

Rhylith

Junior Member
mine is flush with the floor. and the wood is no bother at all I varnished it with gloss varnish (well that was a bother) but now it just gets damp wiped with everything else. You just need to keep the sun off it. It will discolor (unevenly under photos & stuff). Mine is 5 years old and looks as good as new. The repair is because the chainplate goes through the deck and is bolted through that bulkhead. For some reason, especially on that side it leaked. If you do a search there is always someone on this site doing that repair. From the looks of your wiring it nay not be that much extra work to move the panel than to clean it up. There is a natural shelf behind where yours is from the ice box top. That is where most refrigerator compressors get mounted and there is still room for the m/w. Another advantage is that you then can open the panel while sitting at the nav station instead of crawling into the locker (no fun under way in bad weather while the locker is full!) But you do have a long list of more pressing maters. Oh, I think I have a spare set of stay sail tracks if you are interested. I do not know if you have the halyard for it but if you do you are welcome to it. Edd

Took some pictures of some of the interior systems, AC/septic/atomic4
In case you want to add in an AC unit for yourself so you can see how it was done in mine.
 

bigd14

Contributing Partner
Blogs Author
Wow, Rhylith, that is a mountain of work you have there! Amazing how much effort it actually takes to fix even one small thing, isn't it?:headb:

Keep up the good work, it's great to rescue an Ericson from an eventual trip to the dump.

About the crack in the deck near the stanchion- its likely that the core is saturated for quite a ways around the crack. The material may feel sound but is probably wet, and will eventually rot, or crack again in freeze-thaw cycles. I was surprised to find how wet my core was in areas that felt totally sound. I don't know what your eventual plans are for the boat but it might be worth identifying then replacing that wet core and any other you might find, (chainplates, handrails, stanchions are the big ones, but also check near any other deck fittings). This is a huge and disgusting job (an entire summer in my case), and it looks like you have your hands full with many other things, but you might consider doing it, especially if you plan on painting the deck. Or if you can wait and do it during a winter haul out that might be better. I don't mean to be a downer, sorry!:esad:

Doug
 

Rhylith

Junior Member
Wow, Rhylith, that is a mountain of work you have there! Amazing how much effort it actually takes to fix even one small thing, isn't it?:headb:

Keep up the good work, it's great to rescue an Ericson from an eventual trip to the dump.

About the crack in the deck near the stanchion- its likely that the core is saturated for quite a ways around the crack. The material may feel sound but is probably wet, and will eventually rot, or crack again in freeze-thaw cycles. I was surprised to find how wet my core was in areas that felt totally sound. I don't know what your eventual plans are for the boat but it might be worth identifying then replacing that wet core and any other you might find, (chainplates, handrails, stanchions are the big ones, but also check near any other deck fittings). This is a huge and disgusting job (an entire summer in my case), and it looks like you have your hands full with many other things, but you might consider doing it, especially if you plan on painting the deck. Or if you can wait and do it during a winter haul out that might be better. I don't mean to be a downer, sorry!:esad:

Doug

That's mildly depressing, i've been potting (removing some of the core inside of the various penetration areas and filling the entire hole with resin then redrilling the hole though the resin) some of the stanchions as the weather allows me. The crack which I ground out took about a week just to let the core I exposed to dry, afterwards I potted the stanchion.

And i'm aware of a rather large soft spot on the deck near the forward hatch the water appears to have infiltrated the badly sealed grabrail holes and spread out from there.
I've certainly never done a recoring before and it does worry me a bit about having to do one. I do plan on painting the entire boat later in the summer/early fall along with the mast (and dealing with the compression post issues). Any recommended guides on recoring?
 

bigd14

Contributing Partner
Blogs Author
Sorry, I really didn't mean to bring up bad news. It just seems that you are putting so much work into it that you might want to address any other potential issues...

Check out www.plasticclassicforum.com Lots of examples of recores there. Also check out www.lackeysailing.com

Basically the procedure is thus:

A. Research, research, research. Find as much info and advice as you can before proceeding.

B. Gather materials and start work:

1. Identify wet areas (moisture meter, tapping with back end of a screwdriver, and/or 3/8 drill until you hit dry material).

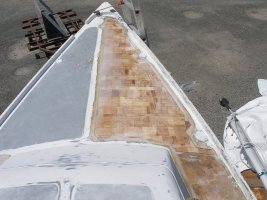
2. Cut off top skin with a circular saw set to just deeper than top skin thickness. The top skin may come off all in one piece, or in chunks.

3. Remove core material

4. Bevel edges of cutout area (and top skin if reusing) with a grinder to accept new fiberglass

5. Prepare new core material (cut to shape, soak in epoxy), then bed in place with thickened epoxy (epoxy mixed with colloidal silica and finely chopped fiberglass).

6. Either replace top skin and glass in place, or lay new fiberglass over the repaired areas.

7. Sand and fair, sand and fair, sand and fair and sand and fair and sand again.

8. Primer and Paint!

Sounds easy, but there is a lot to it and its just a messy miserable job.

The photo is of the bow with half the new core material in. The other side is yet to be cut out and replaced. Fiberglass was layed over the entire foredeck after both sides were done.
 

Attachments

  • P7180035.jpg
    P7180035.jpg
    107.1 KB · Views: 383

jthistle

Member II
Photo Album

I really enjoyed your photo album...amazingly similar situation with my 1972 - E35.

https://picasaweb.google.com/jwthistle/BoatRefit?authkey=Gv1sRgCOS7lvq5s6DQhgE&feat=directlink

I've been working at it off and on for 4 years - that said... I don't miss much sailing either. Spent one summer with the bucket and chuckit sanitation system.

Have a look at some of the pics and if you have any questions get in touch. One thing I've come to understand is that it usually works out when I tear out more and rebuild rather than trying to save pieces and reuse them.

cheers
Jason
 

Rhylith

Junior Member
Thanks, I add in new photos every few days as I work on it, took a look though yours and left a few comments.
 

jthistle

Member II
Great Job...

You're gettin along in the cleanup and planning. I'll give you one piece of advice (that I was given and didn't act on) get the deck done first. - It's tempting to start inside but your priority is stopping any water from gettin in and all moisture issues from ruining your improvements. I'm goin backwards now and still trying to find water leaks.

I'll be watching your album with interest...thanks for the comments - its great to share the challenges and satisfaction of rebuilding this good old boat.

cheers

Jason
 

Rhylith

Junior Member
You're gettin along in the cleanup and planning. I'll give you one piece of advice (that I was given and didn't act on) get the deck done first. - It's tempting to start inside but your priority is stopping any water from gettin in and all moisture issues from ruining your improvements. I'm goin backwards now and still trying to find water leaks.

I'll be watching your album with interest...thanks for the comments - its great to share the challenges and satisfaction of rebuilding this good old boat.

cheers

Jason

Thanks, although I haven't done the deck yet (soft core in one area) I have been sealing the leaks up as I find them (mostly just re-bedding the stanchions with butyl rubber and that one crack I found and reglassed.)
 
Top