Ericson 27: electrical, deck, bottom

Scyph

Member I
Thanks for the suggestion, CamD. I'll check out a glass shop when my roll of butyl runs out. I think it's worth it just for the sheer fun of telling people that I rebedded everything on my boat with chewing gum!

I finally got my outboard fixed. I had a lot of help from new friends in town. At this stage, I can't be too proud to ask for help. Turns out, there were three things wrong with the outboard: 1. I put it on the wrong side, and oil leaked through the carb and filter, and out onto my cockpit bench; 2. the emergency cutoff thingie was not in (*headdesk*); and 3. there's a safety peg that prevents the outboard from starting when it's in gear, and the pedal that was supposed to kick it up when it's in neutral wasn't kicking. This last reason is what I believe the previous owner had mistaken for the need to tune up the motor. We removed the safety peg. I'll need to be cautious when starting it.
Today is June 1, time to pay for June dockage. I'm officially down to $0 :scared:.... but I'll get the other half of my summer budget in 2 weeks.

One of these days I'll go up the mast to see if I need a new anchor light, or just a new bulb. I can't take my mast down this year (I might next year). Any ideas of what to do if the anchor light isn't wired in? As far as I know, all I need is a 360-degree light on the top of the mast. As a temporary solution, I was thinking of raising a camping light up there. I'll probably spend a fortune in batteries that I could instead use to take the mast down. ..... I really hope it's just a bulb.

Speaking of wiring through the mast, is it possible to run a wire through there without taking the mast down? I can't for the life of me figure out how the wires go in there. I only traced them as far as the bilge, and then they vanish somewhere.
 
Last edited:

toddster

Curator of Broken Parts
Blogs Author
As far as a temporary anchor light... it doesn't have to be on the top of the mast. It just has to visible from any direction. An LED will burn a long time on a set of batteries. You can unscrew the head of a small mag-light style flashlight to expose the bulb so it can be seen all around. And summer nights are short.

As far as pulling new wires up the mast... it depends. If the old wires are installed correctly, you can use them as a messenger to pull new ones through. But first make sure the old ones are actually bad. The ones going up my mast went through too many pinch points to ever pull them. I can't believe it was a factory installation, but I see no signs of any previous installation...

BTW, while working on my boat's wiring this last week, I've finally located some of the original wires. They're actually embedded in the fiberglass of the hull! Only stub ends remain sticking out, next to where the original light fixtures were. You should be able to find wires going up to the mast though. Maybe behind a piece of trim on the compression post.
 

Scyph

Member I
Another bilge pump problem

I have a Rule Mate 500 bilge pump, the old one with a magnetic float against which they compare the new one in this video. It woked well for a few days. The other day, I put drinking water in the tank, and found out two things: 1. the sink pump leaks, and 2. the water came out gunky and rubbery. In an effort to make "lemonade" out of losing $6.66 of drinking water, I put a bit of clorox into the tank and ran the resulting pool-like water through the plumbing. That evening and well into the night, the bilge pump kept coming on and off just as it was supposed to on auto. Then later at night, it all of a sudden came on and wouldn't go off (gave me a scare the first time, as you can imagine). I knocked it around with a stick, and it stopped. A few hours later, the same happened again. This time, knocking it with a stick didn't help. I sprayed it with a hose, and that helped. The hose helped the time after that, and again, and again, until it, too, stopped helping. I had to unplug it from the battery to get it to stop. Whenever it plug it back in, it starts and won't stop at all.

I took it apart as much as I could---the upper unit with all the wiring is sealed and I'm not sure it's a good idea to unseal it. I dried it, cleaned it, shook it every which way, but nothing shuts it off. So....
  1. The problem seems to originate in the lower unit, because spraying it with a hose used to help.
  2. When I plug it in, disassembled, with the magnetic float not even in the pump, it starts anyway.
  3. Maybe the auto wire is playing huggy-bear with the manual override wire in the upper unit; but then what? I can't get to it without unsealing the upper unit.

edit: ....... Aaaaand disregard all of the above, unless you have an explanation just to satisfy my curiosity. I figured that if I couldn't get my pump to function automatically, I could at least put it back together and use it as a pump that I don't have to pump manually. And guess what? I put it back together, put it down the bilge, it pumped out all of the water I put there while cleaning it, and shut off like normal. I put more water in the bilge. It activated, then shut off when it was done. The curiosity is killing me, but at least drowning won't.

edit edit: Nope. It's back to malfunctioning again.
 
Last edited:

Emerald

Moderator
butyl color

On the topic of Butyl vs. caulk, [snip] You should be able to get it at any glass shop for cheap--just make sure it is grey NOT BLACK! It is a far better product than the alternatives in pretty much every way imaginable (unless you are a shareholder in 3M).

What's the difference between the grey and black butyl?
 

Scyph

Member I
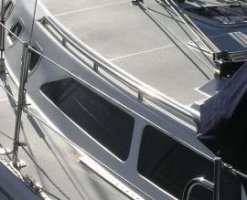
A big bad thunderstorm rolled through the lower Chesapeake yesterday. We're an hour away from the peak high tide right, but the water is up to the dock already. My boat didn't stay dry through this. Portlights poured. Even the one I'd rebedded as an experiment last week poured like my efforts didn't make a bit of difference. This morning, I figured it out: the portlights themselves aren't leaking! The handrails on top of the cabin are. The water gets between them and the liner, and pours out of every hole it encounters en route to the "drain lockers" (whatchamacallit) under the gunwales. Portlights happen to be such holes.

My first idea was to rebed the handrails immediately. It ended badly. One of the previous owners has bedded them with polyurethane liberally applied to the tops of the bolts. My impact wrench couldn't get them out. Lots of the bolts are loose and pull out from beneath.

IMG_5141.jpg

One other bolt is rusted to its nut and getting it out is a two man job (working from inside the cabin and on top). I'll ask a neighbor for help with this one when I can, but the prospects don't look good. If I can't get this rail out, I'll just put butyl all around the bolts I can get to, and rebed it as is. I'm all out of ideas here.

I'd guess that 95% of the water leaking into boat's comes in through the portholes. I took a porthole apart while it was still wet, and saw that there's room between the fiberglass cabin top and the inner liner. If I can't fix the underlying cause, I can at least butyl up this space so that instead of pouring out the portholes, the water keeps on flowing to the bilge.

Any comments on my plan? Any better ideas? I can't be the only person who's ever dealt with a mess like this.
 

bigd14

Contributing Partner
Blogs Author
If it were me I would replace the handrails. Cut the bolts out and install new ones. Bed with butyl tape. Yes its a pain, but those old handrails look gnarly. At the very least you should pull them, sand them and refinish them...

If you want to reuse the existing handrails, you'll need to access the bolt heads on all the bolts. You need to remove the bungs in the handrails to access the slots in the bolts so you can get purchase. Then you should be able to remove the nuts. Drill the bungs out with a bit slightly smaller than the bung hole and then use a utility knife to get the rest. If the previous owner was nice he just used a little varnish to seat them in, rather than gluing them...

Then get some new bungs, rebed with butyl tape (don't forget to counterbore your holes) and you're good to go!

Should be drier after that!
 
Last edited:

Loren Beach

O34 - Portland, OR
Senior Moderator
Blogs Author
Plan C

A big bad thunderstorm rolled through the lower Chesapeake yesterday. We're an hour away from the peak high tide right, but the water is up to the dock already. My boat didn't stay dry through this. Portlights poured. Even the one I'd rebedded as an experiment last week poured like my efforts didn't make a bit of difference. This morning, I figured it out: the portlights themselves aren't leaking! The handrails on top of the cabin are. The water gets between them and the liner, and pours out of every hole it encounters en route to the "drain lockers" (whatchamacallit) under the gunwales. Portlights happen to be such holes.

My first idea was to rebed the handrails immediately. It ended badly. One of the previous owners has bedded them with polyurethane liberally applied to the tops of the bolts. My impact wrench couldn't get them out. Lots of the bolts are loose and pull out from beneath.
One other bolt is rusted to its nut and getting it out is a two man job (working from inside the cabin and on top). I'll ask a neighbor for help with this one when I can, but the prospects don't look good. If I can't get this rail out, I'll just put butyl all around the bolts I can get to, and rebed it as is. I'm all out of ideas here.

I'd guess that 95% of the water leaking into boat's comes in through the portholes. I took a porthole apart while it was still wet, and saw that there's room between the fiberglass cabin top and the inner liner. If I can't fix the underlying cause, I can at least butyl up this space so that instead of pouring out the portholes, the water keeps on flowing to the bilge.

Any comments on my plan? Any better ideas? I can't be the only person who's ever dealt with a mess like this.

Well, I have a comment... but it's not very "traditional"...
I would contact a SS fab shop and have a replacement made up in SS.
That's two less things to have to refinish every season.

We have nice looking teak rails now, but if either one ever gets a crack or break, I will have a local shop weld up and polish a set in 1" ss. Most new boats come with this nowadays.
Matter of fact, I might just measure the length and then check around and see if equal-or-close lengths are available through Catalina Direct...
:rolleyes:

Best,
Loren
 

Attachments

  • ss rail,Catalina 34-2 2004.jpg
    ss rail,Catalina 34-2 2004.jpg
    14.7 KB · Views: 184
Last edited:

Scyph

Member I
I got the bungs out with a rotary tool. All caps are accessible. Maybe I'm wrong about this, but the stuff under the bungs is not varnish, it's polyurethane :0. The bolts themselves are actually flat-headed machine screws, pretty much bolt (a) in this image. The slits in their caps are plugged up. I cleaned them up as I could. It didn't help much. Every single one is stuck solid.

Only 4 of the bolts have nuts inside the cabin. They are the ones at the ends, the only ones without polyurethane in them. I got 3 of them out, and one more is a pain because it's rusted to its nut. I have no clue as to the purpose of all the other bolts. Their nuts are on the underside of the rails! (look closer at the picture) So they're not holding anything except for themselves, as far as I could tell. Maybe the nuts had been originally embedded in the fiberglass. It's a silly idea, but it would explain why some of them are magically stuck to the cabin top. Maybe once I get the end bolts out, I can wiggle the rails free, but that still leaves the problem of 3 bolts per rail permanently stuck inside the rail and not doing anything. Come daylight tomorrow, I'll try that with the rail that doesn't have any end bolts left---if that's a good idea.

I can't afford to replace the rails right now. Worst case scenario, if I ruin them, is having to go without them for one year. Next year, I'll talk to the friend of mine who runs a machine shop about doing it Loren's way.
 
Last edited:

PDX

Member III
Lots of options for replacement

1. Loren's way, mentioned above; certainly the most maintenance friendly.

2. For people who don't like the all SS look (particularly for a 1970s or earlier boat) its possible to make your own all teak rails out of teak dimensional lumber. Or you can buy a pre-fab unit and its probably cheaper. They sell them in various lengths. The disadvantage is there is no guarantee the standoffs/risers would match up with your old ones. If its important to re-use the same holes in your cabin top, making your own rails might be the only way.

3. For a traditional look that is more maintenance friendly, there are a couple options I can think of. Many late model boats (compared to an E27) have fiberglass riser/standoffs molded into the hull with a teak dowel (effectively the grab rail) laid across the top and screwed in. This would involve a lot of FG fabrication work but long term the teak dowel would be a lot easier to varnish than the many-sided all-teak handrail. Another option, and a way to avoid the work of building and glassing in standoffs, is to buy pre-fab SS ones. http://www.newfoundmetals.com/catalog/pg07.html IMO these probably wouldn't look as nice and likely would require some FG buildup on your cabintop to get the rings to line up. One huge advantage it seems to me, is that there would be no need to anchor the teak dowel. It could simply float in the rings. This means you might be able to unbed a single end-cap, slide the dowel out, and refinish it in your garage,
 

CamD

Member II
Emerald: Black butyl makes a mess around the edges that is a pain to clean up. Grey (or white--I've never seen white!) is no problem at all for some reason.

With the handrails I would get them off, pot the holes and overfill with epoxy and don't drill the new holes this season. Go sailing and take time to dry, sand and refinish the rails. I use West System special clear hardener, which basically coats them in plastic, then top it with three coats of varnish. Put them back on in the fall by through-bolting them all.
 

dt222

Member III
I second the advice of remove the rails, plug the holes and sail for now while you work on rapairing/refinishing the rails. Teak is very expensive and I try and reuse all that I have and/or remove.On my '75 model, the exterior rails are thru-bolted to a set of rails in the cabin ( I don't know if this is factory or not). I don't mind the yearly varnish work (but in this neck of the woods the boat is out of the water more than in, so there is time).
 

toddster

Curator of Broken Parts
Blogs Author
Emerald: Black butyl makes a mess around the edges that is a pain to clean up. Grey (or white--I've never seen white!) is no problem at all for some reason.

.

I've read somewhere that the black stuff is "asphalt-based" and dries and cracks more rapidly with age. I used to use thousands of black butyl rubber stoppers in a biomedical application. About 10 or 15 years ago, they switched these to a gray or a blue formula. The old black ones were nice and squishy when new, but would compress and lose their elasticity too quickly. Then there's all those little black rubber non-skid "feet" on small electronic units that seem to mysteriously liquify after a few years and leave permanent black spots where the gadget used to sit...
 

Scyph

Member I
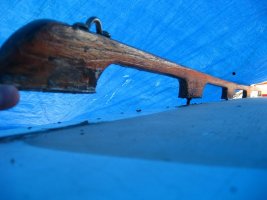
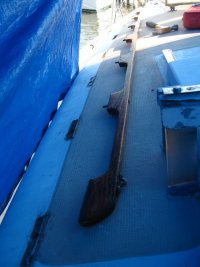
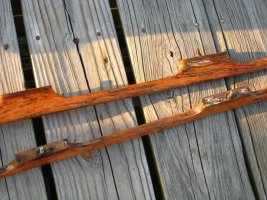
With a heavy dose of rage (caused by one of the previous owner and directed at the rails), I managed to rip them out. Because the genius had glued the bolts in, there's no way of removing them from the rails. I only managed to remove one bolt.

IMG_5166.jpg

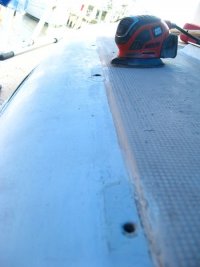
There was no caulk between the rails and the cabin top. One previous owner had decided that caulk on the outside was good enough. Another was obviously dissatisfied with this solution, so he covered the outside caulk with a thick layer of silicone. I cleaned up the black rotten wood that used to sit under the rails.

IMG_5167.jpg

These bolts aren't coming out. What I had first mistaken for nuts are actually... round nuts?

IMG_5168.jpg

I don't so much mind the yearly maintenance. And I prefer the look of teak rails to metal. But I don't know if my rails are salvageable. If I only bolt them at the ends, the middle attachments won't be in tight no matter how much caulk I put around those bolts.

I could drill neat round holes through my liner and use the glued-in bolts that are already on the rails to bolt the rails. Then, I would plug those holes with buttons similar to the ones plugging the rest of the holes. I'm not too keen on that, but I don't see another method of reusing these rails.
 

CamD

Member II
Epoxy fixes all. After removing all of the old fasteners and letting the rails dry out really well put a piece of tape along the bottoms of the bolt holes and pour thickened epoxy into the holes from the top (leave enough room at the top for the new bungs). When it has set you can redrill the holes and use new fasteners. From the outside you won't be able to tell that the teak has been repaired with epoxy. On the other hand you could simply cut new ones with a less expensive wood like mahogany. I recently redid my teak rails and made some mahogany rails to bolt to the inside. You use really long bolts that go through both sets of rails. They make life a lot easier down below when she's heeled over.

Go to Maine Sail's how to article on sealing deck penetrations to see how to prepare the hole in the cabin trunk:
http://www.pbase.com/mainecruising/sealing_the_deck

My preferred method for finishing through bolted hardware (besides the interior handrails) is with big washers and acorn nuts. You bolt tight to the inside of the cabin trunk by drilling a hole in the liner and then put a big washer and an acorn nut over the bolt on the outside of the liner to finish it. It gives it a nice finished look.
 
Last edited:

Scyph

Member I
Yeah... I'm having difficulties in the pulling glued-in bolts out of teak department.

One reason I haven't considered Catalina handrails is because they are straight, and mine are curved. Do they bend? Is it a good idea to bend them? I imagine they might put some stress on the cabin top if I bend them.
 

Loren Beach

O34 - Portland, OR
Senior Moderator
Blogs Author
Yeah... I'm having difficulties in the pulling glued-in bolts out of teak department.

One reason I haven't considered Catalina handrails is because they are straight, and mine are curved. Do they bend? Is it a good idea to bend them? I imagine they might put some stress on the cabin top if I bend them.

If going with teak again, all rails are milled out straight. You have to force them to curve as you do the install. Teak is tough, and some comealongs might be needed to get them to line as you torque down each bolt in sequence, would be my guess.

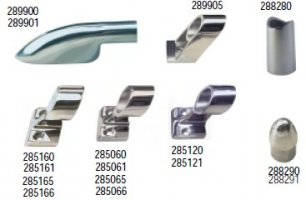
We have a lot of boats in our yc with ss rails. Being from the 60's and 70's, these boats use a "fabricated" railing system with end caps and center support pieces as needed. The actual railing is a section of polished ss tube that is curved during the install. I am not sure if that gentle curve was done forcefully on the fly or with a very large dia. mandrel of some sort.
I found a link with a photo of the rail parts.

Best of luck, whatever you decide.

LB
 

Attachments

  • rail fittings.jpg
    rail fittings.jpg
    16.1 KB · Views: 293
Top