Ericson 30+ Water Tank Questions

dandimm

Member II
Hello, I have a 1984 30+. I just discovered my main water tank was crack along the bottom edge and leaking. IT looks like a Ronco B112, 30 gallon. I also have an aux water tank in the bow. Both tanks have valves to feed the water pump.

I have a few questions and need advice please.
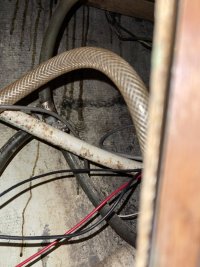
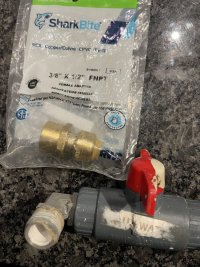
1. I removed the ronco water tank and found the crack along the bottom edge. Can it be repaired by plastic welding? I found that the B-112 was standard on the 30+ plumbing diagram. I am assuming it is the original. It looks like it is still sold by Ronco, but I anticipate it will be a few weeks to have it delivered.

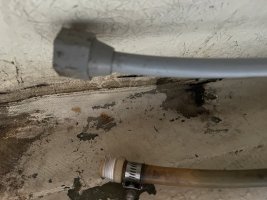
2. Regarding my aux water tank. I am assuming that I can use it until my new tank ( or repair ) is completed. The one thing that concern me it that I cannot locate the outside air vent. The diagram shows it on the starboard side but I don't have one there. I don't even know where the main air vent hose is either. My fear is that I create more issues because the aux tank is not vented properly either. I think I remember seeing something on the transom. I know I have a black water tank vent on the port side near the head.

Any advice would be greatly appreciated!
Daniel
 

paul culver

Member III
I have an E29 so things may be different. The transom vent is for the fuel tank. The water tank vent is a short length of tubing held up above tank level with zip ties -- no through-hull venting.
 

Loren Beach

O34 - Portland, OR
Senior Moderator
Blogs Author
I have an E29 so things may be different. The transom vent is for the fuel tank. The water tank vent is a short length of tubing held up above tank level with zip ties -- no through-hull venting.
Sounds believable. Our '88 model had little tank vent metal "spouts" behind each sink, that evidently were intended to also route excess water into a sink if a deck fill was filled too enthusiastically. Since our tanks are filled from screw-out plates on top of each tank, I rerouted those vents to areas about a foot above the tank tops and removed the "spouts.".

I do not think that the guys in the cabinet shop realized that the counter tops for the Olson's were going into a somewhat unusual model with no fresh water deck fills. :)
 

Frank Langer

1984 Ericson 30+, Nanaimo, BC
On our 1984 E30+ the vent for the water tanks is the spout on the left side of the sink in the head. It looks the same as the outlet for the footpump in the galley, but there is no footpump in the head. You can access the hose for the vent from the locker under the mattress in the v berth, removing the screws in the floor board of that locker, which gets to the optional water tank under the v berth. You turn on/off the water to each tank in a small locker just forward of the large locker holding the main water tank. You will find 2 red knobs to open/close each tank when you want to use the other one. There is no problem using the optional one after you turn off the red button for the main tank and turn in the one for the optional tank.
Frank
 

dandimm

Member II
T
On our 1984 E30+ the vent for the water tanks is the spout on the left side of the sink in the head. It looks the same as the outlet for the footpump in the galley, but there is no footpump in the head. You can access the hose for the vent from the locker under the mattress in the v berth, removing the screws in the floor board of that locker, which gets to the optional water tank under the v berth. You turn on/off the water to each tank in a small locker just forward of the large locker holding the main water tank. You will find 2 red knobs to open/close each tank when you want to use the other one. There is no problem using the optional one after you turn off the red button for the main tank and turn in the one for the optional tank.
Frank
Thanks. This is very helpful and will give me a place to look for the vent lines. I just wanted to be sure that the vent lines were unblocked. I blew through the vent line that connected to the main tank and it seem to be OK. I think I’ll put a shop vac on it just to be sure it’s clear of debris.

I also have the same set up with the two red knobs. I’ve been leaving both red knobs open the whole time when I fill up both tanks. I didn’t know it was a best practice to only use one at a time.

for now I’m just going to use the auxiliary water tank. I just ordered a plastic welding kit off of Amazon and watched a ton of YouTube videos on how to do it. It doesn’t seem complex and if I take my time and follow the instructions I think I’m going to be successful.

Has anyone else had any experience with plastic welding?
 

Loren Beach

O34 - Portland, OR
Senior Moderator
Blogs Author
for now I’m just going to use the auxiliary water tank. I just ordered a plastic welding kit off of Amazon and watched a ton of YouTube videos on how to do it. It doesn’t seem complex and if I take my time and follow the instructions I think I’m going to be successful.

Has anyone else had any experience with plastic welding?
Feeble attempt at humor, but true... I wrote a check to a guy that built and delivered our custom-design water tank. :)
That said, I had zero experience at welding in steel, also. Please post up some pix of the before and after of the seam/area you are repairing.
Good luck!
 

dandimm

Member II
Feeble attempt at humor, but true... I wrote a check to a guy that built and delivered our custom-design water tank. :)
That said, I had zero experience at welding in steel, also. Please post up some pix of the before and after of the seam/area you are repairing.
Good luck!
I just received the quote back from Ronko. The tank with shipping is going to be about $300 so I’m gonna bite the bullet and go this route. At least that way I’ll be able to not have to worry about my attempt at plastic welder job. I’m a DIY person by nature, but I don’t like doing projects that involve water, especially in a boat.

Thanks for all the advice!
 

Loren Beach

O34 - Portland, OR
Senior Moderator
Blogs Author
Cool. And here's some unrequested advice: This is the time to exactly specify where you want the tank fittings installed. They "spin weld" them in. Ditto for a clean-out port if you want one.
 

dandimm

Member II
Cool. And here's some unrequested advice: This is the time to exactly specify where you want the tank fittings installed. They "spin weld" them in. Ditto for a clean-out port if you want one.
Thanks for the advice.

The current tank as three fitting on the end. The filler, air vent and drain. I will be sure to be very specific on the placement.

What is a clean-out port?
 

Loren Beach

O34 - Portland, OR
Senior Moderator
Blogs Author
What is a clean-out port?
Just a screw-out plate with enough room to reach inside and wipe down the interior once a year. The usefulness will depend on access to the tank top in a particular boat model. Our main water tank is under a settee top (easy access) and our second tank is in a lazaret and takes more effort to get at.
 

mjsouleman

Sustaining Member
Moderator
I just received the quote back from Ronko. The tank with shipping is going to be about $300 so I’m gonna bite the bullet and go this route. At least that way I’ll be able to not have to worry about my attempt at plastic welder job. I’m a DIY person by nature, but I don’t like doing projects that involve water, especially in a boat.

Thanks for all the advice!
I have used Ronco and found them reasonably priced. As for the starboard water tank, be sure to secure the new tank. When I looked at my starboard tank, it was free floating and had broken away from the original tabbing.
 

dandimm

Member II
I have used Ronco and found them reasonably priced. As for the starboard water tank, be sure to secure the new tank. When I looked at my starboard tank, it was free floating and had broken away from the original tabbing.
My tank was also not very well secured. Only had a block of wood to add pressure to it. I will be sure to secure the new one better....
 

william.haas

1990 Ericson 28-2
I had a leaking water tank a few years back and started down the path of contacting Ronco for a direct replacement. Here's the caution - on my vessel Ericson used a standard Ronco model and then modified it to fit the molded space (they effectively clipped a corner off and rewelded a smaller, angle onto the plastic). I ended up finding a shop here in Chicago that was able to just repair the small crack and spinweld a new fitting for a much more costly solution than building a new, semi-custom tank based off a standard Ronco model. Long story short, double check the measurements on your tank before purchasing a new one - the stamped in model number does not necessarily mean a plug and play solution with these tanks.
 

dandimm

Member II
I have used Ronco and found them reasonably priced. As for the starboard water tank, be sure to secure the new tank. When I looked at my starboard tank, it was free floating and had broken away from the original tabbing.
Well, I may be back to trying to plastic weld. Bronco emailed me and told me the shipping was going to be $205 which makes the tank almost double now.
 

dandimm

Member II
It looks like I think I found out why the tank finally cracked. Having the boat for four years and never owning a boat before I didn’t know where the air vent was located until this group helped me out- thank you! Unfortunately my lack of knowledge always seems have me learning through my wallet.

I was able to locate it in my cabinet under the sink in the head. What I found was there was a shut off that was closed.(now taped open)The tank must not have been getting any real air and was probably flexing over and over again. the reason why I know this is because every time I opened to refill it it sounded like it was gasping for air. I guess it was just a tank pressure equalizing again.

I hope I didn’t compromise the auxiliary water tank. Assuming that it’s fiberglassed in I would think it would be significantly stronger.

I also ended up breaking one of the fittings that goes to the valve switches for the auxiliary tank. Of course, your local Home Depot, or even West Marine don’t stock these things.

The only thing I could find that was close that I think my work is a shark bite,1/2 to 3/8 Pex fitting to the grey water pipe. The shark bite fitting is rated for up to 200 psi after looking at the original fitting. It looks like it was only held on by a little metal collar. Does anybody have any experience with these?
 

Attachments

  • IMG_8742.jpeg
    IMG_8742.jpeg
    166.5 KB · Views: 14
  • IMG_8745.jpeg
    IMG_8745.jpeg
    152.4 KB · Views: 12
  • IMG_8739.jpeg
    IMG_8739.jpeg
    201.7 KB · Views: 14
  • IMG_8747.jpeg
    IMG_8747.jpeg
    186 KB · Views: 14

Nick J

Sustaining Member
Moderator
Blogs Author
Dandimm,

Good catch on the tank vent. That doesn't look like a standard install. The system diagram for a 30+ in the resources section shows the tank vent going to the chain locker/pan. On my 35-3 and similar models, the tank vent is plumed to a tap at the head sink. Kind of a nice feature because it catches any spillage and is a simple way to verify your tanks are topped off.

The shark bite fitting should work. I've used flairIt fittings in the past to connect PEX to the gray stuff:


Loren Beach

O34 - Portland, OR
Senior Moderator
Blogs Author
The only thing I could find that was close that I think my work is a shark bite,1/2 to 3/8 Pex fitting to the grey water pipe. The shark bite fitting is rated for up to 200 psi after looking at the original fitting. It looks like it was only held on by a little metal collar. Does anybody have any experience with these?
In the 80's, EY was using gray "Qest" brand plastic tubing and fittings for their fresh (drinking) water systems. Our '88 had it. They logically must have figured that if tens of thousands of homes had it ( and oodles of RV's) it must be good. From leaks inside of walls in houses it turned out to have problems holding pressure anywhere there was vibration, and was involved in a lawsuit.

You can still find RV suppliers with some parts for it. We found a leak near a pump fitting, and finally decided to be proactive and renew our water system with barb fittings and reinforced hose.
If you put "Qest" into the search box here there are some threads discussing this. Lots of Ericson's still use it with no problem, I should note.

Here is one with a diagram and parts info: https://ericsonyachts.org/ie/threads/qest-tubing-drinking-water-system.152/
 
Last edited:

dandimm

Member II
It looks like a lot of work was done in the head. The previous owner replaced the sink. They also took out the hot water heater and capped off the line. Maybe the previous set up for the vent lines went to the sink like @Frank Langer setup.

Glad to hear about the 3/8 to 1/2 sharkbite is a workable solution. In my research, several other boat and RV owners also used it successfully. The o.d. of the qest pipe is 1/2" and the same o.d as the pex. I took a sample pipe piece to the big box store yesterday and test fitted it before buying. I'll have another attempt at installing after work today.
 

dandimm

Member II
In the 80's, EY was using gray "Qest" brand plastic tubing and fittings for their fresh (drinking) water systems. Our '88 had it. They logically must have figured that if tens of thousands of homes had it ( and oodles of RV's) it must be good. From leaks inside of walls in houses it turned out to have problems holding pressure anywhere there was vibration, and was involved in a lawsuit.

You can still find RV suppliers with some parts for it. We found a leak near a pump fitting, and finally decided to be proactive and renew our water system with barb fittings and reinforced hose.
If you put "Qest" into the search box here there are some threads discussing this. Lots of Ericson's still use it with no problem, I should note.

Here is one with a diagram and parts info: https://ericsonyachts.org/ie/threads/qest-tubing-drinking-water-system.152/
Thanks for the info on the Qest. None of the local stores carried this stuff and they had no clue what it was until I talked to an oldtimer at West. He pointed to an RV store as well. I did find this online. https://mobilehomedepotmi.com/plumbing/qest.html I think QFNCR2 26-3260 is the right part number for the connector.

I will keep this in my back pocket in case the sharkbite is a no-go.

thanks again!
 

dandimm

Member II
Epic fail on the plastic welding. I think I may have been more successful it would not have been a crack that was along the line of the bottom seam of the tank.

Has anybody used a bladder tank in replace of the Ronco?
 
Top