EricHasAnEricson
Member I
Hi all.
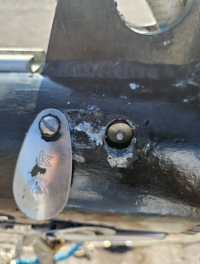
I have my mast down, and want to take advantage of the opportunity to replace the masthead sheaves with some new ones from Zephyrwerks. The situation however, is pretty dire. I have the Kenyon slide-in sheave pins that are welded to a plate, in theory you unscrew the plate and pull the sheave pin out. Bimetal corrosion has made other plans for me, as the pin has sheared off the plate (see photo), and it seems the aluminum has corroded the pin tightly into place.
I was thinking I could drill a hole through the opposite side of the mast and tap the pin out that way. Has anyone done this before? Any gotchas I should look out for?
Thanks.
Attachments
-
 Screenshot 2024-07-18 at 1.42.24 PM.png905.6 KB · Views: 21


