I have a 1972 Ericson 35-2 named WindShadow that I sail on Lake Erie. I have sailed the boat since 1994. She is a dream to sail and has become a part of the family. But now is the time to start a project that I have put off too long. My cabin top has delaminated in several spots. I cut out about 23 square feet and scooped the old core out mostly by hand. I must be insane! Anyway I have purchased 1/2" probalsa to replace the core. I have also decided to use vinylester resin instead of the iso or ortho polyester resin because of its better bonding qualities. If anyone has done this type of repair before I could use some tips. Thanks cduer
You are using an out of date browser. It may not display this or other websites correctly.
You should upgrade or use an alternative browser.
You should upgrade or use an alternative browser.
WhiteNoise
Member III
Vacuum bag core
I replaced the core under my starboard deck, from underneath. This method necessitates vacuum bagging because you are working upside down but I would still recommend it because it will keep consistent pressure on the new core as it sets. It will also help to pull some of the resin through the core. Additionally I would lay a piece of wetted matt glass beneath the core to give a strong bonding surface.
You can create a vacuum bag with a small shop vac, funnel, 6 mil. (about) plastic, thick twine rope, and duct tape. If you want me to go into more detail let me know.
Here's some pics:
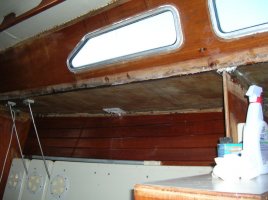
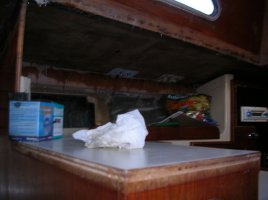
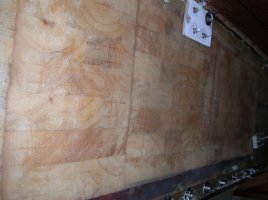
Good luck!!!
-Chris
I replaced the core under my starboard deck, from underneath. This method necessitates vacuum bagging because you are working upside down but I would still recommend it because it will keep consistent pressure on the new core as it sets. It will also help to pull some of the resin through the core. Additionally I would lay a piece of wetted matt glass beneath the core to give a strong bonding surface.
You can create a vacuum bag with a small shop vac, funnel, 6 mil. (about) plastic, thick twine rope, and duct tape. If you want me to go into more detail let me know.
Here's some pics:


Good luck!!!
-Chris
Last edited:
recore
Here's a coupla pics and a thread from my deck recore - same as yours.
http://www.ericsonyachts.org/infoexchange/showthread.php?t=6906&referrerid=2038
...doing a complete refit on it. Not restoring the boat...just makin it safe and fun for the family.
I used marine ply for the deck and did i the bulk of the work in one weekend this past summer. (just the cutting scraping and core installation and re-laid the skins). It could use more farining and needs a coupla coats of paint...but I wanted to sail it so I did.
I used about 5 Gal. of resin and then primed and painted with a coat of interdeck. good and stiff. No rot and no more water leaks.
The job is much more intimidating in your mind that in fact. Not a bad project. Make sure you have helpers! We prepped everthing on Sat morning - cut the skins off...grinded tapers in the skin - scooped/grinded and cleaned the old core out. Cut new plywood core etc... by lunchtime that day we were mixing huge quantities of resin and installing the core then the skins ...next day we mixed and applied fairing compound and voila...stiff dry decks. (finiishing work was done later)
It took three of us - One mixing Resin and the other two spreading and fitting the core and then the deck skins.
Good luck with it... I'll be watching the thread for progress.
Cheers
Jason
encouragement
Thanks for the info on your deck re-cores. The vacuum bagging sounds like a good way to go. I wish I could get started but I have to wait for the snow to melt and temps to warm. I usually over-think a project before I get started and this weather is prolonging my mental stress. Fortunately I will have plenty of help and all your info at EYIE. Thanks
Thanks for the info on your deck re-cores. The vacuum bagging sounds like a good way to go. I wish I could get started but I have to wait for the snow to melt and temps to warm. I usually over-think a project before I get started and this weather is prolonging my mental stress. Fortunately I will have plenty of help and all your info at EYIE. Thanks
gareth harris
Sustaining Member
A few thoughts:
I had to take up about the same amount of deck as you, maybe a little more. I ended up taking it right back to the edges of the deck, in other words, a couple more inches either side of where you have dug it out, to make the fairing easier by having the edges of the glass at the corners of the deck.
The ridges lining the hatches contain plywood, which is sealed off from the deck, so notwithstanding what I said above, unless they have had their own water intrusion you should be able to leave them alone.
At the outer edges of the cabin top, I filled the outermost 3/4" or so of deck with resin vice core, to soften the transition and make fairing the edge of the core material easier.
I recommend divinycell H80 to replace the balsa, and renicell E320 to replace the plywood:
http://www.diabgroup.com/americas/u_products/u_prods_2.html
You will need the gridded divinycell for the curved portions of deck, as it is not flexible. The renicell does not come in a gridded version, but it flexes enough to be fitted into the small sections you need it for.
Under the glass at the base of the mast is a piece of carbon steel which reinforces the deck. I had to take mine out, it was somewhat corroded but not in too bad a shape. If you have to take out the plywood in that area, I would at least inspect it. I would epoxy a piece of pipe through the deck there to take the wires up to the mast - something to remove any edges that may rub on the wires and prevent water in the mast running down into the deck.
That looks like a good shelter you have built BTW.
Gareth
Freyja E35 #241 1972
Can you go into detail about vacuum bagging? I need to fix some delam in the fore deck on my E 27 and I'm thinking about doing it from below.I replaced the core under my starboard deck, from underneath. This method necessitates vacuum bagging because you are working upside down but I would still recommend it because it will keep consistent pressure on the new core as it sets. It will also help to pull some of the resin through the core. Additionally I would lay a piece of wetted matt glass beneath the core to give a strong bonding surface.
You can create a vacuum bag with a small shop vac, funnel, 6 mil. (about) plastic, thick twine rope, and duct tape. If you want me to go into more detail let me know.
Here's some pics:
View attachment 4727
View attachment 4728
View attachment 4729
Good luck!!!
-Chris
WhiteNoise
Member III
You asked - tough to explain so here it goes
NOTES:
I recommend this process only if you have a headliner and not finished gel coat underneath because it would be easier to cosmetically repair the top deck with non-skid than gel coat from underneath.
This is very messy so cover the areas around you well.
Wear a respirator mask. When resin/epoxy kicks in a closed area like a boat cabin the fumes can be pretty bad.
Wear protective eyewear.
MATERIALS: (the first section can be ordered from DynaGrout.com - nice guys, reasonable prices)
fiberglass Matte
fiberglass cloth
Balsa Core
3" laminating roller
Resin or Epoxy (your choice)
Structural thickener (your choice)
--------
Chip brushes
plastic putty knives
small paint roller and small paint roller pan (disposable)
Acetone (only effective way to get this stuff off of you - not the healthiest
so if anyone has a better recommendation I am all ears)
small shop vac
small funnel
hemp rope (cheap rope from Home Depot - thick diameter, not twine)
6 mil. or heavier plastic - clear so you can see
duct tape
resin paper and blue tape (to cover underneath the area you will be working)
PREP:
Cut out fiberglass skin underneath and remove the damaged core. I recommend a router or rotozip to cut the glass. Be sure to only cut the underneath and not go through the top skin.
Sand/fair underneath of top skin.
If you have areas/crevices that you will have trouble getting a large square of balsa to fit, no worries. We'll get to that, just clean out as best you can.
LET'S BEGIN:
NOTE:
If you are working on a large enough area you will do this is stages as you have to work within the working time of the resin/epoxy you are using. Do each stage (labeled by number) at a time. e.g. Stage 1 until done with all sections, then stage 2., and so on.
For those hard to reach, small crevice areas we will address those first. The object is to fill enough of those areas that the remaining square will fit a piece of unbroken balsa.
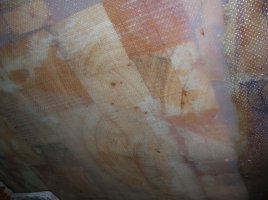
1. Mix a pot of thickened epoxy/resin to a peanut butter consistency. Not running. Completely static. Push the thickened epoxy/resin into the crevice. If space allows jam a piece of the balsa core in. If there are multiple, then line up the pieces. Once satisfied, let it kick. In the below picture you can see where I had to do this.
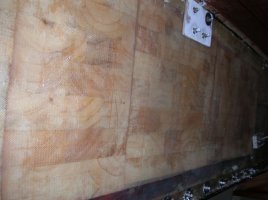
2. Measure area for a section of balsa core. Cut to size.
Measure out a piece or two of matte glass. Cut to size.
(Create vacuum bag) Cut a piece of plastic larger than the area. Cut a small hole in the middle of the plastic to insert the funnel, tip down and duct tape it in trying to make it as air tight as possible. Pull a couple of strands of rope through the funnel. Leave enough length such that you will be able to spread the rope out the length of the area. This will make an air gap and allow air to pass.
Here's where you need to move fast: (2 sets of hands is VERY, VERY, VERY helpful)
Mix up pot of resin/epoxy
Wet out area of deck you are working with
Press up matte glass and wet out some more
Roll out evenly with laminating roller
Roll on resin/epoxy with paint roller (a good coat)
Press up core
Press up plastic against core while friend spreads out ropes and then duct tapes perimeter
Have your friend put shop vac hose on funnel and duct tape
Have friend continue to duct tape to seal all leaks which will ultimately cause enough suction to hold up everything, pull the resin through the core, and keep even pressure while everything kicks off
Leave vacuum running for about an hour or until satisfied with how well it kicked
Do not remove anything until hours later. I'd wait until the next day
3. Pull away all duct tape, plastic, etc.
Sand and fair
Fill any gaps with thickened epoxy (peanut butter again)
Let kick
4. Sand and fair
Wet out and lay out fiberglass cloth. I would recommend 2 layers
Roll out evenly with laminating roller
Let kick
Tips:
Keep deck shaded from the sun, If it gets hot the glass/core will not have a good initial tack (which makes this very not fun)
Don't put a light just underneath where you are working for the same reason
Keep lots of paper towels and acetone on hand
Clean laminating roller(s) and paint rollers thoroughly
If you need me to clarify any points let me know. It's a lot of steps. I did my best to be clear and concise.
Hope that helps!
NOTES:
I recommend this process only if you have a headliner and not finished gel coat underneath because it would be easier to cosmetically repair the top deck with non-skid than gel coat from underneath.
This is very messy so cover the areas around you well.
Wear a respirator mask. When resin/epoxy kicks in a closed area like a boat cabin the fumes can be pretty bad.
Wear protective eyewear.
MATERIALS: (the first section can be ordered from DynaGrout.com - nice guys, reasonable prices)
fiberglass Matte
fiberglass cloth
Balsa Core
3" laminating roller
Resin or Epoxy (your choice)
Structural thickener (your choice)
--------
Chip brushes
plastic putty knives
small paint roller and small paint roller pan (disposable)
Acetone (only effective way to get this stuff off of you - not the healthiest
so if anyone has a better recommendation I am all ears)
small shop vac
small funnel
hemp rope (cheap rope from Home Depot - thick diameter, not twine)
6 mil. or heavier plastic - clear so you can see
duct tape
resin paper and blue tape (to cover underneath the area you will be working)
PREP:
Cut out fiberglass skin underneath and remove the damaged core. I recommend a router or rotozip to cut the glass. Be sure to only cut the underneath and not go through the top skin.
Sand/fair underneath of top skin.
If you have areas/crevices that you will have trouble getting a large square of balsa to fit, no worries. We'll get to that, just clean out as best you can.
LET'S BEGIN:
NOTE:
If you are working on a large enough area you will do this is stages as you have to work within the working time of the resin/epoxy you are using. Do each stage (labeled by number) at a time. e.g. Stage 1 until done with all sections, then stage 2., and so on.
For those hard to reach, small crevice areas we will address those first. The object is to fill enough of those areas that the remaining square will fit a piece of unbroken balsa.
1. Mix a pot of thickened epoxy/resin to a peanut butter consistency. Not running. Completely static. Push the thickened epoxy/resin into the crevice. If space allows jam a piece of the balsa core in. If there are multiple, then line up the pieces. Once satisfied, let it kick. In the below picture you can see where I had to do this.


2. Measure area for a section of balsa core. Cut to size.
Measure out a piece or two of matte glass. Cut to size.
(Create vacuum bag) Cut a piece of plastic larger than the area. Cut a small hole in the middle of the plastic to insert the funnel, tip down and duct tape it in trying to make it as air tight as possible. Pull a couple of strands of rope through the funnel. Leave enough length such that you will be able to spread the rope out the length of the area. This will make an air gap and allow air to pass.
Here's where you need to move fast: (2 sets of hands is VERY, VERY, VERY helpful)
Mix up pot of resin/epoxy
Wet out area of deck you are working with
Press up matte glass and wet out some more
Roll out evenly with laminating roller
Roll on resin/epoxy with paint roller (a good coat)
Press up core
Press up plastic against core while friend spreads out ropes and then duct tapes perimeter
Have your friend put shop vac hose on funnel and duct tape
Have friend continue to duct tape to seal all leaks which will ultimately cause enough suction to hold up everything, pull the resin through the core, and keep even pressure while everything kicks off
Leave vacuum running for about an hour or until satisfied with how well it kicked
Do not remove anything until hours later. I'd wait until the next day
3. Pull away all duct tape, plastic, etc.
Sand and fair
Fill any gaps with thickened epoxy (peanut butter again)
Let kick
4. Sand and fair
Wet out and lay out fiberglass cloth. I would recommend 2 layers
Roll out evenly with laminating roller
Let kick
Tips:
Keep deck shaded from the sun, If it gets hot the glass/core will not have a good initial tack (which makes this very not fun)
Don't put a light just underneath where you are working for the same reason
Keep lots of paper towels and acetone on hand
Clean laminating roller(s) and paint rollers thoroughly
If you need me to clarify any points let me know. It's a lot of steps. I did my best to be clear and concise.
Hope that helps!

Last edited:
Not to be a broken record, but don't forget to check out the resources at West System, including EpoxyWorks Magazine. Lot's of good detailed write ups on this and similar deck projects. From here,
http://www.epoxyworks.com/indexprojects.html
check this:
http://www.epoxyworks.com/19/Replacing_Core.html
There are many good resins out there. One of the things I like about using the West System products is there has been a tremendous amount of product experience, and a good (IMO) job has been done by Gougeon Brothers to get a lot of information out there covering all sorts of scenarios, e.g. cold weather working conditions. Here are some useful links:
http://www.epoxyworks.com/proj_techniques.html
http://www.westsystem.com/ss/how-to-use/
and I don't have any connection to anything that would get me anything for promoting West System products, just had good results.
http://home.comcast.net/~independence31/core/looksbad.html
Thanks, great explanation! I vacuum bag to clamp wood together when building furniture but I use a complete bag. I wasn't sure of the technique you use on an area that you can not completely surround, but your explanation cleared it up for me. I have gelcoat, not a headliner so I may end up top. I'm still waying my options and really appreciate your advice.
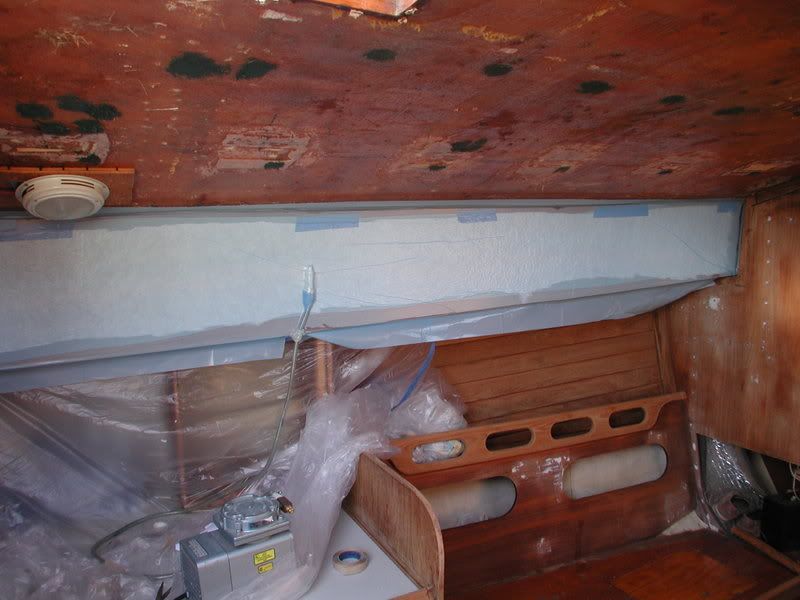
The only thing I would add is to use vacuum bagging tape. It's way
more forgiving than duct tape on uneven surfaces. And for bleeder
fabric, I like synthetic batting like the kind they sell in yardage stores.
Martin
more forgiving than duct tape on uneven surfaces. And for bleeder
fabric, I like synthetic batting like the kind they sell in yardage stores.

Martin
WhiteNoise
Member III
Martin
That pic looks great. What do you mean bleeder fabric/synthetic batting. Would that would be used instead of the plastic in my scenario? I would love to get a real vacuum bagging setup like you have there.
That pic looks great. What do you mean bleeder fabric/synthetic batting. Would that would be used instead of the plastic in my scenario? I would love to get a real vacuum bagging setup like you have there.
The bleeder fabric is under the plastic in my photo. There is also
a layer of plastic under that as well. This batting takes the place
of the rope scenario described above. The main point I was trying
to make is to use the grey bubble gum tape when attempting
to bag stuff like this.
Martin
a layer of plastic under that as well. This batting takes the place
of the rope scenario described above. The main point I was trying
to make is to use the grey bubble gum tape when attempting
to bag stuff like this.
Martin

![1102081517[1].jpg](/ie/data/attachments/4/4075-a4e11d5de36f25c5320751aa8906708d.jpg)
![1102081518b[1].jpg](/ie/data/attachments/4/4076-1069ebf56d05a2494f0acbdb3e0aabe6.jpg)
![1102081518d[1].jpg](/ie/data/attachments/4/4077-3263588e827016b7d0281b4e2e5860fe.jpg)