Leaking Portlight Steps and Damage Assessment

_Ish_

Member I
Hi everyone, thank you in advance for any advice! I'm a first time boat owner and am figuring it all out.

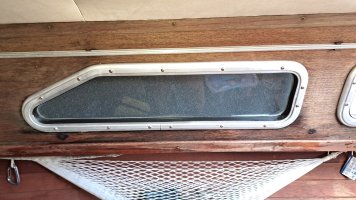
I purchased a 1981 25+ that was left unmaintained (but lived in) for several years. I am getting large puddles in the quarter berth and I have leaking portlights. I am very much hoping that those two things are related since I can't find a water trail that leads to the aft outboard corner where the water is coming down to pool...

Anyways, the portlights need to be addressed and I have read through many threads on doing so but I was hoping someone could list out a step by step process for me. There's tons of great information in the threads but I am coming across things that get mentioned without explanation (filling is one example that comes to mind) and I don't understand where it fits in the process or how to do it. I have the type of frame that screws together which, I have inferred, should be easier to deal with.

The second question I have is: how do I assess the damage that this years-long leak has done? Is it "not great, but could be worse?" for this leak to have lasted this long? Or is it "well 2 years (minus the winters) of water coming in will have pretty much damaged everything in its path?" The wood paneling (probably not the correct term) is rotted beneath the leaks and peeling away in other places. I've seen some folks talk of replacing it or just stripping it all off and painting.

Mold is a pretty big problem as well and the leaks don't help with that. But from the folks I've talked with, a constant battle with mold is just a part of sailing in Alaska.

I have attached a photo and will try to find a few more of the other, worse portlight.
 

Attachments

  • 20240427_184756.jpg
    20240427_184756.jpg
    405.2 KB · Views: 18

Christian Williams

E381 - Los Angeles
Senior Moderator
Blogs Author
Sounds like you have studied up. I'd say first deal with the leaks. That means removing and rebedding the ports, which is not a big challenge. They probably just have old caulk, which when renewed will solve.

Ports can also leak through their gaskets, which hold the lens to the frame. I'd test for that with a hose. Gasket leaks require changing the gasket, a separate procedure from rebedding.

If your lenses are crazed or opaque, some frames allow replacement, some don't.

The damage to the veneer is cosmetic, with many solutions. But cosmetic can always wait.

Related threads:

Replacing Fixed Ports (Windows): https://ericsonyachts.org/ie/threads/replacing-fixed-windows-research-master-thread.9603/
Replacing gaskets on Fixed Ports (Windows): https://ericsonyachts.org/ie/thread...main-large-windows-ports-master-thread.13578/
 

_Ish_

Member I
Ports can also leak through their gaskets, which hold the lens to the frame. I'd test for that with a hose.
Ah, is this what people are doing when they say "the newspaper test"?

Good to know that it isn't a big challenge. Some of the threads I saw looked way over my head in terms of skills. But I think that those were for the frames that don't screw together.

Would it be a good idea to just replace the gasket since I will have the lens off already? Or is it a time consuming project?

Also, if I take the portlight out and find that I cannot get some material up here (it can be hard to get some things shipped to AK) is it possible to put it back in place so I can sail in the meantime? Obviously it wouldn't be watertight, but better that than a big hole.

Thanks for the reply!
 

peaman

Contributing Partner
Your photo shows a port light which is in MUCH better condition than mine was, so that's good. I have recently corrected my issues, so let me try to answer your questions. First, note that, in a port light which matches your picture, I considered, but then decided NOT to replace gaskets. In that unit, there are two "gaskets": the one on the inside can be removed entirely, and is apparently intended to keep dust or whatever from accumulating in the space that it occupies. I arranged mine so the gap is at the top of the port light, but it doesn't much matter. The other gasket is on the outside, and hopefully it is reasonably intact. I tried to source a suitable replacement, but was unsuccessful. I did use some black silicone sealant to fill the gap between the ends of the shrinking rubber, and also at a couple of corners opened by the same shrinkage. Others have found ways to replace the outside gasket, but I was happy to avoid that.

You will need to remove the portlight for a proper fix. Very thin plywood or similar can be taped to the exterior to keep the weather out during repairs. If you have serious damage that affects the evenness of the interior surface, as I did, then you will need to correct that, by any number of means, according to your talents and taste. I chose to scab in some plywood and veneer, which was barely within my skill set, as the end result shows.

Once the interior surface is prepared, it is smart to seal the exposed edge of the interior panelling to prevent future wicking of any possible leaks around the port lights. With the port light removed, the opening left is surrounded by a raw edge of fiberglass on the exterior, and plywood on the interior. Sometimes, there is a gap between the two, sometimes, not. The raw edge of plywood should be sealed with epoxy, with or without filler, and any gap between plywood and fiberglass should be filled as well. This is so that any water that gets past the port light frame will find no hidden paths, and instead will show itself either on the interior panelling, or the exterior house.

Finally, the port light must be re-bedded in the opening. Opinions vary on materials to be used, except in one thing: do NOT use silicone for this. The most common choice for a bedding material is any of several polysulfide or polyurethane caulks like LifeCaulk, LifeSeal, or 4200. My own preference for now for this application, is Dolfinite bedding compound for its lack of fussiness. I hope this helps.
 

gargrag

Member II
I did this job two years ago. I removed all the portlights, bought a seal kit from catalina direct, refinished the portlights, powdercoated them and re install everything with 5200

I can send pictures, and BTW as @peaman said, do not use silicone, the oil from the fiberglass will detach the silicone from the gelcoat, and you will get leaks again, light sand, clean with acetone, and then use marine sealant.
 

_Ish_

Member I
Oh wow, thanks for the rundown. That's exactly what I needed to hear about the process. I'm gonna try to get down to the docks today and inspect/photograph my gaskets. Then I can figure out whether or not to buy the Catalina set that I've seen people talking about. It makes me relieved to hear that other folks haven't necessarily had catastrophic damage resulting from previous owners' neglected leaks.

The pictures of both boats look great.
 

peaman

Contributing Partner
It's worth noting that the hardest part may well be in removing the port lights from the hull without damaging them. The aluminum frames are pretty thin material, and fairly soft. And depending on the adhesive used previously, it can be a struggle to get them out. There are solvents which can be of some use, but they are not a magic cure. Mostly it will take perseverance to get the worst ones out. And that struggle should be considered when deciding what material to use when it comes time to reinstall them.
 

gargrag

Member II
Oh wow, thanks for the rundown. That's exactly what I needed to hear about the process. I'm gonna try to get down to the docks today and inspect/photograph my gaskets. Then I can figure out whether or not to buy the Catalina set that I've seen people talking about. It makes me relieved to hear that other folks haven't necessarily had catastrophic damage resulting from previous owners' neglected leaks.

The pictures of both boats look great.
I removed all the plywood and glued some vinyl flooring. Also the liner was re done
 
Top