Need simple advice from woodworking gurus, please

Frank Langer

1984 Ericson 30+, Nanaimo, BC
I would appreciate your opinion and advice on repair of one of my teak hatchboards. It is one (the bottom one) of three that fit together one on top of the other to form the companionway entry to our boat. This lower piece consists of a centre piece with two small vertical end pieces which are connected to the centre piece by tongue and groove joints to make a single board--all three of the hatchboards are made like this, likely for decoration purposes. The boards are each 7/8" thick.

I accidently caught my foot on it and one of the end pieces broke off of the centre piece. It broke the tongue part of the tongue and groove joint, so that the connection looks more like a simple butt joint now. It is a clean break, so I epoxied it together again--cleaned both sides of the break, put lots of fast cure mixed epoxy on the one side and applied pressure until the epoxy cured. I didn't apply epoxy to both sides, as I didn't want it to ooze out and cure on the face of the board while I was applying pressure and couldn't clean it up, but I think I applied enough on the one side to fill the joint quite well. After 24 hours of drying/hardening, it looks like a good repair, and after having applied varnish it looks as good as before.

My question now is whether this epoxied joint is likely to hold up to normal wear and tear. I will try very hard not to trip over it again, so that's not the issue. But I'm wondering if the epoxy joint as I've described it above is likely to be quite solid and I can proceed normally, or do I need to treat this section with "kid gloves"? I have considered angling a wood screw from the bottom of the centre piece upwards into the end piece to hold the two together, and similarly from the top downwards, but I don't think it would look good, even with teak bungs. I'm also a bit doubtful whether I can drill this straight enough by hand at an angle and hit the centre of the piece without splitting out either side, so would prefer not to have to attempt this.

Any opinions or advice would be very helpful from those who know the strength of epoxy in this kind of wood joint.

Thanks,
Frank
 
Last edited:

Mark F

Contributing Partner
Blogs Author
Hi Frank,

I think you are right about not screwing diagonally top and bottom, you are more likely to split something. I would use 2 or 3 long, course thread, thin shanked screws screwed in from the side and cover with bungs.

If the pieces had not yet been glued I would use biscuits and screws.
 

Frank Langer

1984 Ericson 30+, Nanaimo, BC
Thanks, Mark.

Are you suggesting the screws and bungs because you think they'll be needed to keep the repair intact, or just as added security? The piece that broke off is 2 1/2" wide, so I would likely need to use at least 3/12" long screws from the side. I may be able to drill holes to accommodate that if you think it's necessary, though my woodworking skills are not great. Any other suggestions?

Thanks again!
Frank
 

mherrcat

Contributing Partner
My dad built furniture for years and glued up many multi-panel constructions using butt joints. This is how bookmatched panels are made. Granted, the two mating surfaces should be perfectly squared using a jointer (fancy name for a power plane) but aliphatic hydrocarbon glue (like Tite-Bond woodworking glue) will make the joint as strong or stronger than the surrounding wood. I'm guessing epoxy would probably work as well? The key is to have the two surfaces mate as perfectly as possible.
 

Frank Langer

1984 Ericson 30+, Nanaimo, BC
Mark, thanks for your reply. The break was quite clean and the wood at the joint looked good. Even after adding epoxy to the joint, I could fit the two pieces together and they fit well, so I'm thinking it should be a good bond, as long as the epoxy bonded well to the wood on both sides of the joint, and is strong enough in itself not to break apart.

I'm hoping it will be ok, as there really isn't much pressure on the joint--mainly I guess if one of us lifted and carried it by the edge piece, with the rest of the board exerting downward pressure on the joint. I guess time will tell, and if it does break, I would either have to re-glue it adding screws as was suggested above, or have a new piece made.

Thanks again for your reply.

Frank
 

Keiffer

Member II
Frank,

From what you have described I think your repair will hold up fine. I would not add screws after the fact I don't think it is necessary and you run the risk of weakining what you have already done. If screws were necessary the best time to add them would be when you were gluing up the peice. In most instances the only purpose for mechanical fasteneres in conjunction with a properly done glue joint is to hold the joint until the glue dries.

I have a similar problem when entering and exiting the boat with the bottom drop board in place. Mine however have proven to be very strong and I fear if anything ever breaks it will be my knee banging into the drop board:mad:
 

u079721

Contributing Partner
I too think the repair will probably be about as strong as the original. But I guess I'm surprised that anyone would choose to make drop boards this way, as the construction (if I understand the description) sounds inherently weak to a side blow. Granted you probably will not be taking green water over the stern right into those boards, but if you did they don't sound up to the task. More likely is for someone to fall against them and have them split.

If they were mine I would fasten a nice looking cleat of teak across the back of each board, screwed in all the way across, to strengthen them.
 

Frank Langer

1984 Ericson 30+, Nanaimo, BC
Thanks for these additional replies. Steve, you are right that it makes one wonder why they built these hatchboards that way, as they could have simply made a nice piece of teak as a single board, without the joint at either side and it would have been stronger. They do look nice, maybe not as plain as a single board, but I don't think they are as strong. I will think about whether to add a teak piece to the back to strengthen them--it will make them look a bit "clunkier" and would make them a bit harder to stack on top of each other, but may still be the right thing to do....

We currently only intend to do coastal sailing, usually in winds to about 25 knots and waves to about 4 feet, so are unlikely to get a following wave into the cockpit that could break these boards. The greater risk is in having a crew member lift it by an end piece and having the joint snap due to the weight of the board on the other side of the joint, but hopefully the epoxied joint will be strong enough to withstand that. It sounds from the replies so far that it should be ok.

Thanks again for your replies.

Frank
 
Last edited:

Loren Beach

O34 - Portland, OR
Senior Moderator
Blogs Author
One small bit of trivia...
I have always understood that the reason that the solid wood boards did not just go all the way across was that they can "cup" and the the mortised end piece resists this force.
Lots of boat builders do this same bit of hatch board design. (That, and it looks cool, as well).

For real strength, you want the grain to go all the way to the ends.
Interestingly enough, that's the way they are on the Olson.
And, sure enough...
there is some very slight cupping in several of them -- not even noticeable except that the varnish wears off unevenly on the inside of several of the ends.

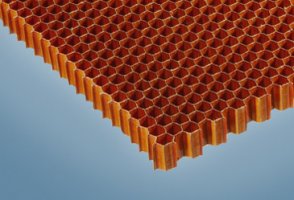
I replaced them all many years ago with a one-piece board made of honeycomb, which is light and easier to store by far. Those varnished heavy teak boards are pretty and the next owner can have them. :rolleyes:

Loren
 

Mark F

Contributing Partner
Blogs Author
Hi Frank,

Added security.

Keiffer is right about the best time to use screws would have been when you were gluing everything.

You are probably fine with the epoxy joint but if it were me I would add 2 or 3 4" - 5" long screws just for peace of mind.
 

tenders

Innocent Bystander
> I replaced them all many years ago with a one-piece board made of honeycomb, which is light and easier to store by far.

Loren, could you elaborate on this? The same kind of honeycomb used as core material (Hexcel)?

I didn't even realize it was a solid material. Is it sufficiently strong and UV-resistant for this purpose?

Signed,

The guy who replaced his elderly wood hatchboards with Starboard and boy are they heavy
 

mherrcat

Contributing Partner
...one wonder why they built these hatchboards that way, as they could have simply made a nice piece of teak as a single board...

My hatch boards are all one-piece. I think there is some very slight, almost imperceptible cupping on one.

They are heavy, as Loren points out, but they do look nice with eight coats of varnish on them!

If you do have new ones made at some time be sure to use the old ones as templates; the hatch opening is not symmetrical as I discovered when I made a temporary panel so I could remove the original boards for varnishing.
 

tenders

Innocent Bystander
If you do have new ones made at some time be sure to use the old ones as templates; the hatch opening is not symmetrical as I discovered when I made a temporary panel so I could remove the original boards for varnishing.

Yeah, that was surprise #2308 when I rebuilt mine too! The angles of the cabin entry are mismatched by several degrees--more than enough to make a symmetrically-angled hatchboard either bind in the track before it bottoms, or fall right out afterwards.

Martin probably has a clever jig to take all the guesswork out of making these right the first time but it took me two duds, one round of shock and awe, and several pounds of wasted material to get it right.
 

mherrcat

Contributing Partner
I never realized that the hatch opening is not on the center line of the boat (hence the asymmetrical shape) until I made the temporary panel. I just measured the width of the top, the width of the bottom and the height at the center...d'oh!
 

Loren Beach

O34 - Portland, OR
Senior Moderator
Blogs Author
> I replaced them all many years ago with a one-piece board made of honeycomb, which is light and easier to store by far.

Loren, could you elaborate on this? The same kind of honeycomb used as core material (Hexcel)?

I didn't even realize it was a solid material. Is it sufficiently strong and UV-resistant for this purpose?
Signed,
The guy who replaced his elderly wood hatchboards with Starboard and boy are they heavy

Actually, the "honeycomb" is a coring material, like balsa only lighter. I was lucky years ago and bought scrap pieces of paneling from the former Boeing Surplus store up near Seattle. They use this stuff with a thin skin of glass on each side for panels for the interiors of new airliners.
You can buy the raw honeycomb or other light coring from a few vendors by mail, and sometimes from your local boatyard. I have used the raw coring to lay up a panel with a couple of sheets of glass and some epoxy, but was able to build my one-piece hatch board out a complete panel. Since this is a potentially high load/impact use I did add an extra layer of 9 oz on each side.

Here is a url with examples, and I always used the nomex stuff.
http://www.plascore.com/product-honeycomb-cores.htm
Loren
 

Attachments

  • cores-aramid-fiber.jpg
    cores-aramid-fiber.jpg
    62.9 KB · Views: 49
Last edited:

Martin King

Sustaining Member
Blogs Author
Thanks for these additional replies. Steve, you are right that it makes one wonder why they built these hatchboards that way, as they could have simply made a nice piece of teak as a single board, without the joint at either side and it would have been stronger. They do look nice, maybe not as plain as a single board, but I don't think they are as strong. I will think about whether to add a teak piece to the back to strengthen them--it will make them look a bit "clunkier" and would make them a bit harder to stack on top of each other, but may still be the right thing to do..

Actually, they are plenty strong. Your boards were built with what is known
as breadboard ends. This type of joint is typically used on the ends of wide
solid panels, like tables for example. In this application, it not only aids in
keeping the table flat, but allows for seasonal movement. In your case,
it does help keep the board from cupping, but moreover minimizes end
grain exposure and helps to dress it up a bit. If it were mine, I would
have grooved both pieces to take a spline, but no matter, your epoxied
butt joint should be adequate-just try not to kick it.:)
 

Greg Ross

Not the newest member
Adhesive

Frank,
A couple of things came to mind as I was reading this;
First off I dislike the quick setting epoxy (5 minute, etc.) to my mind it sets up too quickly and doesn't have the dwell time to really soak into every crevice.
Whenever I tackle a repair proposition I start by trial fitting to make sure there are no splinters that have dislodged from the force of the break and aren't going to go back into place. Bit of trimming possibly with a razor blade or Xacto knife.
Next is to set up a curing fixture, and it obviously has to be organized to grab/ clamp/ wedge the bits into place. This allows for cleanup so you can be liberal with the adhesive.
Probably the most adapatable is the twisted rope clamp where you use a batten to twist the rope to the desired tension. A companionway board being tapered on both ends would require some extra lashing to work.
My 2 cents worth!
 

Walter Pearson

Member III
Back in the days when I actually worked, I had access to tensile testers and many types of adhesives which I 'borrowed' at times to do boat projects. It is generally true that those fast-curing epoxies were the weakest. Sometimes you have to differentiate that weakness and determine whether it's the bond that is weak or whether it's the internal strength of the cured material. Many times the strongest adhesive was of the Gorilla Glue variety - a moisture-curing polyurethane. The issue with them is the expansion during cure and the need to mask off areas. Sometimes the teak itself provides problems in bonding due to the inherent chemical nature of the wood. In recent years, I use Smith's Penetrating Epoxy as a primer and then apply the bonding epoxy before the Smith's is completely cured.

Another fastening method that can be used before and after the fact is pocket screws. Maybe a little bit more involved as far as woodworking skills, but it would not require those long fasteners and the pocket to cover would be on the interior.

Walter Pearson
 
Top