• Untitled Document

    Join us on April 26th, 7pm EST

    for the CBEC Virtual Meeting

    All EYO members and followers are welcome to join the fun and get to know the guest speaker!

    See the link below for login credentials and join us!

    April Meeting Info

    (dismiss this notice by hitting 'X', upper right)

New Teak Veneer

treilley

Sustaining Partner
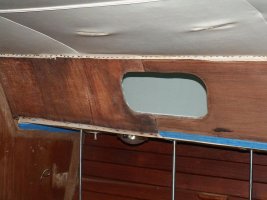
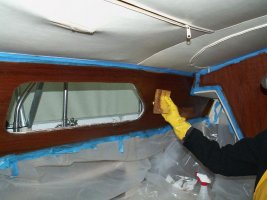
I am replacing all my fixed and opening portlights and will be installing new veneer along the cabinside areas. I have used contact cement to adhere cherry veneer for my kitchen cabinets but I am unsure what is the best method and adhesive for a marine environment. I am also planning to apply over top of the old veneer as it will be very difficult to remove from the plywood. Any tips or advice is greatly appreciated.

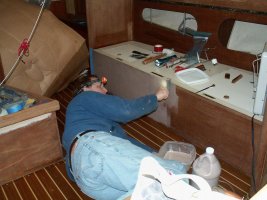
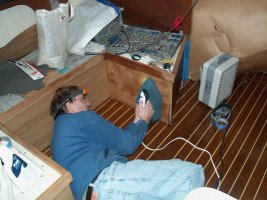
I thought about vacuum bagging but I cannot see how I could do this without removing a lot of the headliner which I really do not want to get into.
 

Chris Miller

Sustaining Member
Hey Tim,

Rockler has veneer with 3m's Pressure Sensitive Adhesive on it. I've used it for a couple of projects (non-boat) and the PSA is easy to work with and sticks well. They even have it in Teak.

Just a thought (although let me know how it goes, I got the go ahead from the admiral to spend the cash on replacing all the opening portlights and I'm thinking new veneer might be a nice look).

Chris
 

spencer

Member II
Tim I have used the West System epoxies on a new floor I put in a few years ago, plus some other projects and the stuff is fantastic. Right now I am in the middle of repairing the propane locker hatches in the cockpit of my E-38 with it.I looked thru the info I got from them and there is something about teak veneers in it although on horizontal surfaces. Give them a call they may have info on vertical surface installations also. My info is a few years old but here goes: Gougeon Brothers, Inc po box 908 Bay City , MI 48707-0908 tel 989 684 7286 or www.westsystem.com . There are also adheisives used for installing prefinished wood floors that work well. When putting the new prefinished cherry floor in my boat I use a combination of both . Unfortunately I can't remember the brand name. I had gotten it and the brazilian cherry from a friend of mine who is a commercial floor installer. Good luck
 

Martin King

Sustaining Member
Blogs Author
Tim,
If it was at all possible, I would try to save what you have. Sand,
bleach, stain...whatever works. If it's just too far gone to save, and you don't
want to pull down any headliner, then contact cement would be your
next best approach. That's a fairly big workpiece and going to be tough
to lay up perfectly but I think it's doable with help. 'Course as you already
know a v-bag and epoxy would be my first choice.

Martin
 

treilley

Sustaining Partner
Thanks for the tip Martin. I have found that most of the veneer is coming off from under the opening portlights and even some of the plywood base. I was able to remove all the veneer from the seam forward which is at the rear most opening portlight. The strange thing is that the veneer forward of that seam is raised by the thickness of the veneer itself so removing it made the underlying plywood even with the rest of the veneer going aft which is still in good shape but I will cover for uniformity.

I have attached photos. The first is of the seam. As you can see, we have removed most all the trim from the cabin. Ericson used a tremendous amount of teak in these boats. I most have over a hundred pieces in my basement.

The Second photo is of the gunk that is coming up from the teak. We are using Captain John's teak cleaner which works better than any other I have ever used and it is fairly safe.

One disappointing note was that after all this they used plain steel staples for the headliner. Why not the few extra dollars for SS?
 

Attachments

  • veneer.jpg
    veneer.jpg
    64.5 KB · Views: 108
  • cleaner.jpg
    cleaner.jpg
    65.9 KB · Views: 107
Last edited:

Martin King

Sustaining Member
Blogs Author
Why not the few extra dollars for SS?

I believe the headliners were subcontracted out. Being a production
boat and trying to squeeze out profit wherever possible...well
plain old steel is cheaper than monel or stainless. Especially in larger
quantities.

Are you planning to veneer up to the staple lines? If so are you reusing
the original trim or going with something else?

Martin
 

treilley

Sustaining Partner
I am planning on applying the veneer right up to the headliner. I will also restaple with either SS or Monel. I will then reinstall the original trim that has been stripped, bleached and sanded. I plan on applying 3 coats of Varathane Premium semi gloss oil based Urethane. I have applied two coats to a test piece of teak and am very happy with the results. It has a beautiful golden color and is very scratch resistant. It is also fairly easy to apply. I used a cheap foam brush and it leveled out nicely with no bubbles although the foam seems to put it on thick and needs a lot of brushing to spread it out. Next I will test with a good badger hair brush.
 

Martin King

Sustaining Member
Blogs Author
Tim,
If you are going to pull the staples out on the headliner, then you should
have access to the glass. If you can access the glass around the
perimeter of your workpiece, then you can vacuum bag the veneer.

Martin
 

treilley

Sustaining Partner
Thanks Martin. I did think about that but the veneer is applied in continuous sheets right through all the bulheads and butts up against more veneer fore and aft. There is no tabbing where the veneer goes through teh bulheads so it would be difficult to vacuum bag the fore and aft ends. So I will leave the existing staples in the headliner to avoid losing the nice snug fit it has now and restapling all the way around.
 

treilley

Sustaining Partner
Update

After lots of research I found a new product called Heat Lock. It is a heat activated adhesive. You apply 2 coats of glue to the back of the veneer and the substrate and let dry. Once dry you can line up your veneer without it sticking to the substrate. Now you apply heat/steam/pressure with an iron and it causes the glue to liquify and bond immediately. I test glued a piece of wood backed veneer onto some luan and then let cure(about 3 hours). I then let it soak in the tub for a day. I tried to pull the veneer off the luan and I could not. In fact the adhesive in the wood backed veneer gave before my glue bond did.

So now I am prepping the existing panels and gluing the veneer. It is going great. Here are some photos. The glue rolls on very nicely and dries in about 45 minutes with a little help from a space heater.
 

Attachments

  • rolling.jpg
    rolling.jpg
    77.8 KB · Views: 109
  • ironing.jpg
    ironing.jpg
    91.8 KB · Views: 76
  • veneer.jpg
    veneer.jpg
    87.6 KB · Views: 81
Last edited:

footrope

Contributing Partner
Blogs Author
Nice work

Tim,

It's looking good, Tim. Your plywood base appears to be nearly perfect. Keeping up the interior woodwork is worthwhile on these boats, because that really adds to the ambiance while below. Visitors really notice a boat's interior, boaters and non-boaters alike. Can't hurt resale value either.

I am doing my port refurb one at a time. My 1/4 inch (5 mm?) plywood is crumbling under the all the ports and de-laminating and warped in other places, so I'm replacing the veneer plywood with new. All 6 of the opening ports throughout the forward half of the boat leaked for years.

I have decided to staple above and below the plywood, rather than into it. I am using epoxy to glue strips above and below. A future project will be to replace the headliner and insulate the cabin ceiling. I may do a short project posting once I have enough pictures and have learned my lessons. I'm just about ready to stick the third one back in and this one has gone very smoothly.
 

Attachments

  • AftStbdPortDetail01.jpg
    AftStbdPortDetail01.jpg
    130.1 KB · Views: 175
Top