off season charging batteries onboard with a solar panel

hdlEric

Member III
No experience with the Harbor Freight solar stuff, but it wouldn't be my first choice. Just found:

HFT Thunderbolt 100W solar panel: $99.99
HFT Thunderbolt 30A charge controller $76.99

VS

Renogy 100W Solar panel: $84.99
Renogy Rover 30A MPPT controller: $120.99

Renogy is quality stuff. I used Renogy panels and Victron controllers, but I see Victron's prices have gone up a lot since I bought mine.

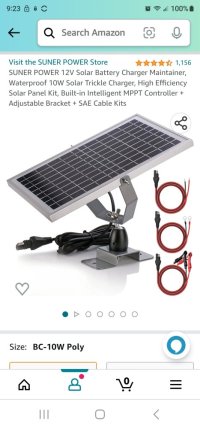
View attachment 46100
View attachment 46099
Thanks for the info! I guess I better have an electrician take a look at things
As mentioned previously, Slick470's diagram is what you want to do, except you have a solar charger rather than an AC charger (plugs into the solar panel rather than the wall plug).

I assume you bought the...
The solar panel has an output plug that plugs directly into the charge regulator "solar" plug pigtail. That should be easy unless you need to extend the wire - if you do, make SURE you don't inadvertently reverse the polarity (don't cross the streams).

You will need to source a compatible plug for the battery and run a pair of wires from the solar charger plug to your batteries, putting a fuse (10A should be good) close to the batteries. In Slick470's diagram, this would be the alligator clips (you can use alligator clips if you want a temporary connection - still fuse it!). Make sure the + (red) side of the battery output plug goes to the + post on the battery!

Safely terminate the "Load" outputs so they don't short to each other or to anything else (heat shrink is good). Alternatively, you could connect the "load" output to e.g. a lighter plug. It isn't obvious whether the "load" output is powered by the battery when the solar isn't charging (probably). If it is powered by the battery, make sure you don't connect a load that could discharge the battery if it doesn't get enough sun.

This isn't a fancy multistage charge controller but it should keep your batteries topped off without boiling them.
HI Jerry,
Thanks so much for the step by step, and yes; those are the. parts I bought!! I know I am being cheap, but I may have to sell the boat :( :(, and I have other more expensive mandatory repairs. Thanks again.
 

Kenneth K

1985 32-3, Puget Sound
Blogs Author
A piece of 14AWG wire had come loose and its end had contacted the engine block so it that shorted, and it had melted its way through a 2AWG cable to the engine which sent power into the starter.

When working in my battery box, I errantly let the
neg. battery cable touch the positive battery post. The spark instantly removed about a 1/8" chunk of stainless steel from the threaded post. I couldn't have done that so quickly with an angle grinder.

I think folks should be aware that on most of these Ericsons, any time the battery switch is on, there are at least two hot posts on the engine: one on the starter lug, and one on the alternator output post. Drop a wrench while you're working on the port side of the engine, and you might get some sparks.
 

bigd14

Contributing Partner
Blogs Author
one on the alternator output post
One can install an alternator disconnect switch to address this issue as per Maine Sail’s great advice. You are working blind in that area on the 30+. I mounted a small Blue Seas switch on the angled section of the port engine stringer.

I should note that the alternator is connected to a common bus with the battery charger so it is live all the time, necessitating the switch.

FE9A2C0E-FAC6-4B7F-85D1-20B634B0B8F9.jpeg
 

Jerry VB

E32-3 / M-25XP
Hi Eric,

I don't think an electrician is necessary. It is pretty close to plug-n-play.

You probably will want a "SAE to SAE extension cable" (ref: amazon - available in various lengths) to go from the solar panel to the inside of your boat. I would mount the charge controller close to (or in) the battery box. The red (+) side of the connector should match with the red side of solar panel and charger - I don't believe you will need the "polarity reversal connector" that comes with the above linked extension. Just verify that when you get it.

For the battery connection, you want a pigtail where the "exposed" (male) side is connected to the red wire (ref: amazon). Crimp a lug on the black (negative) side and connect it to your battery negative terminal. Crimp an in-line fuse (ref: amazon) to the red (positive) side, crimp a lug on the other end of the fuse wire, and connect it to your battery positive terminal. Note that it looks like you need to supply your own fuse (10A should be sufficient, 20A max).

Pretty straight-forward.

This charges the battery directly so your A-B switch would be turned off unless there is a reason to power something on the boat.
 

Slick470

Member III
I have one of those thunderbolt charge controllers. If I recall they come with a couple different battery connection options and quick connect style connections for the solar panel. For quick and dirty, you can use the alligator clips, but as mentioned before it's better to wire it in and add a fuse.

The thunderbolt is a PWM style controller so it will shunt off once the solar panel voltage exceeds a specific threshold. Not ideal if you are trying to get the most out of a solar panel, but to keep things topped off while the boat is in storage, it's perfectly fine. I used one of their solar charge controllers and a 15W panel to keep things topped off over the winter until I upgraded a bit a couple years later. My old Harbor Freight stuff still works fine and I will occasionally use it to keep my truck battery topped off if I'm not using it much.
 

gareth harris

Sustaining Member
Thanks for the info! I guess I better have an electrician take a look at things
Your Harbour Freight system should be adequate for keeping the battery topped off as you require, the advice I gave above is more for a set up to go for prolonged sailing or time at anchor.

If you are still in doubt as to how to make the connections then post a photograph of your battery and regulator wires which might make it easier to explain the set up - an electrician would be expensive and should not be necessary.

Gareth
Freyja E35 #241 1972
 

gareth harris

Sustaining Member
When working in my battery box, I errantly let the
neg. battery cable touch the positive battery post. The spark instantly removed about a 1/8" chunk of stainless steel from the threaded post. I couldn't have done that so quickly with an angle grinder.
If I install an electric motor then the 48V DC system would need very careful insulation. I have heard that electric cars use 800V DC systems which mechanics who have forged their skills on combustion engines can be reluctant to touch.

Gareth
Freyja E35 #241 1972
 

hdlEric

Member III
Hi Eric,

I don't think an electrician is necessary. It is pretty close to plug-n-play.

You probably will want a "SAE to SAE extension cable" (ref: amazon - available in various lengths) to go from the solar panel to the inside of your boat. I would mount the charge controller close to (or in) the battery box. The red (+) side of the connector should match with the red side of solar panel and charger - I don't believe you will need the "polarity reversal connector" that comes with the above linked extension. Just verify that when you get it.

For the battery connection, you want a pigtail where the "exposed" (male) side is connected to the red wire (ref: amazon). Crimp a lug on the black (negative) side and connect it to your battery negative terminal. Crimp an in-line fuse (ref: amazon) to the red (positive) side, crimp a lug on the other end of the fuse wire, and connect it to your battery positive terminal. Note that it looks like you need to supply your own fuse (10A should be sufficient, 20A max).

Pretty straight-forward.

This charges the battery directly so your A-B switch would be turned off unless there is a reason to power something on the boat.
Thanks very much Jerry VB. I should be able to follow this procedure
Your Harbour Freight system should be adequate for keeping the battery topped off as you require, the advice I gave above is more for a set up to go for prolonged sailing or time at anchor.

If you are still in doubt as to how to make the connections then post a photograph of your battery and regulator wires which might make it easier to explain the set up - an electrician would be expensive and should not be necessary.

Gareth
Freyja E35 #241 1972
Thanks for the info Gareth!!
 

Kenneth K

1985 32-3, Puget Sound
Blogs Author
For what it's worth, from my recent readings about fusing, ABYC has an exception for the starter circuit. Seems a simple enough matter, but it can get complicated in application. I will have both banks fused on my boat when I launch next month.
Right. Leaving the start circuit unfused only works for systems that are wired to have a "true" (isolated) start battery. In most Ericsons, the starter cable comes off the common post of the main battery switch. So, regardless of what you label as "House," "Start," "#1," or "#2," you can always only power BOTH the starter cable and the DC panel at the same time (or power neither). The battery switch just lets you decide which which battery bank does the powering. So, unless you've rewired your battery setup, you're left with the decision to fuse ALL battery circuits or NO battery circuits.

Sorry to hijack your post Eric.
 

RKlemm

Junior Member
I want to leave my batteries on the boat during Winter, and charge them with a solar panel. I am unsure of how to make the connections, and what position the battery switch should be in. The batteries are wired in parallel. Thanks for your time
Eric,

I bought a solar panel with a trickle charger built in on Amazon for about $60. I mount it to the rear rail and run it all winter. You might need a reverse pole adapter. I bought one just in case. My batteries remain 100% all season and they stay in the boat.
 

Attachments

  • Screenshot_20230304_092353_Amazon Shopping.jpg
    Screenshot_20230304_092353_Amazon Shopping.jpg
    79.2 KB · Views: 5
Top