Rehabilitation of interior house panels in E32-3

peaman

Sustaining Member
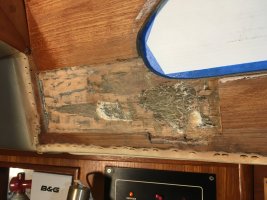
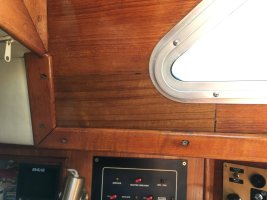
Previous owner neglected leaks at all of the port lights for a long time. I fixed the active leaks two years ago and I am now getting around to addressing the remediation and refinishing of the teak panels. I know that some here have chosen to paint the panels, which is fine, but I really like the appearance of well kept varnished teak.

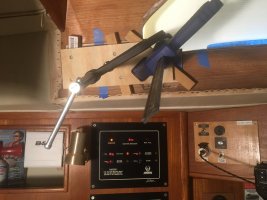
I have removed each of the port lights, as well as the teak trim pieces at the top and bottom of the panels, and I have sanded much of the panel to remove old varnish and stains caused by water intrusion. I am optimistic that I will be able to achieve a nice appearance in the panels with a few coats of varnish. That is, except for one area.

The most neglected part of the panels is at the aft corner of the port port light, where serious rot was allowed to flourish. I have removed all of the softest wood to reveal part of the fiberglass interior surface of the house. In the image below, some layers of the plywood have maintained integrity. The thickness of the wood panel is 3/8” including the surface veneer.
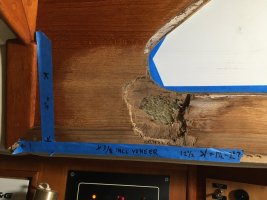
IMG_3749.JPG

I expect soon to receive a couple of packages of a few square feet of teak veneer. I had thought I might be able to replace the rotted wood with filled epoxy or Bondo or whatever, and then to cover with teak veneer. But given the extent of the injury, I think maybe I should remove more solid wood and replace with a suitably shaped piece of new panel with integral veneer.

I’ve been dreading this piece of work, as fine finish work has never been part of my skill set, so I hope someone or some several here can help me figure out the best way to reasonably return my teak panels to a presentable condition. New veneer is an option I have considered, but if there is a way to reasonably repair the rotted area while preserving the remaining original teak with its handsome figure, that is what I would prefer.
 

Christian Williams

E381 - Los Angeles
Senior Moderator
Blogs Author
I have used Rockler sticky-back veneer to turn small pieces of plywood into teak, and it looks great. Whether it matches the existing, well, probably not perfectly.

Yes, you could make a straight cut of the entire after portion, including a few inches of the portlight area. Remove wood down to the glass. Construct veneer with backing to match the depth, Glue it in . Labor of love. Depth of piece a challenge. Wouldn't match. Might look neat, at least.

You could trim the rotted area into a square, for neatness, then layer epoxy in to match the depth. C-clamps could maintain smooth surface, since the portlight is removed. Epoxy thickened with 205 filleting Blend is conveniently teak-colored (it's essentially sawdust). The repair would always look like a repair.

Do you have curtains? Ericson-style curtains sometimes hide a good deal of the cabin house wall.

I had similar issues on the 32-3, tried several solutions that didn't work, and just faired the surface smooth followed by Brightside Hatteras Off-White.

Interlux Hatteras Off-White Cabin house interior GOPR0622.JPG


Prairie Schooner

Jeff & Donna, E35-3 purchased 7/21
The words of a friend come to mind, "If you can't fix it, feature it."
If you're going to put in a patch, I don't think there's any way to completely hide it. I'd be thinking about how to shape the patch in a way that it makes sense with the other geometry in the panels.
It might be worth scarfing the joints between old and new. A straight butt joint will show a more visible gap.
 

Alan Gomes

Sustaining Partner
We recently replaced my cabin sides with Formica. I’ll post pics when I get a chance. Looks terrific, but it was a big job and Formica is not easy to work with, especially applying it vertically.
 

Vtonian

E38 - Vashon
Timely, this is on my list too. Sticky-pic teak and curtains sound like a great way to go sailing.
 

Loren Beach

O34 - Portland, OR
Senior Moderator
Blogs Author
Trivia note about applying Formica. I applied a lot of it vertically, when finishing out our forepeak ceilings. Also our new galley countertop.
I have had good luck using epoxy, combed out thin.The new laminate can be moved around a bit to your satisfaction after laying it on/down,
If you use any sort of instant-adhesive, you only have One chance to get it perfect. One.
 

PANorth

Member II
We replaced the rotten teak veneer with Formica also. It looks good and brightens the cabin. The only problem we have had with that is re-attaching the trim. And there is no longer wood to which to attach the head liner. I'm not good with wood, so still trying to solve that problem.
 

Loren Beach

O34 - Portland, OR
Senior Moderator
Blogs Author
And there is no longer wood to which to attach the head liner.
You might try an air-driven stapler. On our model the head interior bulkhead faces are Formica rather than teak veneer like the rest of the boat. They finished off the headliner with a vinyl cover strip, and this was all driven with larger-diameter staples. I had to access one side of the cabin top interior when replacing and moving the housetop winches -- those staples were a bear to extract. They were driven right thru the plastic surface a little ways into the plywood underneath.
 
Last edited:

Martin King

Sustaining Member
Blogs Author
However you attempt to cut a patch, you are going to see it. Even if the joinery is perfect, the grain mismatch alone will reveal it. Your next best option would be attempting to re -veneer the entire panel after patching the rotten wood. If it were my boat, I'd rip off the entire panel down to the glass and start over from scratch, but having done this myself, I can report it's a lot of work.
 

peaman

Sustaining Member
Update from my earlier post, I managed to patch the damaged area to my satisfaction, as shown below:
IMG_3750.JPG
I removed the rotten veneer and underlying plywood for a defined area and cut a filler piece of plywood to match the area.

IMG_3767.JPG
The filler plywood was epoxied into place. Once cured, the teak veneer was epoxied over the new plywood.
IMG_3948.JPG
The finished patch is clearly visible, but it looks pretty good to me. The Admiral figures there is no need to replace the teak plugs to cover the fasteners in the trim, and I agree.
 

David Vaughn

Member II
Blogs Author
….The Admiral figures there is no need to replace the teak plugs to cover the fasteners in the trim, and I agree.
We made that same choice on a couple of places we repaired on Kotona.
In the photo, looks like those are stainless fasteners. We found some silicon bronze screws that blend in very nicely with the teak. Made it look kinda like we meant to do it that way.
 

peaman

Sustaining Member
Thanks!

I don't have much experience with PVC. Lowes says of Azek "Paintable with 100% Latex paint", so I think Brightside polyurethane might be a problem. Or not? And then there is the question of adhesive. PVC is pretty slippery stuff, so I would be looking for something that works specifically with PVC for paint and adhesive.
 
Top