• Untitled Document

    Join us on April 26th, 7pm EST

    for the CBEC Virtual Meeting

    All EYO members and followers are welcome to join the fun and get to know the guest speaker!

    See the link below for login credentials and join us!

    April Meeting Info

    (dismiss this notice by hitting 'X', upper right)

Removing the forestay with roller furling.

p.gazibara

Member III
You can definitely drop the furler and forestay with your halyard and a extra pair of hands. I did that on a sketchy dock in Tonga at high tide. Tied Cinderella alongside, went up the rig tied the forestay to a spare halyard and pulled the pin. Eased her down with an extra set of hands walking the forestay onto the pier. On the ground I cut the old rod forestay, ran the new wire we bought in Tahiti, cut to length and added 2x Hayn Hi-Mod fittings. Reversed the process and had the new stay in place before the tide went out.
I have helped someone do it on anchor here in NZ as well with 3x dinghies to get the furler/forestay assembly to shore for disassembly/rebuild.
Fatty Goodlander talks about dropping rigs using bridges, tie alongside, use block and tackle to lift it out, drop onto the boat and go to town.
Easier yet if you can find a big schooner/ketch willing to use their mainmast as a crane. I met a Belgian guy in Tahiti that sailed a 20’er across the Atlantic. He was too scared to go up the rig as the boat would probably capsize, he mentioned rafting up to two yachts (one on either side) and useing their halyards to pull the rig on his 20’er.
We had to use the raft to another boat method last time we pulled our rig, as the marina’s crane was broken and they weren’t expecting the parts to arrive to fix it for 3 months.
Boatyard crane is the easiest and least anxiety-producing method though.
-P
 

Kenneth K

1985 32-3, Puget Sound
Blogs Author
Can anyone tell me if there is any way to raise the Harken roller drum an inch or two without major surgery?
Yes, but the "how" depends on the type of furler you have.

If it's a Harken Mk I, the furler body itself (which is what the drum attaches to) IS the forestay turnbuckle. As you loosen the turnbuckle (furler body) the drum will move further "up" the lower screw (see pics in post #50) which will raise the drum (as you want) but will also slacken the head stay, which would then need to be shortened. Also, there needs to be a minimum of 2" thread engagement on the turnbuckle threads, so you wouldn't be able to raise the drum much this way.

A better way, with the Mark I, would be:
1. release back stay tension
2. remove the pin that attaches the furler/head stay to the chainplate
3. loosen the top and bottom locking nuts on the furler and rotate the drum to shorten the forestay as short as it will go. See if this raises the drum sufficiently. If not, your head stay cable will have to be shortened.
4. With the turnbuckle/forestay shortened, the drum will be raised. Find a longer shackle, tangs, rigging extenders, etc to bridge the gap to the chainplate.

If you raise the drum too high, it might affect the ability to pull the jib luff tight.
 
Last edited:

Kenneth K

1985 32-3, Puget Sound
Blogs Author
..... tied the forestay to a spare halyard and pulled the pin. Eased her down with an extra set of hands walking the forestay onto the pier.

Yeah, this is been a good learning experience for me. I've been up the mast three times so far. I've done everything solo except lowering the furler which I did just as you described.

[/QUOTE].... added 2x Hayn Hi-Mod fittings [/QUOTE]

I'll have to use Hi-Mod fittings as well. The upper fitting will have a swage eye, as was the original. But I need to slide the cable back through the further foil without a lower fitting or it won't fit. I'll have to install a Hi-Mod threaded stud on the lower end after I feed the cable through.

[/QUOTE] I have helped someone do it on anchor here in NZ as well with 3x dinghies to get the furler/forestay assembly to shore....
[/QUOTE]

Now that would be a sight! Where there's a will there's a way.
 

Kenneth K

1985 32-3, Puget Sound
Blogs Author
While there may be some people on this site I would choose to argue with just for the sport of it, Guy Stevens wouldn't likely be one of them. So, when Guy posted (see #35) that the Harken Mk I is a "twice recalled furler," I asked:
@Guy Stevens
But what's a casual owner to do at this point? It's been working fine for me. Once the head stay has been replaced, it doesn't seem worth preemptively replacing a furler that's still working and will likely continue to do so. No?
My best attempt to answer this question, to date, has been to, "tear this thing apart and see what it's really made of." Here's what I've found so far (I'll just delve into the roll pin issue here and address the lower turnbuckle bolt in a later post). This is all just my $.02:

In regards to the roll pins falling out, leaving the sail "unfurlable:" The loss of a single roll pin, absent one or two other failures, cannot likely cause this to happen. This is because the aluminum connectors that mate the foil sections are spade-shaped and not round.
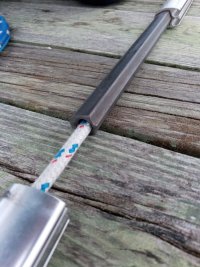
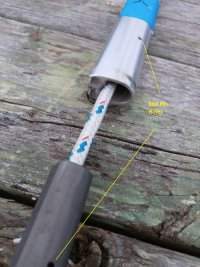
20220218_173232.jpg 20220218_173216.jpg

Each connector takes two roll pins--one for each of the foil sections it joins together. If a SINGLE pin falls out, the spade shape ensures that the two adjacent foils still rotate together (while gravity holds one resting firmly atop the other) unless at least TWO OTHER possible failures occur. Those being;

(A) the loss of the second roll pin on that SAME connector AND the failure of the Loctite applied (between the foils and connector) during installation. If ALL THREE of these occur, then the connector can become loose inside the foil and slide down below the seam between the adjacent foil sections. Then, when the lower portion of the foil rotates during furling, the upper "disconnected" foil half does not rotate, but is free to streamline, along with the sail, wherever the wind pulls it.

Or, (B) an installation error allowing more than 3.5" of clearance at the top of the foil AND failure of the Loctite on the SAME section that lost its roll pin (Harken specifies 1.5” clearance above the furler foil). In this case, the interior connector becomes loose from only one of the two foil sections it spans. Gravity still holds the two foil sections together (and the spade shaped connector still causes them to rotate together) UNTIL a sail is hoisted up the foil's sail track. If more than 3.5" of clearance exists at the top of the foil, the process of hoisting a sail could lift the "loose" upper foil section off of the connector (connectors are 7" long). If this happens, the upper half of the foil becomes "disconnected" from the lower half, leaving it free to rotate (or not) with the same result as in (A).

None of this is meant to doubt that these multiple, linked failures didn't actually happen, as Guy says, and with enough regularity to actually force Harken to recall the foil. On the contrary, my hunch is that these failures were most likely caused specifically BY the installation process.

First, Loctite was probably a poor choice for this application. Loctite's own tech data sheet (https://dm.henkel-dam.com/is/conten...-Red-271-Carded-Tube-0.20-fl-oz-2018-04-09pdf) says:

- "The product cures anaerobically, when there is an absence of air between close fitting metal surfaces"
- "Cure Time: 24 hours--dependent on temperature, and type of metal being bonded"
- "A primer is needed if two inactive metals are used"

I don't know that connectors-and-foils pass the "close fitting" test (versus, say, nuts-and-bolts). Here, one part was meant to easily slide inside the other without interference. Second, if many riggers/installers considered a furler installation to be a half-day job, then it makes you wonder if all parts were thoroughly cleaned, primed and fully cured before installation. Finally, if the furler was allowed to bend excessively while being hoisted, that likely caused the single highest stress ever placed on the roll pins.

A roll pin coming loose shortly after initial installation seems possibly a much higher likelihood than that of one falling out 30+ years later (especially considering the corrosive bonding that occurs between stainless (the pins) and aluminum (the foil) over time--though the Loctite may have limited this effect somewhat.

Ultimately, everyone who still uses an old Mark I has to make his/her own decision about its adequacy for continued use. For me, it does seem pretty safe to say that if your roll pins haven't fallen out by now, I wouldn't lose a lot of sleep over them. That said, after having removed several of my roll pins during this disassembly, I have to make a separate decision about the risks of RE-INSTALLING them. I'm currently exploring the option of tapping the old roll-pin holes to a 6-32 thread and installing 3/4" long #6 set screws in place of the pins.
 
Last edited:

Kenneth K

1985 32-3, Puget Sound
Blogs Author
Foiled again.....

So I tried the idea of replacing the problematic Harken roll pins with threaded set screws.

The initial progress was encouraging. The aluminum foils and connectors are easy to tap; a 3/4" long, #6 screw is almost the perfect length; and I figured a little Loctite or 3M 5200 would make the attachment nearly permanent.

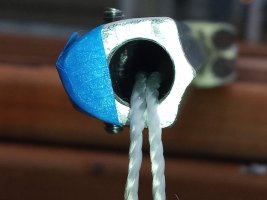
Problem is the set screw, being slightly larger in diameter than the roll pin, protrudes into the center chamber of the connector. Since this is where the forestay is housed, I dejectedly realized it would be unacceptable to have the forestay scraping against stainless steel threads inside the connectors.

20220326_182505.jpg

I think my last attempt will be to find a mobile welder to see if they could weld the pieces together. Absent that, I'll probably just spring for a new Harken Mk IV.
 

toddster

Curator of Broken Parts
Blogs Author
Is there room to stick a little piece of 1/4” ss tubing in there as a sleeve to protect the threads and wire from each other?
 

Kenneth K

1985 32-3, Puget Sound
Blogs Author
Is there room to stick a little piece of 1/4” ss tubing in there as a sleeve to protect the threads and wire from each other?

I don't think so. The forestay fills most of the space in that void. The setscrew itself might even impinge on the stay. Plus, there would be the problem of fastening the new tubing to the inside of the connector.

Thanks for the idea though.
 
Top