Rolling and Tipping cabin top with Awlgrip

Rhett_m

Member I
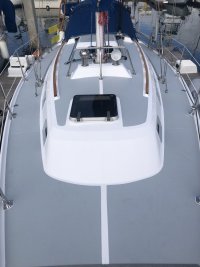
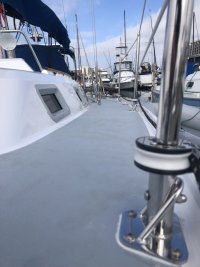
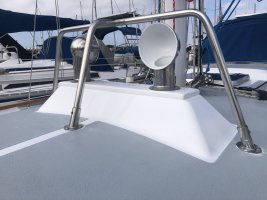
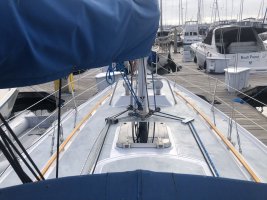
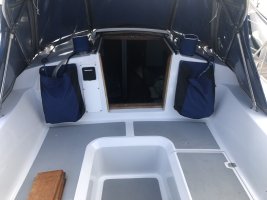
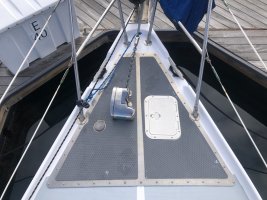
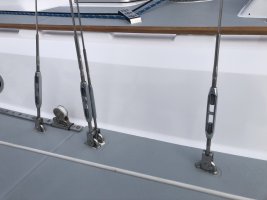
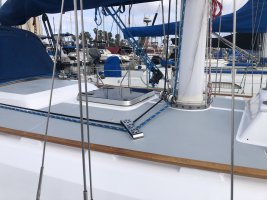
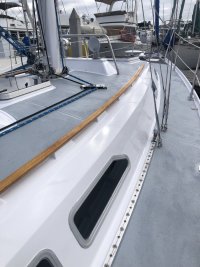
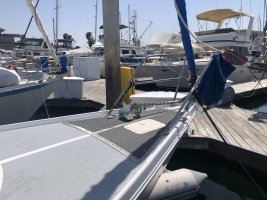
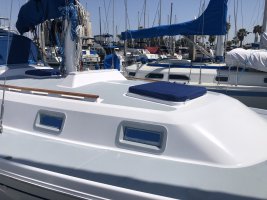
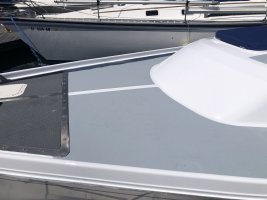
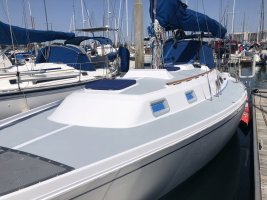
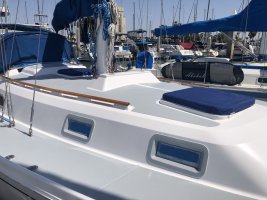
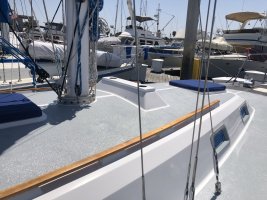
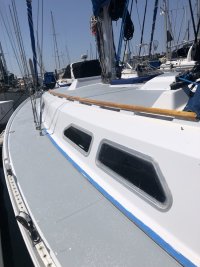
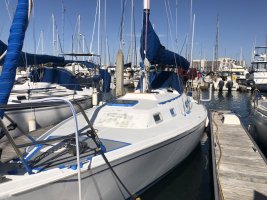
I was inspired by one of Christian Williams’ posts about his neighbors boat that had the top deck rolled and tipped, as well as adding sand to the existing raised nonskid areas. This project took me about 2 weeks, and I still have a day or two left of touching up some areas where the gray seeped though spots along the taped edges.
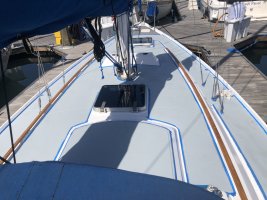
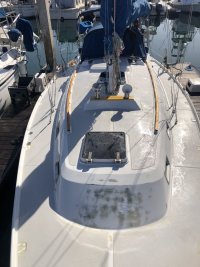
I used Awlgrip Cloud White, And Kingston gray. 4 coats of white, 4 coats gray
Biggest lessons learned:
- take your time. Any time I rushed a step, it always caused me more work the next day prepping for the next coat.
-take the prep work seriously. Clean with acetone, then tack cloth before you paint.
- when using awlgrip, the thinner you can roll a properly thinned paint on the better it will tip out. Here in San Diego. I thinned the paint to 10% and it went on really well when it was cool on the mornings.
-when you load the roller, roll it on the pans ramp to remove as much as you can. The less paint on the roller the better.
-if you miss a spot in the coat, wait until it cures to try and add more paint. It WILL run if you mess with it. A lot of the time, small imperfections lay down as the paint cures. Work it as few times as possible.
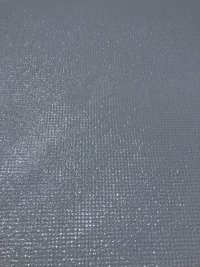
- spread the sand with a good dispersion device like a salt shaker with small holes. I tried to sprinkle it with my fingers and there’s uneven spots in the non skid.
- get your coats on early in the morning. LP take so long to cure that if evening dew settles on it, it will haze over.
-Lastly, if you can afford it pay someone to roll and tip your boat, I strongly recommend it. Your back will thank you.
 

Attachments

  • 971BF319-5910-4496-8EA3-9B07CB02B9DE.jpeg
    971BF319-5910-4496-8EA3-9B07CB02B9DE.jpeg
    268.5 KB · Views: 62
  • 0F763C06-0D88-48F9-97E8-0E65CCAC067C.jpeg
    0F763C06-0D88-48F9-97E8-0E65CCAC067C.jpeg
    212 KB · Views: 61
  • D77F33F0-54A6-4371-A1FC-1B455B4E6C1F.jpeg
    D77F33F0-54A6-4371-A1FC-1B455B4E6C1F.jpeg
    170.7 KB · Views: 60
  • 3E496FD6-8135-4AC1-93BE-CC404D88A09F.jpeg
    3E496FD6-8135-4AC1-93BE-CC404D88A09F.jpeg
    233.4 KB · Views: 59
  • 9F17F001-FF1F-4EA3-B5AC-5C822A2C7CD4.jpeg
    9F17F001-FF1F-4EA3-B5AC-5C822A2C7CD4.jpeg
    220.8 KB · Views: 56
  • 6E417571-B407-4FFF-BB89-4DDC90929BB2.jpeg
    6E417571-B407-4FFF-BB89-4DDC90929BB2.jpeg
    292.4 KB · Views: 57
  • 41CE6A3D-C130-4CC2-A705-6500538C130D.jpeg
    41CE6A3D-C130-4CC2-A705-6500538C130D.jpeg
    135.7 KB · Views: 60
  • 543290DE-7FC2-4A01-8BCE-EE262BFA8C4E.jpeg
    543290DE-7FC2-4A01-8BCE-EE262BFA8C4E.jpeg
    287.7 KB · Views: 58
  • 9990D3F2-FD48-4C2B-90F1-4F03688B7F56.jpeg
    9990D3F2-FD48-4C2B-90F1-4F03688B7F56.jpeg
    233.2 KB · Views: 59
  • C09CFFA7-1141-4C15-A724-6CA2B7711064.jpeg
    C09CFFA7-1141-4C15-A724-6CA2B7711064.jpeg
    154.3 KB · Views: 59

Loren Beach

O34 - Portland, OR
Senior Moderator
Blogs Author
Nice! Did you clear-coat over the color coat?
And, did you paint the window frames? (They look really new-ish)

Also, good idea to forward a description and your photos to your insurer, with a request to increase the "agreed value". Now... you have more to lose... ! After our repower and then the total re-fit, we increased our valuation a lot. I do not ever foresee a sinking or fire, but it would take a lot of $ to replace our boat, after what we have invested (probably the wrong word) in it.
 
Last edited:

Rhett_m

Member I
I did not clear coat. I think Awlgrip clear coat is normally used for dark colors. I rolled and tipped the window frames with the same gray as the non skid. They were in rough shape before.
 

Rhett_m

Member I
Nice! Did you clear-coat over the color coat?
And, did you paint the window frames? (They look really new-ish)

Also, good idea to forward a description and your photos to your insurer, with a request to increase the "agreed value". Now... you have more to lose... ! After our repower and then the total re-fit, we increased our valuation a lot. I do not ever foresee a sinking or fire, but it would take a lot of $ to replace our boat, after what we have invested (probably the wrong word) in it.
Also, that’s good advice about re-negotiating the value with my insurance.
 

Christian Williams

E381 - Los Angeles
Senior Moderator
Blogs Author
Nice indeed.

LP takes so long to cure that if evening dew settles on it, it will haze over.

The pro who painted my transom* had this occur. He had to sand it and reapply the next day. It was only $300, but I think next time I would do it myself, with some practice with Awlgrip first.

*My transom gelcoat had deep shadows result of the former owner's very large vinyl crest and boat name.
 

cdesopo

Member II
Looks amazing! We're looking at the Alexseal product line but of course would consider Alwgrip. Did you have much crazing in the gelcoat in the non-skid areas? We have quite a bit & assume it will take significant prep work before we're ready to paint.
 

Rhett_m

Member I
Looks amazing! We're looking at the Alexseal product line but of course would consider Alwgrip. Did you have much crazing in the gelcoat in the non-skid areas? We have quite a bit & assume it will take significant prep work before we're ready to paint.
I had a little light crazing on the companionway hatch housing. I didn’t really do anything about it. So far it looks fairly well covered up. All the bigger cracks in the gelcoat I lightly ground out with the dremel and filled with thickened epoxy. I’ll take some closer pictures of both so you can see.
 

Rhett_m

Member I
Looks amazing! We're looking at the Alexseal product line but of course would consider Alwgrip. Did you have much crazing in the gelcoat in the non-skid areas? We have quite a bit & assume it will take significant prep work before we're ready to paint.
Alexseal is virtually the same as awlgrip. I have actually used alexseal with awlgrip converters and reducers. The Alexseal topcoat comes with a much thicker consistency than awlgrip. It needs to be thinned more.
I think the people that developed Alexseal used to work for Awlgrip.
 

Loren Beach

O34 - Portland, OR
Senior Moderator
Blogs Author
FWIW, there are several pix of our hull & deck, during the prep work and after it was painted a year ago. Please see my blog. All Awlgrip with clear coat on top. All coats were sprayed.
 
Last edited:

cdesopo

Member II
I had a little light crazing on the companionway hatch housing. I didn’t really do anything about it. So far it looks fairly well covered up. All the bigger cracks in the gelcoat I lightly ground out with the dremel and filled with thickened epoxy. I’ll take some closer pictures of both so you can see.
Thanks, this is helpful. Pics would be great. We're taking this on if we can ever get the Beta dealer to finish our repower (I'll post that nightmare story if/when it ends).
 

Christian Williams

E381 - Los Angeles
Senior Moderator
Blogs Author
Re Message #11: Here's Loren's blog (they're hard to find these days):


Rhett_m

Member I
Some photos of the finished product, with the boat all put back together. Also redid the lifeline stanchions and bases, as well as new deck block organizers to simplify everything.
 

Attachments

  • DC57076B-D691-4386-A9F0-43118E8EDF96.jpeg
    DC57076B-D691-4386-A9F0-43118E8EDF96.jpeg
    99.6 KB · Views: 24
  • D1FA5714-6CFB-4841-8BCA-9B453CCA6A68.jpeg
    D1FA5714-6CFB-4841-8BCA-9B453CCA6A68.jpeg
    101.5 KB · Views: 24
  • 18D83722-C9FB-44FC-8309-56A322F347BA.jpeg
    18D83722-C9FB-44FC-8309-56A322F347BA.jpeg
    212.6 KB · Views: 24
  • 4D141CF4-31A9-4089-8BD7-AA6C6847DDB6.jpeg
    4D141CF4-31A9-4089-8BD7-AA6C6847DDB6.jpeg
    244.4 KB · Views: 23
  • 7DDA8169-22FD-4F7D-995E-CCF99FDA1485.jpeg
    7DDA8169-22FD-4F7D-995E-CCF99FDA1485.jpeg
    137.7 KB · Views: 22
  • A29AA488-0210-48F6-AAE1-F811B8F46046.jpeg
    A29AA488-0210-48F6-AAE1-F811B8F46046.jpeg
    249.9 KB · Views: 22
  • F01D4A72-6661-405E-9B84-97FA0A370717.jpeg
    F01D4A72-6661-405E-9B84-97FA0A370717.jpeg
    134.7 KB · Views: 20
  • 747FADB8-F9DC-40EB-8EE7-899D20ED7010.jpeg
    747FADB8-F9DC-40EB-8EE7-899D20ED7010.jpeg
    221.7 KB · Views: 22
  • 25D00F64-628E-46F1-BCF9-AC69FEF76EC3.jpeg
    25D00F64-628E-46F1-BCF9-AC69FEF76EC3.jpeg
    143.6 KB · Views: 26

Rhett_m

Member I
Thanks, this is helpful. Pics would be great. We're taking this on if we can ever get the Beta dealer to finish our repower (I'll post that nightmare story if/when it ends).
This is a closeup of the companion way slide cover which had some crazing in it. The epoxy primer and awlgrip filled it in nicely.
 

Attachments

  • 49AE718A-DF53-4066-AAB0-E03EC6E363CE.jpeg
    49AE718A-DF53-4066-AAB0-E03EC6E363CE.jpeg
    225.1 KB · Views: 15
Top