Structural question on teak ply glued around portlights

Red Squirrel

1985 Ericson 28-2 Hull# 607
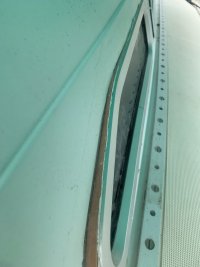
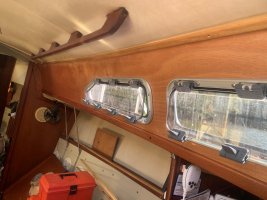
I have a 1985 E28-2. Like others on this forum, my plywood faced teak that runs along the sides with the portlights is rotted out.

I see that Ericson has glued it on.
Was this done for cabin side structural reasons?

I have a replacement design where I would bond on Rotaloc http://rotaloc.com/products/bonding_fasteners/female-hex-nut/
nutplates. I would then mount the panel across the side cabin with screws.

This would however not be glued and won't increase the structure in the side where the portlights are.

Does anyone have any information regarding the design and construction of this area?

Thank you
 

Dave G.

1984 E30+ Ludington, MI
Purely a educated guess but I would think that the wood liner being bonded to the FG does at the very least provide rigidity to the cabin trunk. Not sure how you would seal the portlights if the liner was not physically attached so you could compress the frames but maybe I'm not understanding your plan either. I did look at those fasteners on the link you provided and could not tell if they made those in SS ? There's a couple of those that look interesting to me if they make them in SS.
 

Red Squirrel

1985 Ericson 28-2 Hull# 607
McMaster carr sells the adhesive nuts in 316 ss. Pockets would be drilled on backside to allow nuts to sit into the panel. This would allow close contact with the fiberglass and allow the window frames to compress on the panel.
 

Martin King

Sustaining Member
Blogs Author
So if I understand this correctly you want to bond nuts to the house sides, bore recesses in the back side of the new ply to acommodate the nuts and fasten the panel with machine screws? Are you planning on bunging the screws over or leaving the heads exposed? I'm not sure why you want to do this. Why not just vacuum bag the panel in epoxy?
 

Red Squirrel

1985 Ericson 28-2 Hull# 607
Yes, you understand it correctly.
I could bung over the screws. Haven’t decided which look and feel I like.
Reason: ease of installation, maintenance of panel over time. If it is truly cosmetic, why would it be best to epoxy on something new?
Laminated MDO panel with teak batten strips upper and lower. Put it up, screw in place, install window frames....
 

Loren Beach

O34 - Portland, OR
Senior Moderator
Blogs Author
That teak faced ply on the inside of the cabin side is, IMHO, more than decorative. It is about 3/8 thick and along with the frp layup stiffens the cabin side some. How much I do not know.
I have seen repairs to the veneer done by vacuum bagging, clamping with other panels thru the port openings, and with a herd of sticks propped up against the new paneling.
You could, alternatively, cut out and patch in some replacement paneling of marine ply, and then fair the whole surface and paint it out, as Christian did so nicely on one of his Ericson's.
If you choose paint, do both sides to the same finish standard, for symmetry.
 

clayton

Member III
As this project is looming in my future I am contemplating attachment methods. I have never vacuum bagged. How difficult of a process for a newbie for this project? Is there a kit/preferred equipment you would recommend? I have plenty of clamps and experience using them. Might be more cost effective to do it old school, but I am always looking to expand the knowledge and experience base. Thanks in advance.
Clayton
 

Christian Williams

E381 - Los Angeles
Senior Moderator
Blogs Author
Restoring the veneer around the portlights is basic stuff with no particular rules. Just depends on whether you want perfection or improvement. When the wood facing is rotted and crumbly and really bad off, members just scrape it all off and replace with something else--new veneer, or any material you like. That's a rather large cutting and fitting job, but the stuff is just glued on, no fastenings required. Portlight trim covers the edges.

If the areas under the lights are just discolored, or locally ruined, they can be hardened back up by CPES and epoxy. If they look awful but the surface is sound, some sort of cosmetic covering could be applied such as sticky-back veneer from Rockler, for instance. Or, for a simple solution, paint with Interlux Brightside Hatteras Off-White, which happens to precisely match the tone of the typical Ericson vinyl headliner.

Gotta stop the leaks first, of course, which in almost all cases means removing and rebedding the opening ports, or the fixed ports, or both.

Lots of forum and blog threads on common veneer issues. Here's one:


Martin King

Sustaining Member
Blogs Author
As Christian said, this extent of this work will depend on how far you are willing to go. Reveneering the panel or painting is much easier to pull off than total replacement, and there is nothing wrong with it. Hell, Pacific Seacraft used to slap on some white formica on the house sides and call it good. Having done this work and speaking strictly for myself, I wanted varnished wood house sides on my interior. Not just any wood either. I am very picky when it comes to wood selection and pawed through pallet after pallet of teak at various lumberyards until I had acquired a few boards that I liked. The boards were resawn, planed to thickness, edges jointed and glued up into bookmatched panels of enough width. These panels were then vacuum bagged onto a ply substrate. Prepping the house sides meant removal of the ports, headliner, and the factory panel. The rough glass sides were then faired thickened epoxy. After templating, the panels were trimmed to size, thickened epoxy spread with a notched trowel, and vacuum bagged in place. Vacuum bagging ensures a mostly void free laminate and is easy to do in my opinion. All you need is the pump, some plastic sheeting and some bagging tape.
 

clayton

Member III
Thanks so much for your replies. I'll be replacing at least half the panels on each side as the leaking 4 large portlights led to destroyed plywood. Was considering just replacing the whole of each side with new teak ply as the original bulkheads, head door, settee enclosures, etc. are all light toned teak. Would be sifting through sheets at the lumber yard to find that right tone. Picky like you. Also considering the pacific seacraft approach of off white formica on baltic birch ply for the trunk sides, or painting with the Hatteras off white as Christian suggested. The plan is to replace the 4 large portlights with new ones by Moonlight. This will require some glasswork to modify the openings as they are just slightly different. The 2 on starboard are installed approx 6 inches forward of the 2 on port so I am thinking of moving them aft for symmetry. The Moonlights have a "rubber" gasket attached to the outer frame perimeter to seal against the trunk side so hopefully no more leaks.
 

Red Squirrel

1985 Ericson 28-2 Hull# 607
@Martin King
You mention to epoxy on the new ply or such to the house sides.
Do you know if that additional material thickness is required with the initial boat design to create more needed structure to the house side?

If one were to say fair it and gel coat it, the only structure would be the 1/4" glass layup.
Is the original glass layup structure stiffness acceptable?

This is what I'm trying to determine. The glass work on these boats is very well done.
I am assuming that the teak ply is cosmetic and doesn't really add to the overall stiffness of the house sides. However there isn't any real data I can find to verify this.
Thanks.
 

Loren Beach

O34 - Portland, OR
Senior Moderator
Blogs Author
You mention to epoxy on the new ply or such to the house sides.
Do you know if that additional material thickness is required with the initial boat design to create more needed structure to the house side?
If you click on Martin's name, there is an option to click to send him a private message and have a conversation with him.
 

Christian Williams

E381 - Los Angeles
Senior Moderator
Blogs Author
The cabin house is very strong, the trim is cosmetic. Here are slices showing about half an inch of glass, to which veneer is attached.

ortlight install Capture.JPG ... cutout portlight E32-3.JPG

(E32-3)
 

eknebel

Member III
I recently replaced the 1/4" teak ply along the interior due to rot. On my 30+, the FRP was about 3/16", with no core. The old ply was somewhat haphazardly attached with polyester resin. The resin was applied in ribbons, with no real pattern, and not much adhesion to the plywood(it mostly came off intact. I think vacuum bagging would have been overkill, as most of the eggshell like strength comes from the cabin superstructure, not the weakly glued plywood. Due to the multiple complex bends, I used a adhesive, and braced the plywood with struts until the adhesive cured. I looked at screws, but on the 30+, those complex bends would have required many screws in a unflattering pattern. I did screw small wood screws thru the plywood and into the FRP around the ports. They were covered by the port frame, but ensured that any leak would not go between the cabin side and the plywood undetected. I went with a tube adhesive for a longer cure time vs epoxy, to allow for positioning and removal( any job doing once is worth doing twice!). Either way, it is a big project, but worth it in the end.
 

Attachments

  • IMG_3428.jpg
    IMG_3428.jpg
    199.1 KB · Views: 22

clayton

Member III
Nice job Ed. What brand of port lights did you use? I’ll have 2 of the 4 fixed, 2 opening. I’ll bet the air movement in the cabin is a big improvement.
Clayton
 

eknebel

Member III
I went with lewmar 4l and 4r( 1 right and 1 left per side). your ports are likely a different size. Be careful if there is curvature on the cabin side, as opening ports especially have to be flat. This required me to build up with FRP about 3/8 inch on each port to make it flat, as well as laying cloth to make the opening about 1.5 inches smaller in some places. The ports were different sizes on my 30+, the aft port originally larger. Something to check on on your 32-200, if you replace the ports. Try and re-bed them first, it is the least painful option.
The pic is before painting, so it shows the buildup as a tan color, the white on the port frame is excess butyl tape, since the ports were being removed/replaced as the interior teak was installed.
The opening ports are really nice in a slip where you aren't bow to the wind at anchor. In retrospect, I am not sure if I would do it again. But time dulls pain, so I will start loving them in a few years ;)
 

Attachments

  • IMG_2589.jpg
    IMG_2589.jpg
    75.5 KB · Views: 11

clayton

Member III
Ed-
Thanks for the photos. I'm going to be dealing with the same issues. The Moonlights are nearly identical to the Lewmar 4L/R, found them on ebay for low cost compared to the Lewmars. The original cutouts were so sloppily done I was looking at filling and fairing anyway even to reinstall the originals. The originals had leaked from even before I became the owner, POs had tried caulking the glass seal, etc. Estimate to rehab them at Select Plastics in Connecticut was $1200. My former neighbor owned a company that manufactured circuit boards and gave me a piece of 1/4" composite board (similar to G10) so I cut out fill pieces to fill the original openings and glass in, then fair to get that flatness. Might hire a glass person, as I might not have the time to teach myself that part of the project. Thanks again for sharing!
Clayton
 
Top