Thru-hull installation

footrope

Contributing Partner
Blogs Author
DIY Vikings,

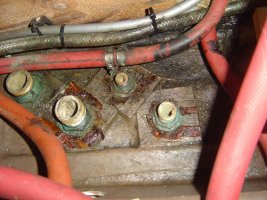
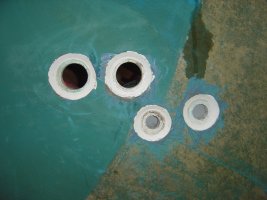
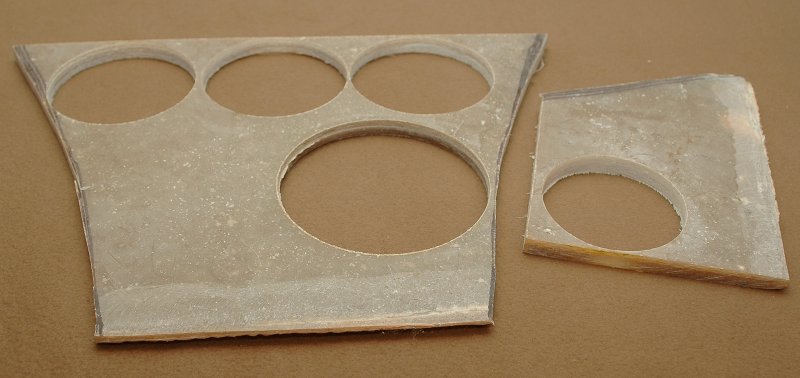
Somewhere on the board there is a thread that describes replacing these four aft thru-hulls on an E38. I couldn't find it tonight. The picture attached shows the seats of the flush thru-hull holes. The thread I was trying to find described rebuilding the seats with some kind of filler or something. These seats are cleaned up - the old sealer wasn't too hard to pry out. The seats are all slightly damaged.

Should I remove these seats and build up new ones or repair these? What is that nice white material?

The old thru-hulls were cut up using a die grinder with a cutting wheel. It went pretty quickly, but I may have lost some hearing. Once the nuts were cut off, it wasn't hard to get them out with a hammer.

Thanks,
 

Attachments

  • AftThru-Hulls01.jpg
    AftThru-Hulls01.jpg
    196.6 KB · Views: 237
  • AftThruHullSeats.jpg
    AftThruHullSeats.jpg
    212.4 KB · Views: 811

footrope

Contributing Partner
Blogs Author
Thanks Loren

That was one of the threads I was looking for. The other I will continue to search for. I was so tired last night.

It is apparent I will have to choose thru-hulls and seacocks carefully. The flange diameters on the flush thru-hulls have changed over the years. Slightly smaller would be best because then it is a filling operation, rather than a grinding one. The entire area around the outside of these may have been faired with that white compound.

The triangular vs. circular bases are competing for my attention as the area is tight both to work in and for handle orientation. Rob's pictures were very good to see again, now that I have a meaningful frame of reference - staring at my own holes!
 

footrope

Contributing Partner
Blogs Author
Saw that one referenced in the earlier, I think.

Is it good practice to cut off the extra length of the thru-hull stem to avoid building up on the inside with a tall block of backing material? I'll be using seacocks (straight threads) and I am not sure cutting the thru-hull down would be a problem with any important parameter. Lower is usually better as long as the handles do not interfere with the stringers in there, which are the extensions of the TAFG.

The inline ball valves I took off were pipe thread - but the engagement was about 4-5 threads on all of them. Not quite the nightmare that Rob and others have found. It was good to see that condition, but better to get them off the boat.

Thanks again!
 

Maine Sail

Member III
Here's some info..

Seacock & Thru-Hull Primer/Pre Information

Replacing Seacocks & Thru-Hulls


Mismatching of threads is not a good idea! From my web site I had a lot of emails and questions regarding the "mismatching" of different thread types such as NPS (NPSM) and NPT.

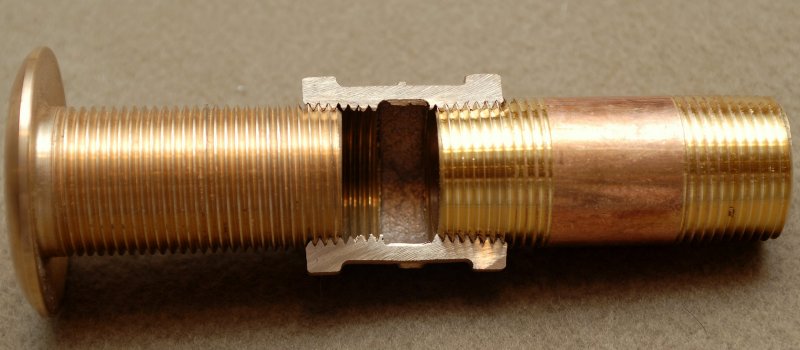
Someone challenged the idea that mismatching threads was OK because "so many do it" so I made a cut away view to show why using two different thread types is really not such a good idea even if "so many do it". While many boat owners screw NPT threaded valves directly onto NPS threaded through-hull fittings it's clearly not a logical idea.

NPSM or NPS, as it's referred to, is the actual sub class of straight threads used in the marine industry. The M means "mechanical" seal. They are not intended to seal in or seal out water or take pressure like NPT fittings. Manufacturers such as Groco warn against doing so. Mismatching threads is done by lots of people but as you can see you don't get a lot of purchase compared to using matching threads. All threading machines have slightly different tolerances and some straight thread might screw in more and some may screw in less. The parts in the photos were purchased right off the shelf at my local chandlery.

To make this photo possible I basically used a bronze nipple, or threaded pipe, with standard plumbing threads of NPT (National Pipe Tapered) and a bronze coupling also the industry standard of NPT thread. I cut the bronze coupling almost in half, for a cut away view, so I could thread the NPT bronze nipple into one side and an NPS through-hull fiting into the other. I then sprayed each with a McLube, to reduce friction but save the picture quality, and threaded both the NPT nipple and the NPS through hull into the cut-a-way bronze coupling by hand and until I had an equal resistance.

The results even surprised me! As you can clearly see the NPT nipple threaded into the NPT coupling quite a bit further than did the NPS through-hull. One would expect this because NPT and NPT threads match. If you were to take a wrench to both you might get one more turn at best out of the NPS through hull but you may still get two or three full turns out of the NPT nipple. If you look very closely at the picture you can also see the outer-most threads of the through hull are already NOT fitting tightly against the female threads of the coupling and the inner-most threads are quite tight or virtually bottomed out...!!! The square peg evidently does NOT fit a round hole..! This coupling represents the threads of an in-line valve. Most all available ball valves or gate valves have NPT or tapered threads and most all commercially available through hulls have NPS or straight threads which is a clear & potentially dangerous mismatch.

Sticking a ball valve directly onto a through hull gives you about three or four threads between sinking and floating so I can't, with a good conscience, recommend anyone do it regardless of how the factory did it. For safety's sake I suggest using proper seacocks with flanges..!!
I would have cut away an actual ball valve but I don't have a machine shop. The coupling represents and has the same exact NPT female threads as an in-line valve of either the gate or ball type...

NPS to NPT on Right / NPT to NPT on Left
91533235.jpg
 
Last edited:

footrope

Contributing Partner
Blogs Author
Thanks Maine Sail

I got a "404 not found" error on the first link.

The external site is a good one (Is that your site?). Good section on the port replacement referenced there from other threads. I won't add bolt holes through the hull, however, the big one is enough. With the flanged seacock screwed to the backing plate, and given the wall thickness of the stem of the thru-hull, there's no need that I can see. The extra holes slightly increase the leakage risk, while not returning enough in the way of relieving stress on the stem. This hardware is overbuilt, thankfully, as it should be for the intended uses.

I see it is your site, based on your footer.
 
Last edited:

Maine Sail

Member III
I fixed the link..

I got a "404 not found" error on the first link.

The external site is a good one (Is that your site?). Good section on the port replacement referenced there from other threads. I won't add bolt holes through the hull, however, the big one is enough. With the flanged seacock screwed to the backing plate, and given the wall thickness of the stem of the thru-hull, there's no need that I can see. The extra holes slightly increase the leakage risk, while not returning enough in the way of relieving stress on the stem. This hardware is overbuilt, thankfully, as it should be for the intended uses.

I see it is your site, based on your footer.


I fixed the link. You really should consider the Groco flanged adapter plates as you can replace a valve at any time without disturbing the integrity of the thru-hull to flanged adapters seal.. Through-bolting is personal preference I choose to do it and I've never once had a leak. I will say though if you don't through-bolt you really ought to consider solid fiberglass backing plates, as opposed to wood, so you can tap them. Never use Starboard!! It offers NO support and even the manufacturer says NOTHING will stick to it for long including 4200 or 5200.

I owned a 2001 Mainship power boat a few years ago and they had used Starboard, or something similar, as backing plates and on a three year old boat three of the thru-hulls were leaking because the sealant parted from the starboard or Starboard like material....

It took me all of about an hour to make my fiberglass board or you could buy some Garolite G-10..

91533230.jpg


Fiberglass Board For Cutting Backing Plates

89237495.jpg


BTW here's Marelon...I'm not the only one to have had this type of problem, there are reports of failed Marelon valves all over the internet sailing forums, and YES I was lubing them as directed. Heck, Tim R. (Ericson 35-3) discovered a failed 1 1/4 Marelon valve just this Monday at 3:00 the day before his launch! Fortunately, we live close to Hamilton Marine, and they had one in stock..
91192269.jpg
 
Last edited:

footrope

Contributing Partner
Blogs Author
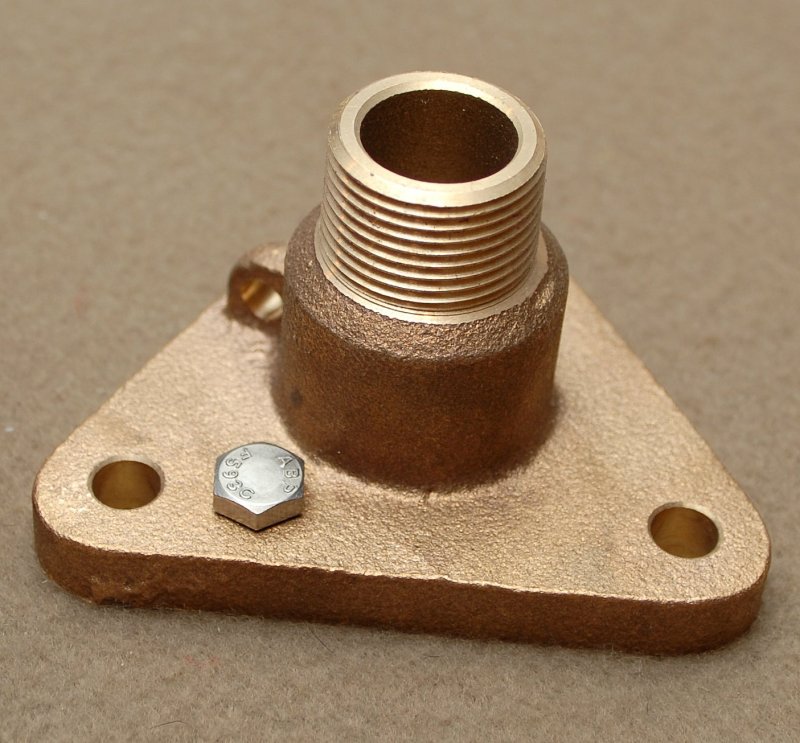
I will consider the flanged adapter. I haven't found a 1/2" bronze seacock yet, so I may need something like that for the smallest thru-hull. If the adapter is pipe thread at the top so that it matches the ball valves, then that is a good option. If I use seacocks or adapters, then I'll probably thru-bolt them to the backer plate, nuts up, so that the length of the bolt can be adjusted if need be, and a ratchet can be used to remove them.

The flanged adapter doesn't solve the backing plate vs stem height issue, though. I'd still have to do extra backer thickness or cut the stems off to the proper length. According to my measurements, an inch+ may be required. I still need to level off the inside area before deciding what to do.

The fiberglass backer is a good idea. I looked for some a while back, but gave up. I will look again. The King Starboard is ok for some applications (ref my port replacement thread) where mechanical strength isn't desired or required. Polysulfide sticks well enough to it for use as a non-pressure gasket.

Time to go shopping. Thanks.
 

treilley

Sustaining Partner
All bronze for me next Winter.

BTW, the boat is in the water and the seacock is working fine. I did not know it was malfunctioning until I shut it off. It is the thru-hull for the inner cockpit scuppers. I was running the engine out of a bucket in the cockpit and the water was draining through the seacock an blasting a hole in the ground. I decided to close it and let the water go out the outer seacocks that were over grass. Unfortionately the water just kept pouring through the defective valve. It always felt like it was working fine.

So every one should check the operation of their Marelon seacocks and lube them while you are at it.

BTW, Maine, did you bond your thru-hulls in any way?
 

Maine Sail

Member III
BTW, Maine, did you bond your thru-hulls in any way?

Tim,

I did not. This is a hotly debated issue and after much research I decided that it was not necessary for my situation. Considering where I keep my boat and the fact that I'm never plugged in and my Zincs last me more than an entire season I think I made the right choice for my application. After the first season there is no sign of any discoloration to the bronze so for now I'll keel on without bonding.

It would only take about an hour to do it but I think I'm at more risk from internal stray current, if I bond, with the older wiring, than I am from external sources. I plan a full re-wire for next winter then I should be better suited for bonding..
 

rwthomas1

Sustaining Partner
After two years of use I can report that the bronze Groco's are still working great and worth the money. I got the top of the line version that is cast/machined and rebuildable. I installed them to teak plywood soaked in epoxy backer plates fastened with bronze machine screws. I did not through bolt the units to the hull. Groco's instructions show both methods as acceptable. I filled the outside of the hull thru-hull mushroom seats with West epoxy thickened with colloidal silica. The inside of the hull was also levelled with the same material. I had to cut the thru-hulls down to allow them to fully seat in the seacocks and tighten down correctly. Measure twice, cut once. I assembled the units with a light coating of grease on the mating surface of the thru-hull, grease on the threads and a wax paper ring under the backer plate when tightened down on the thickened epoxy. After it sets up the assembly can be removed and cleaned. The new thru-hull seat and flat bed for the backer board/seacock can be checked for voids, etc. and cleaned for final assembly. I used 5200 on final assembly.

C.E. Beckman www.cebeckman.com had all the thru-hulls, seacocks, bronze hardware, etc. WM, etc. only had 1-2 of anything in stock.

A marine mechanic/paint/etc. pro I know looked at the seacock farm under the galley sink in my E38, he recoiled and exclaimed "Oh my God, what a colostomy!" Then complimented my ability to get it all done in such a small place. Why Ericson chose to put that may seacocks in such a poor access area is beyond me.

The job sucks, best of luck with it. RT
 

footrope

Contributing Partner
Blogs Author
Thanks for the testimonial, Rob. You did a great job on yours. I'm glad to hear that you cut off the stems of the thru-hulls to make the seacocks fit to a reasonable thickness backing plate.

Did you use a thru-hull for the engine cooling water that had a screen on the inlet? My original did have one and Buck Algonquin sells them.

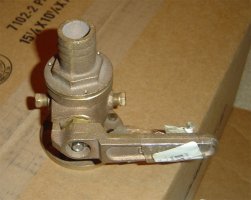
I'm not sure I'll be copying your entire installation, but I have run across a new BV750 with a large barb on it. The barb is 3/4" ID but my Groco ARG500 strainer has either 1/2" or 5/8" inlet/outlet fittings. Using hose for a reducer may work, but it would be better to find a top for the seacock that is the correct size barb, or to put a reducer on the strainer inlet. I'd sure like to use this valve since it cost me $50 at the surplus store. I've got 5 days to return it if I can't make it work.

Initially I will try to find a reducer elbow or an elbow and reducer to put on the strainer inlet. If that is possible, then the raw water system should still work. The larger hose should not be a problem for the Oberdorfer. It's all based on maintaining a suction pressure through the strainer, I think. I would leave the strainer outlet at 1/2" or 5/8" just as it is now.

The other issue is the salt water pump thru-hull. It's 1/2" and there are no seacocks or flanged adapters for that size. I might have to go up to 3/4" here unless someone can point me towards a 1/2" assembly.

A comment on bonding thru-hulls. My 4 originals in this area were bonded for a period of time before I got the boat. The wires were disconnected from ground when I bought her. Eventually I removed all the wires and some of the clamps. I'm pretty sure they were used for an SSB ground, or perhaps the boat was in lightning country for part of its life. When I was working to remove the fittings I gently poked the perforated screen on the engine fitting and it practically crumbled. The broken edges were very red and I found redness on 3 out of 4 of them on the threads under the nuts. I have no advice for anyone, but personally I will use copper foil and/or the keel as a counterpoise for my HF radio. This boat is plugged in to marina power most of the time at our homeport and I use an external zinc over the side to help the other 4 on the prop, strut and shaft. The zincs generally last at least a year, if I wait that long to have them checked and replaced. The strut is isolated from all other metal and its zinc lasts the longest.
 

Attachments

  • GrocoBV750Seacock01.jpg
    GrocoBV750Seacock01.jpg
    70.6 KB · Views: 989

Maine Sail

Member III
Did you use a thru-hull for the engine cooling water that had a screen on the inlet? My original did have one and Buck Algonquin sells them.

No I did not. I've had trouble with eel grass still getting in there and then it's very hard to get out unless you have a hinged screen which would require diving to clean it out. I used a 1" intake which is plenty big enough to get my plastic snake through.

To clean if I get a plug (which has not happened yet):

1) Close the seacock

2) Remove engine intake hose from the barb and clean anything out that's in it.

3) Dig out my 3.5 foot length (gets it above the waterline) of 1" clear PVC hose and affix it to the seacock intakes hose barb.

4) Lift hose above the waterline and stuff my plastic snake down the hose to break up the gunk.

5) Close seacock and stick end of hose in bucket BELLOW the waterline.

6) Open the seacock with the hose in the bucket and all the crap comes blasting out into the bucket..


It's best to have a plan, and the supplies, that you've tried and proven on dry land so you know you can execute it at sea.

With a screen there is no way to break through the gunk because it slams up against the screen when you snake it (been there done that)..

I just prefer an open 1" thru-hull and the tools to clean it. With 1" I rarely get enough in there to cause it to plug up..


P.S. 5/8" (the likely size of your strainer barb) is smaller than 3/4" (your seacock's barb) just up size the barb on the strainer and you're good to go... No need for reducers or extra hose clamps..


P.S.S.

Hamilton Marine 3/4" Flanged Adapter = $24.99

Hamilton Marine Groco Full Flow 3/4" Bronze Ball Valve = $12.49

Total to have a Groco bronze flanged adapter and a 3/4" UL Listed bronze ball valve is less than the consignment store price at only $37.48! Plus you can easily replace the valve in the future without disturbing the seal....
 
Last edited:

rwthomas1

Sustaining Partner
I used two 1 1/2" seacocks and two 3/4" seacocks, upgrading the salt water foot pump inlet from 1/2". The Groco in the pic looks just like mine but IIRC mine had female NPT on top to allow you to choose the hose nipple needed.

If you look at the pics of my installation you will see that the raw water cooling intake passes from the thru-hull to a T and then to the strainer/engine and the other part to a ball valve that is capped with a garden hose male threaded end. This allows a straight shot to snake it if necessary and also a handy flush port for winterizing. I suppose that in a real emergency it could be hooked to a hose/strum box and used as an emergency bilge pump as well. Works great.

RT
 

footrope

Contributing Partner
Blogs Author
Hose vs pipe lesson

What a day for the bronze fitting industry. And a big "thank you" to the Fisheries maintenance department guy for helping me find the fittings I needed. That big barb on the seacock is a 1" hose barb, which is named after the ID of the 1" hose, and its flow size is 3/4". Pipe or NPT fittings are named (numbered) by their pipe diameter - a 1/2" NPT fitting has a 1/2" hole for fluids to flow through it. I've heard that explanation a half dozen times. Maybe this time it will stick. What I ended up with is a stack of fittings on the inlet side of my strainer that leaves enough room for a few inches of 1" hose between the barbs. The extra weight to starboard will also help correct the list to port that my E38 has. I'll post a picture after I clean it up a little and tighten the fittings.

Tightening the fittings - some fittings around the boat have a white pipe dope and others have a dark brown syrup looking thread lubricant - any recommendations?

Rob, I decided to up the diameter of the salt water pump thru-hull to 3/4 also. That will avoid any compromise with mixing straight and pipe thread. I was thinking about it this morning while I chipped out the old white seat material and realized that the diameters of the flare for the 1/2 and 3/4 fittings are exactly the same. So all I'd have to do is correctly enlarge the smaller hole. Might have the yard help me with that. I will also preserve the ice box drain pump connection that goes through there - it's very convenient. I will stick with the 1-1/4" for the drains.

The other 3 seacocks will have the female NPT on top. The one with the 1" hose barb was a surplus store find - only $49.00 - I couldn't pass it up.

Maine Sail, I asked the yard about fiberglass board for backing material. They have some 5/8" sheet leftovers that they may give me for free. Even if they charge me it won't be like buying a huge sheet. I will probably have the yard cut some discs as soon as I get the seacocks and thru-hulls and decide how big the ODs and the donut holes should be. I like the idea of bonding the backing plates to the hull as that means one less sealant layer. I will be able to thread it for the seacock bolts, too.

Thanks for the help.
 

Maine Sail

Member III
Tightening the fittings - some fittings around the boat have a white pipe dope and others have a dark brown syrup looking thread lubricant - any recommendations?

Thanks for the help.

Wrap with male threads with teflon tape (I prefer the thicker yellow teflon tape used for gas lines) then apply plumbers teflon pipe dope, such as Hercules Pro-Dope or Megaloc (which I use), over the tape. You don't coat the female threads as it just pushes it up into the valve anyway..

Any plumbing supply house will carry these products and maybe even Home Depot..

Hercules Megaloc - This is great stuff!!!!
 
Last edited:

Dave Hussey

Member III
Craig,
I went through the same drill you are going through just last month, replacing all my through hull fittings. After numerous frustrations and quick decissions followed by tardy second guesses (what I mean is, "too late now") the boat is in the water and only one of five fittings wept. The yard said they use 4200 on all the threads. I wish I had thought of that instead of the wierd combination of experiments I chose to use. (teff gell and teflon pipe dope)
I used the starboard like material for my backer, and never thought about sealing the seacock flanges to it...and as a result of my ignorance, I discovered the weeping fitting...it stopped, thankfully. I'm going to use 4200 when I haul again.
Dave H
 

footrope

Contributing Partner
Blogs Author
Nothing wrong with Teflon tape, but why use a dope and the tape? Is the sealer not a good lubricant when applied?

I like the suggestion on the engine raw water thru-hull - no screen needed if you plan for snaking it if it clogs. My own limited experience (five years on this boat) around here is that I've never had a problem sucking anything into an engine thru-hull. Likely I'm lucky. I'll see what the screen looks like. I have an "easy button" in this case - since I'm upsizing the 1/2" for the salt water pump to a 3/4 without a screen, I can change my mind even after installing the thru-hulls. In fact, I could swap the hose over "in-flight," with a little planning, in a pinch. That wire-reinforced pipe is the ugliest stuff to get on & off a barb, though.

Dave, thanks for the confession. I hope I don't feel your pain, but I sympathize. I got into a situation on this layup with the dripless shaft seal when I ruined a good one because I didn't evaluate it carefully. Very small bright spot is that the cutless bearing was pretty worn and once the shaft was out the rubber immediately de-laminated from the tube. On this boat I have not thought of a way to get the PSS shaft seal out of the way if I have to pull the shaft. I might be able to do it if I remove the red plastic donut from the transmission flange. I may have to do that anyway when we persuade the shaft back into the flanged coupling in a couple days. I'm not sure how to do the reinstallation without banging on the shaft while the coupling is against the transmission. That just sounds bad, but maybe I don't understand how it's done.

Comment: This yard I'm in has good rates and is populated with people with some skill and experience, but they are definitely keeping an eye on the bottom line. On the 1/2" thru-hull, when I asked the yard manager about finding a straight to pipe thread adapter (they don't seem to exist) to avoid putting straight and pipe together, he said, basically, do it with thread sealer and it will work fine. The thread sealer they use is 3M 5200. The bedding compound they use on thru-hulls is 5200. The filler they use under the waterline for thru-hull seating is 5200. One way of doing it right the first time that makes future disassembly a difficult process.

I figure that by doing it the slightly harder way, I can pay forward to the next guy who has to work on the boat. In some cases, that guy might be me. For sealing the thru-hulls and mounting the valve bodies, I will use 4200. I like a polyurethane, rather than polysulfide, for below the waterline. It's just a feeling, and seems to be the consensus of the board.
 

Maine Sail

Member III
Nothing wrong with Teflon tape, but why use a dope and the tape? Is the sealer not a good lubricant when applied?

Used to be a manufacturers rep in the hydronics industry selling commercial high pressure steam, industrial & residential boilers, radiant tubing and anything else that went along with a hydronic system. I also trained the trade on steam and h2o near boiler piping. I did this for 12 years before I sold out.

In 12 years I never saw a well executed NPT-NPT (tape/dope) fitting leak yet I saw many tape only or dope only fittings that leaked. On a system with black iron pipe the leaks eventually stop due to rust but on bronze fittings they will continue to leak..

Any good plumber or pipe fitter I ever met on a start up used both tape and dope. No one wants to re-do a fitting. Tape is good but you can still feel dry thread to thread as you tighten. Dope is good but not always good enough. Dope and tape is what most of the good trade guys do especially in high pressure steam or food grade stainless to stainless...

A can of pipe dope will last you the rest of your life and the brush is in the cap so it takes maybe an additional 10 seconds, after you've applied the tape, to wipe some dope on the threads...

4200 or 5200 on threads is a short cut!! Pipe dope and teflon tape have hundreds of millions of dry fittings, many running pressures as high as 100 PSI or more, out there to speak for. Only in the marine industry would anyone even consider a polyurethane as pipe dope...:confused:
 
Top