Veneer Removal / Repainting

racushman

O34 - Los Angeles
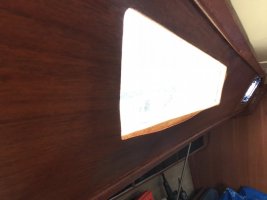
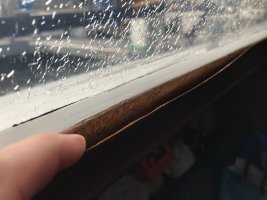
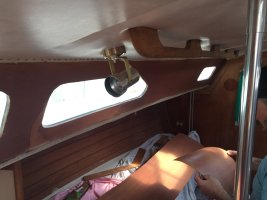
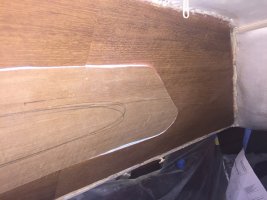
The teak veneer on the inside of the cabin trunk is badly damaged. It’s coming unglued in spots and has some bad water damage around the opening portlights.

My original renovation plan was to remove it and replace with off white Formica. However, was recently looking at it more carefully and wondering if I could remove the veneer, and then paint the area with something like off white Brightsides. I’ve read other posts about people replacing the veneer, but I think I’d rather lighten up the interior with either Formica or paint.

A couple questions for this group:
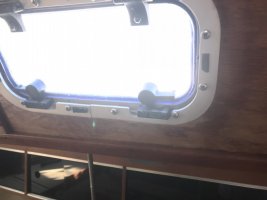
  • Is the cabin trunk area around the windows solid fiberglass? It appears to be.
  • When others have peeled away the veneer, did you find a surface that was relatively fair (it seems like it would be).

  • Has anyone else successfully painted this area and liked the results?
A couple pictures attached. Windows are badly crazed and would replace them too while at it.77AECDFA-0B9A-4D08-825D-257FE6D2B0FC.jpeg

Thanks,
Rob

4AEF81EA-6475-41D2-8846-D3521C368146.jpegF39254FC-154F-4F3F-8F07-2B6FAE390434.jpeg
 

Loren Beach

O34 - Portland, OR
Senior Moderator
Blogs Author
Unless yours is way different than mine, you have about a half inch of teak-faced plywood laid against the cabin inside, probably when it was in the mold. I have remounted one of the opening ports and found good plywood all 'round. That's what is under the layer of white gel coat applied around the inside of the cut out for each fixed port, also. As for water damage... oh my. We were very lucky that we had only water stains on the inside, below 3 out of 4 of the large fixed ports, when we bought our boat.
:(
Problem was that the guys in the shop, probably being unfamiliar with external-lens Lexan ports on the just-acquired Olson line, thought they should screw down the outside fastenings -tight- after seating the lens in black sealant, and promptly forced out most of it. This probably started leaking in the first couple of seasons.
What happens is that the coefficient of expansion of Lexan is way more than the frp cabin side surface they fastened it to. Hot and cold weather makes the long lens grow and shrink.
(If your whole boat were made of Lexan, on a hot day it might an Olson 34.3)
:)
The cure actually is pretty easy. The lens has to be "floated" on a bed of about an eight inch of sealant. That way the lens does not break the adhesive attachment with the cabin side.
I re-bedded four new fixed ports on our boat in 1995, and while they are hazy now, there has never (!) been a leak.
How to get the lens to "float" proudly while snugging down the screws? The secret is to put little black O-rings around each toothpick that you placed in every single screw hole when you do the final dry fit. Mask off everything all around it too.

Shoot the sealant uniformly around the surface, and lay the lens down over all the toothpicks. Then just withdraw the 'picks one by one, replacing each with a screw.
Oh, and be sure to abrade the lens part that will be against the sealant. Also abrade (80 grit) the cabin surface only where the lens edge will cover it.
Do not over tighten the screws -- once down against their O-rings, they are tight enough.

I used black Life Seal. No chemical harm to plastics and it has held on for 25 years.
As for refinishing the inside I do like teak, but the slick white paint that Christian put on his E-32 looks mighty fine too.
(We bleached our teak, and applied several coats of varnish -- we love the golden look of natural teak. )
 
Last edited:

Christian Williams

E381 - Los Angeles
Senior Moderator
Blogs Author
IMG_0160.JPG

Painting ruined veneer worked for me. Has to be reattached and epoxied and faired first, as for any painting surface.


Loren Beach

O34 - Portland, OR
Senior Moderator
Blogs Author
Addendum: Watch out for ignored water stains along the top of the inside cabin sides from water seepage around the mast boot. Also from poorly sealed wiring exit in the spar, above the headliner and below the cabin top. Water can run across the top of the interior vinyl and show up along the top of the cabin sides inside. This was another stained area we refinished.
 

Tin Kicker

Sustaining Member
Moderator
The fiberglass is solid and about 3/8" thick with a very rough interior after the veneer is removed. Painting it would not look good at all.
20191005_152110-X3.jpg


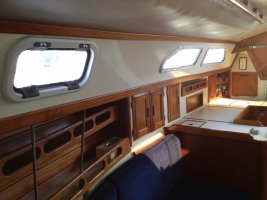
I went with thick vinyl floor planks from Home Depot held in place with the industrial Gorilla Glue, so nothing will ever suffer water damage again. As you can see in the 3rd photo, it matched the bulkhead wood quite well. Used a little paint (Michaels Craft Store) in the seams then wiped it off with a rag.
20191015_142909-X3.jpg

20191026_163045-X3.jpg


The panels from HD:
20191006_135000-X3.jpg
 

markvone

Sustaining Member
I suspect your only two choices are fill, fair and paint the existing damaged teak veneer ala the C. Williams blog or scrape off existing teak plywood and replace with either teak faced plywood if you like teak or something like birch faced plywood if you prefer to paint. My E36RH only needed one sheet of 4x8 1/4 inch teak veneer plywood at $135 for the complete job. The install of new plywood will require removal of the teak ceiling trim battens at the top and bottom edges of the cabinside teak and the pulling of approx. 10,000 rusty staples. The ports and portlights will need to be removed (replacing those anyway?) and a method of clamping the plywood to the cabinside devised. You will need to make templates for the plywood shapes.

You will get to seal the new plywood edges around the port/portlight openings so that any future leakage won't damage the new plywood and also access pretty much everything above the ceiling vinyl (mast wiring, nuts for deck hardware, etc.) and also access the shroud u bolts/tie rod blocks above the side deck vinyl overhead which become available when the lower cabinside trim batten and the lower rusty staples are removed for this job. I replaced my teak in Spring of 2017 and I still have the edges of the vinyl loose and trim battens at home, did cabintop hardware, still need to investigate shroud u bolts before I seal it up.

Mark
 

racushman

O34 - Los Angeles
Thanks guys, all super helpful experience and very much appreciated.

Big assumption on my part was that it was solid glass covered with teak veneer — which I know understand is actually plywood with a (peeling) veneer. Took my rigging knife and poked in several places, and it is clearly wood. Good news is I didn’t find any soft spots.

Has anyone tried Formica as a remedy? The tricky part would be the window cutouts, but I could imagine it being a good solution and would be fairly impervious to water if any leaks.
 

Loren Beach

O34 - Portland, OR
Senior Moderator
Blogs Author
IMHO, Formica is a surface , like veneer or paint. The main work would still be to bring the plywood layer back, for thickness and strength.
If you restore the plywood, you could do a half inch back from the edge of each window in thickened epoxy and strips of G10. Unlikely that after this work there will ever be another leak in your lifetime, but then there would be no wood fiber for water to invade.
Further, when replacing the Lexan lenses, you would have an excellent opportunity to slightly re-cut the openings, using a pattern for your router bit, and make them perfectly symmetrical from port to starboard. (A friend of mine is presently replacing all the plastic opening port in his Tartan 37 with Newfound Metals SS port lights, and his is using a precise plywood pattern for his router for each opening.)
Perhaps the guys that did your cut outs were really attentive to their drawing/pattern, ours are just slightly off, altho not normally apparent to a non owner. :)

I have used formica for my new forward hull ceilings and also for the new surfaces inside both hanging lockers, and the hull beside the nav desk and behind the galley range. This was over honeycomb paneling; details in my blog here.

Hmmm. Interesting idea --- use honeycomb panels for the new cabin sides -- make the boat about 15# lighter and a nano-knot faster! :rolleyes:

Anyhow, do keep pix and comments coming.
 

markvone

Sustaining Member
I will propose that it is far, far easier to pay attention to leaking ports/portlights and reseal them when they leak than it is to replace the teak veneer plywood with anything that is not sensitive to moisture.
 

Rocinante33

Contributing Partner
This stuff which is used in RVs is likely a good substitute. It’s probably lighter than the plywood, comes in smooth or textured, is easy to cut and attach, is paintable , and it’s pretty cheap. It might be too thin for the window frames, though, so you still may need plywood backing. Home Depot has some too.


PANorth

Member II
I have just started into the same project - replacing teak veneer plywood that softened over the last 40 years. The layer of wood that is glued to the cabin wall has no sign of degradation and it is solidly attached to cabin well. Is there any reason that I should go to the trouble of removing it? I am leaning toward the Formica, or some such material, option so as to brighten the cabin.

I am also going to replace the fogged lenses in the opening portlights. I'm thinking glass as the replacement. This is an '82 with aluminum portlights and lenses that are in an aluminum frame. That is the opening part. I don't see sign that any of them leaked, but I want to be able to see through the lenses. Any suggestions about where to get replacement lenses?
 

Tin Kicker

Sustaining Member
Moderator
I will propose that it is far, far easier to pay attention to leaking ports/portlights and reseal them when they leak than it is to replace the teak veneer plywood with anything that is not sensitive to moisture.
I agree with you totally, but the problem is that by the time we may get the boat the damage is already done.
 

markvone

Sustaining Member
I agree with you totally, but the problem is that by the time we may get the boat the damage is already done.
Right you are! My teak veneer was already gone at year 30 when I bought my boat from sunny and relatively dry southern California. The sunny part also crazed the ports, portlight and hatch acrylic. Insulated covers should keep the new hatch acrylic and new opening ports clear for a long time. I optioned up to glass lenses for the replacement portlights.

Mark
 

markvone

Sustaining Member
I have just started into the same project - replacing teak veneer plywood that softened over the last 40 years. The layer of wood that is glued to the cabin wall has no sign of degradation and it is solidly attached to cabin well. Is there any reason that I should go to the trouble of removing it? I am leaning toward the Formica, or some such material, option so as to brighten the cabin.

I am also going to replace the fogged lenses in the opening portlights. I'm thinking glass as the replacement. This is an '82 with aluminum portlights and lenses that are in an aluminum frame. That is the opening part. I don't see sign that any of them leaked, but I want to be able to see through the lenses. Any suggestions about where to get replacement lenses?
There is no reason to remove the plywood if it is solid and you intend to go white to lighten the cabin, UNLESS the surface will require more effort to smooth and fair for paint than the effort to scrape off the old plywood, clean up, buy new plywood, pattern, cut and glue/epoxy new plywood on.
I do question your description that the "teak veneer has softened", but the "layer of wood glued to the cabin wall has no degradation". My cabin side had 1/4 inch thick teak veneer plywood. The teak veneer is very, very thin. My plywood had many leak induced rot throughs. My teak veneer was firmly attached where there was solid plywood behind.
The bottom line is really how smooth a surface you will have after you remove any soft, loose, discolored, etc. layers.
Mark
 

PANorth

Member II
I do question your description that the "teak veneer has softened", but the "layer of wood glued to the cabin wall has no degradation".
I have wondered what caused the teak veneer to rot. The soft wood was through much of the area covered by the veneer. But it did not seem to be associated with any specific source of water, such I have seen in my past boats. I was looking for rot from leaking portlights or drips from the headliner, but that did not seem to be there. Absent a better explanation, I am assuming the rot is from many years of being in a water environment in Southern California and sometimes Hawaii at the end of Transpacs. Perhaps the moisture in the air slowly degraded the wood. When I took off the rotten layers of ply wood, the last layer of ply, glued to the fiberglass cabin wall, was in good shape. Perhaps it was impregnated with blue, so the wood cell walls are preserved.

The treatment area would need a lot of fairing to make it look good with paint. Not to mentions that the portlights now stick out 1/4+ inch beyond the cabin wall. So I am leaning toward adding a layer of something. Still deciding what that something should be.

I have really learned a lot by following this line of conversation.
 

Christian Williams

E381 - Los Angeles
Senior Moderator
Blogs Author
I was looking for rot from leaking portlights or drips from the headliner, but that did not seem to be there.

Me too. What I discovered was that the leaks in the mounting of the ports wick between the wood and the glass of the cabin house. The subtle leaks wick sideways as well as down, often without much obvious change in the appearance of the veneer. But the base of the veneer graduallly delaminates and rots away.

So, when portlights are removed it's a good idea to seal the edges of the wood with CPES or other epoxy, where it is cut out around the port openings, just to make sure it doesn't happen in future.
 

markvone

Sustaining Member
I have wondered what caused the teak veneer to rot. The soft wood was through much of the area covered by the veneer. But it did not seem to be associated with any specific source of water, such I have seen in my past boats. I was looking for rot from leaking portlights or drips from the headliner, but that did not seem to be there. Absent a better explanation, I am assuming the rot is from many years of being in a water environment in Southern California and sometimes Hawaii at the end of Transpacs. Perhaps the moisture in the air slowly degraded the wood. When I took off the rotten layers of ply wood, the last layer of ply, glued to the fiberglass cabin wall, was in good shape. Perhaps it was impregnated with blue, so the wood cell walls are preserved.

The treatment area would need a lot of fairing to make it look good with paint. Not to mentions that the portlights now stick out 1/4+ inch beyond the cabin wall. So I am leaning toward adding a layer of something. Still deciding what that something should be.

I have really learned a lot by following this line of conversation.
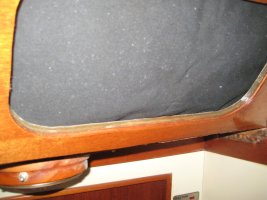
I understand now. I agree with your assessment that the inner most layer of plywood was saturated with glue or epoxy which preserved it. The ports/portlights can leak between the back of the plywood and the inside of the cabin side fiberglass without showing on the interior. I sealed the edge shown in the picture below with thickened epoxy to prevent this in the future.
Portlight edge seal.jpg
You need to add back 1/4 inch of some plywood. Birch or another species might be cheaper than teak veneer plywood The actual work wasn't that hard or costly. Logistics of getting thin plywood home might be. See the tread below for details:


Mark
 

dcoyle

Member III
The teak veneer on the inside of the cabin trunk is badly damaged. It’s coming unglued in spots and has some bad water damage around the opening portlights.

My original renovation plan was to remove it and replace with off white Formica. However, was recently looking at it more carefully and wondering if I could remove the veneer, and then paint the area with something like off white Brightsides. I’ve read other posts about people replacing the veneer, but I think I’d rather lighten up the interior with either Formica or paint.

A couple questions for this group:
  • Is the cabin trunk area around the windows solid fiberglass? It appears to be.
  • When others have peeled away the veneer, did you find a surface that was relatively fair (it seems like it would be).

  • Has anyone else successfully painted this area and liked the results?
A couple pictures attached. Windows are badly crazed and would replace them too while at it.View attachment 32996

Thanks,
Rob

View attachment 32994View attachment 32995
We took on this project in 2018 on my 82 E33. There was rot around several of the portlights. I removed the 6 portlights in main cabin the ground out rotted plywood and faired with thickened epoxy. Fortunately a freind with high end wood shop had teak veneer wide enough to cover side wall in 10’ lengths 1/16 think. He templated project and ruff cut at his shop the came onsite for install. We used a type of contact cement recommended by Tim Reilly (see his E35 posts). It doesnt kick till heated with iron so made install much easier. I considered replacing portlights but would have had to enlarge holes so decided to reuse original. Took about 20 hours per window to clean up and make ready for install. Used butyl tape to rebed. Was big project but love results, get to enjoy every time below!! Also we coated window cutout wood edges w epoxy.
 

Attachments

  • 7CD8987F-F064-4D49-9335-9DB3AB8D8E7C.jpeg
    7CD8987F-F064-4D49-9335-9DB3AB8D8E7C.jpeg
    135.9 KB · Views: 17
  • 01136E09-EB7C-4E9D-B5F3-8D8BC4021778.jpeg
    01136E09-EB7C-4E9D-B5F3-8D8BC4021778.jpeg
    190.7 KB · Views: 17
Top