• Untitled Document

    Join us on April 26th, 7pm EST

    for the CBEC Virtual Meeting

    All EYO members and followers are welcome to join the fun and get to know the guest speaker!

    See the link below for login credentials and join us!

    April Meeting Info

    (dismiss this notice by hitting 'X', upper right)

Why Are Ericson fixed Portlights tapered?

Red Squirrel

1985 Ericson 28-2 Hull# 607
Hi Everyone,
I'm re-doing my portlights. I am still trying to figure out the reason Ericson made the Fwd portlight smaller than the Aft one. Also why the taper on each? I am hoping to make them both the same size in height.

Anyone have any ideas?
Thanks
 

Mark David

Member II
I have always thought/felt that the lines of classic Ericson bows, cabin tops and windows are quite pretty and very recognizable. Twice a year my slip neighbor tells me he really enjoys looking at our boat!!
 

Slick470

Member III
I don't know the answer of why they are different sized but you aren't the first owner to discover this. I was able to get a rebuilt set of, I think forward?, portlights that an Ericson 38 owner had rebuilt. Their plan was to replace the forward set with new opening portlights and sent the old ones to Hatchmasters to be rebuilt with new lenses so they could swap those with the aft and not have a point where the boat was without portlights. Well, they got them back and went to take the aft ones out and realized that the sizes didn't match.

If I were to guess on the differences, it would be that Bruce King liked the look of slightly different window shapes and was able to convince the bean counters it was worth it. By the time Ericson got to building our Olson 911, they had gotten to the point where doing the fixed Acrylic portlights had probably gotten too expensive from a labor standpoint and they changed over to standard Lewmar portlight sizes and ours are standard size 4, 4R, and 4L. I wouldn't be surprised if they went to standard sizes on the later Ericson line boats too and they just used 4R and 4Ls.
 

Loren Beach

O34 - Portland, OR
Senior Moderator
Blogs Author
Other trivia... in the 80's EY bought their trapezoidal fixed ports as a custom shape from Lewmar. I am not sure if Lewmar ever cataloged them for general retail, tho. They were available, IIRC, in an opening version, also.
What with the slight fore-n-aft curvature of the cabin side, I always wondered how long the opening version might seal up adequately with all the turn levers tightened. The whole port had to flex slightly when fastened in.
While we did notice this curvature when replacing the long external fixed lenses on our boat, the polycarbonate was screwed down with no particular effort. I have seen one O-34, said to be the last one finished out, with the long opening version of the Lewmar's. I hope they stayed water proof.
Subjective thing -- but Bruce King liked that distinctive port light shape starting almost from the beginning and we found it very attractive on our Olson, as well.
It seemed a real shame when PSC built out a run of the larger EY boats in the 90's with a row of conventional rectangular opening ports. Nice boats, but they just lacked the "Look".

Monday Opinion Special, reduced to one cent. Quantities limited. :)
 

Slick470

Member III
Loren, we had long considered replacing our forward 4R and 4L ports with the newer opening versions but we got a good enough deal on the rebuilt fixed ones, that we have decided against it for now. Lewmar updated the frames at some point too, so the frames would not have matched between the two sets and I would have probably wanted to replace the aft size 4 ports too. $$$. The newer style hinge and latch system seems a lot more robust than our 1990 vintage ones, so leaking may be less of an issue with the new ones.
 

toddster

Curator of Broken Parts
Blogs Author
Without going to the boat and providing actual measurements... there may also be some issues with curvature and angle of the internal liner. I recall having some difficulty making my curtains line up "straight." (Straight with respect to what?)

I've actually collected a set of standard opening ports with a plan to eventually replace the fixed ones - though it would be a pretty vexing fiberglass job. I think one would have to either glass over at least the ends of the old port openings and re-cut new holes. OR it might be easier to overlay the entire window area with a piece of... laminate? wood? inside and out, and cut the new holes through that.
Currently I have no time budgeted for such a project.
 

texlan

Member I
Blogs Author
I think the original design was a (brilliant) aesthetic that allowed the tops and bottoms of the portlights to perfectly parallel the horizontal line molded into the top of the cabin sides and the line of the deck sheer.

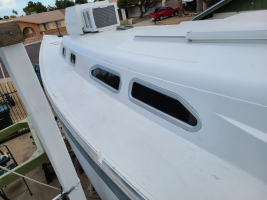
Unfortunately it's hell for us replacing things. Very recently (weeks ago?) I wrapped up replacing all of my E-29 portlights with opening lewmar size 1, 4R, and 4L's.

The forward long port lights required only a little trimming to fit, the after port lights required filling and trimming. I didn't take any pictures while I was working on it unfortunately, but -- The method I used to do this was as follows:

(On my boat, the outer cabintop is about 3/16" to 1/4" thick, the inner ranged from 1/8th" to 3/16". The screws that come with the lewmar lights are too long for any of the lights on my E29.. I had to order shorter screws from lewmar, which took 4 months to arrive.. You'll want to make sure you have all the right bits before you start this project)

1) Make template of window cutout in 1/4" plywood from both dimensions in literature and measuring actual 4L/4R portlight (literature doesn't have all the required data but has useful information like radius of corners). Use same template for both sizes.

2) Take template, base it against the forward edge and bottom edge of existing cutout

3) Trace around template onto gelcoat with pencil where possible. There was a long gap between the template and the top of the cutout from the upper forward corner down to the upper side of the aft-most corner; the maximum width of this gap was about 3 cm -- 1 & 1/4" at the top of the taper on mine.

4) Cut out an appropriately long, ~6-7cm wide piece of 1/8th" G10 fiberglass, cram it in between the inner liner and outer hull such that it fills the gap you infer from your pencil marks and then some. It's important to have some overlap for the next step. After you've verified with your template you've got it right, make some more alignment marks on the G10, pull it out, prep all the edges and fill gap with thickened epoxy and glue the g10 into place.

5) Come back draw the top of your template over the G10. (reprep edges if necessary and) Slop some epoxy fairing compound (that will remain a little flexible after cure, I used total boat total fair) onto both the inside and outside to make it proud of the gelcoat. Took me a couple rounds to get it done, retracing the template each time to make sure you've covered the important area. Finally, sand it all flush with the gelcoat, I used my 6" RO sander on the outside and a 3" festool rotex 90 on the inside, with 80 grit to accomplish this..

6) Re-trace your template again over the new filler, come back in with the jigsaw, and go to town. Be wary of the blade overheating...


At this point, I painted the new work outside and the inside cabin liner all around. after the paint cured for 4 or 5 days, I installed the portlights with Maine Sail's butyl tape

After it's all said and done, you can't tell that it was originally a different size hole. The fairing compound might crack (I kept my cutout to test for flexibility now and then..) though to be honest, 1/8th" G10 seems more rigid than 1/4" 1971 Ericson layup, so maybe not. If it cracks, whatever, I'll fix it then. :)

Back to Bruce King's aesthetic though -- the top of the portlight no longer parallels the line molded into the cabintop.

1644324168273.png

It's definitely not as pretty, but in my case I had no choice (Old lights were leaking and sealed in with gobs of some compound that destroyed the frames on removal.) To Loren's point there is a slight curve in the cabinside, but the lights went in, open and close without much trouble. Having them open is pretty heavenly, as well.
 

Red Squirrel

1985 Ericson 28-2 Hull# 607
I think the original design was a (brilliant) aesthetic that allowed the tops and bottoms of the portlights to perfectly parallel the horizontal line molded into the top of the cabin sides and the line of the deck sheer.

Unfortunately it's hell for us replacing things. Very recently (weeks ago?) I wrapped up replacing all of my E-29 portlights with opening lewmar size 1, 4R, and 4L's.

The forward long port lights required only a little trimming to fit, the after port lights required filling and trimming. I didn't take any pictures while I was working on it unfortunately, but -- The method I used to do this was as follows:

(On my boat, the outer cabintop is about 3/16" to 1/4" thick, the inner ranged from 1/8th" to 3/16". The screws that come with the lewmar lights are too long for any of the lights on my E29.. I had to order shorter screws from lewmar, which took 4 months to arrive.. You'll want to make sure you have all the right bits before you start this project)

1) Make template of window cutout in 1/4" plywood from both dimensions in literature and measuring actual 4L/4R portlight (literature doesn't have all the required data but has useful information like radius of corners). Use same template for both sizes.

2) Take template, base it against the forward edge and bottom edge of existing cutout

3) Trace around template onto gelcoat with pencil where possible. There was a long gap between the template and the top of the cutout from the upper forward corner down to the upper side of the aft-most corner; the maximum width of this gap was about 3 cm -- 1 & 1/4" at the top of the taper on mine.

4) Cut out an appropriately long, ~6-7cm wide piece of 1/8th" G10 fiberglass, cram it in between the inner liner and outer hull such that it fills the gap you infer from your pencil marks and then some. It's important to have some overlap for the next step. After you've verified with your template you've got it right, make some more alignment marks on the G10, pull it out, prep all the edges and fill gap with thickened epoxy and glue the g10 into place.

5) Come back draw the top of your template over the G10. (reprep edges if necessary and) Slop some epoxy fairing compound (that will remain a little flexible after cure, I used total boat total fair) onto both the inside and outside to make it proud of the gelcoat. Took me a couple rounds to get it done, retracing the template each time to make sure you've covered the important area. Finally, sand it all flush with the gelcoat, I used my 6" RO sander on the outside and a 3" festool rotex 90 on the inside, with 80 grit to accomplish this..

6) Re-trace your template again over the new filler, come back in with the jigsaw, and go to town. Be wary of the blade overheating...


At this point, I painted the new work outside and the inside cabin liner all around. after the paint cured for 4 or 5 days, I installed the portlights with Maine Sail's butyl tape

After it's all said and done, you can't tell that it was originally a different size hole. The fairing compound might crack (I kept my cutout to test for flexibility now and then..) though to be honest, 1/8th" G10 seems more rigid than 1/4" 1971 Ericson layup, so maybe not. If it cracks, whatever, I'll fix it then. :)

Back to Bruce King's aesthetic though -- the top of the portlight no longer parallels the line molded into the cabintop.

View attachment 41598

It's definitely not as pretty, but in my case I had no choice (Old lights were leaking and sealed in with gobs of some compound that destroyed the frames on removal.) To Loren's point there is a slight curve in the cabinside, but the lights went in, open and close without much trouble. Having them open is pretty heavenly, as well.
I see what you mean there. I’ll take measurements of that line on my 28-2 and see if that is the case with mine. Nice job
 

kapnkd

kapnkd
Hi Everyone,
I'm re-doing my portlights. I am still trying to figure out the reason Ericson made the Fwd portlight smaller than the Aft one. Also why the taper on each? I am hoping to make them both the same size in height.

Anyone have any ideas?
Thanks
As a person with a college background in art/design and later 20 years in automotive design/stying, …it’s primarily centered on aesthetics more so than any engineering needs.

…Keep in mind all the smaller ports forward from the two main are much smaller in size. Hence, the current design doesn’t abruptly magnify or contrast that difference but instead subtly leads your eye to them and continues with a forward moving motion following the full design of the cabin top (coach roof) combining
overall lines of the boat.

It definitely would have been much easier and cheaper to design but a single port that would/could face forward or aft and then be used on each side. Bruce King, as a naval architect AND definitely a designer combines these essential two ingredients to create the boats we enjoy today and do still get compliments on regardless of their age.

Yes, you could modify the design to accept one size port/window - but - I personally would certainly not recommend it.
 

Red Squirrel

1985 Ericson 28-2 Hull# 607
I’ll measure the slope on my boat and adjust the shape accordingly. Thanks, I didn’t think to look at that in more detail.
 

Loren Beach

O34 - Portland, OR
Senior Moderator
Blogs Author
A data point to add to the mix: When we replaced all of the OEM Lewmar opening ports (1988 vintage) with their current upgrade "Atlantic" series, the new ones were about/approx an eighth taller, and about 3/8 or a bit more longer. Since EY had cut some of the original openings a bit large we did not really remove too much material.
We have never changed the sizing of our fixed ports, but then they are frameless Lexan lenses. Rather Different than the stock (Lewmar) framed fixed ports on the Ericson's from the mid to late '80's. The shape is still the EY trapezoidal shape, tho.
 
Last edited:

Alan Gomes

Sustaining Partner
As a person with a college background in art/design and later 20 years in automotive design/stying, …it’s primarily centered on aesthetics more so than any engineering needs.

…Keep in mind all the smaller ports forward from the two main are much smaller in size. Hence, the current design doesn’t abruptly magnify or contrast that difference but instead subtly leads your eye to them and continues with a forward moving motion following the full design of the cabin top (coach roof) combining
overall lines of the boat.

It definitely would have been much easier and cheaper to design but a single port that would/could face forward or aft and then be used on each side. Bruce King, as a naval architect AND definitely a designer combines these essential two ingredients to create the boats we enjoy today and do still get compliments on regardless of their age.

Yes, you could modify the design to accept one size port/window - but - I personally would certainly not recommend it.
Not long back I noticed and Ericson 27 on Craig's List where someone modified the windows. Instead of the standard Ericson windows the owner had filled in the original openings and installed three smallish round windows in their place on each side. Hideous.
 

Nick J

Sustaining Member
Moderator
Blogs Author
Did Pacific Seacraft make the switch away from the standard Ericson shaped fixed portlights to these stainless ones or were these aftermarket changes?


I really like the fit and function of the stainless ones, but I can't say I lake them in place of the ones Mr. King designed.
 

Loren Beach

O34 - Portland, OR
Senior Moderator
Blogs Author
Did Pacific Seacraft make the switch away from the standard Ericson shaped fixed portlights to these stainless ones or were these aftermarket changes?


I really like the fit and function of the stainless ones, but I can't say I lake them in place of the ones Mr. King designed.
Yup. PSC decided against the King-designed fixed ports. From a short distance most of the smaller opening ports, regardless of make, will look similar, tho.
I thought that PSC made an "unforced error" when they discarded the trademark fixed port shape.
Water under the bridge, now.....
 
I think the original design was a (brilliant) aesthetic that allowed the tops and bottoms of the portlights to perfectly parallel the horizontal line molded into the top of the cabin sides and the line of the deck sheer.

Unfortunately it's hell for us replacing things. Very recently (weeks ago?) I wrapped up replacing all of my E-29 portlights with opening lewmar size 1, 4R, and 4L's.

The forward long port lights required only a little trimming to fit, the after port lights required filling and trimming. I didn't take any pictures while I was working on it unfortunately, but -- The method I used to do this was as follows:

(On my boat, the outer cabintop is about 3/16" to 1/4" thick, the inner ranged from 1/8th" to 3/16". The screws that come with the lewmar lights are too long for any of the lights on my E29.. I had to order shorter screws from lewmar, which took 4 months to arrive.. You'll want to make sure you have all the right bits before you start this project)

1) Make template of window cutout in 1/4" plywood from both dimensions in literature and measuring actual 4L/4R portlight (literature doesn't have all the required data but has useful information like radius of corners). Use same template for both sizes.

2) Take template, base it against the forward edge and bottom edge of existing cutout

3) Trace around template onto gelcoat with pencil where possible. There was a long gap between the template and the top of the cutout from the upper forward corner down to the upper side of the aft-most corner; the maximum width of this gap was about 3 cm -- 1 & 1/4" at the top of the taper on mine.

4) Cut out an appropriately long, ~6-7cm wide piece of 1/8th" G10 fiberglass, cram it in between the inner liner and outer hull such that it fills the gap you infer from your pencil marks and then some. It's important to have some overlap for the next step. After you've verified with your template you've got it right, make some more alignment marks on the G10, pull it out, prep all the edges and fill gap with thickened epoxy and glue the g10 into place.

5) Come back draw the top of your template over the G10. (reprep edges if necessary and) Slop some epoxy fairing compound (that will remain a little flexible after cure, I used total boat total fair) onto both the inside and outside to make it proud of the gelcoat. Took me a couple rounds to get it done, retracing the template each time to make sure you've covered the important area. Finally, sand it all flush with the gelcoat, I used my 6" RO sander on the outside and a 3" festool rotex 90 on the inside, with 80 grit to accomplish this..

6) Re-trace your template again over the new filler, come back in with the jigsaw, and go to town. Be wary of the blade overheating...


At this point, I painted the new work outside and the inside cabin liner all around. after the paint cured for 4 or 5 days, I installed the portlights with Maine Sail's butyl tape

After it's all said and done, you can't tell that it was originally a different size hole. The fairing compound might crack (I kept my cutout to test for flexibility now and then..) though to be honest, 1/8th" G10 seems more rigid than 1/4" 1971 Ericson layup, so maybe not. If it cracks, whatever, I'll fix it then. :)

Back to Bruce King's aesthetic though -- the top of the portlight no longer parallels the line molded into the cabintop.

View attachment 41598

It's definitely not as pretty, but in my case I had no choice (Old lights were leaking and sealed in with gobs of some compound that destroyed the frames on removal.) To Loren's point there is a slight curve in the cabinside, but the lights went in, open and close without much trouble. Having them open is pretty heavenly, as well.
Looks beautiful!
But what a pain in the a$$!
I looked at buying an E28+ which had replaced the OEM portlights with opening Lewmars and the ventilation was so sweet!
 

goldenstate

Sustaining Member
Blogs Author
Bill Tripp put opposing trapezoid lights on the Hinckley Bermuda 40-1 at least as early as the 1958 design. Other designers seemed to follow suit. I don’t know if this is the first example but I think it predates Ericson use.


Shankara

Member II
On my 1980 25+. Observation of angles on port lights reveals a match to angles of the boat itself.

The top of the port lights are about level, the same level line that runs along the cabin top. The bottom of the two rear port lights angle up smaller from stern to bow, and when the two lines meet at the foremost port light, the angles have grown smaller to match the smaller port light.

The angle of the back of the rear port light is identical to the angle of the line where the cockpit combing meets the cabin top. The angle of the front of the middle port light is the exact same angle of the front of the cabin top. These two angles if continued make a triangle above, revealing the same degree mirrored.

055645B3-50D7-4B73-BD0F-321054FAF3DE.jpeg
 
Last edited:
Top