
Guest viewing is limited

Windlass Installation for Ericson 32-III [Master Thread]

lindaloo

Member II
While you want to keep the structure good and solid, avoid the temptation to overdo it.

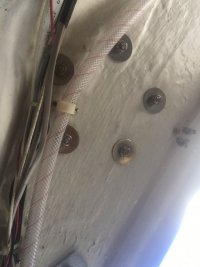
When sailing close hauled, especially when cracking on in a stiff breeze, I am amazed at how tremendously tight the genoa sheet is, and how small the washers are backing up the primary winch bolts/nuts. I know it is set in solid (uncored) fiberglass in the cockpit coaming, but still.

The weight of 5/16" chain and 35lb anchor hanging up and down in 100ft is about 140lb. Even allowing up to 500lb pull to break the anchor out of sticky mud under power, you are well within safety margins (compared to the primary).

The grain of the balsa blocks in a cored deck is usually vertical, the best orientation for compressive strength. The chain locker lid is so thin however that this may not be the case. I would still not suggest overdrilling the holes as preserving the upper skin is vital to layup integrity. Use Neil's method to hog out some balsa and then fill with thickened epoxy. I like to paint balsa with unthickened epoxy first so it wicks into the core. Do this for a few minutes till it stops wicking, then add the filler to the cup.

If you wanted to beef up anywhere, make the "wings" bigger maybe 5" square, to spread the upward force component over more hatch surround.

Rob
 

lindaloo

Member II
I just came back from my boat and took a photo of the washers holding the primary winch down. My Barient 27's have five bolts with what appears to be a 1" washer on each. And the fiberglass is cored, maybe 1.5" total, with a layer or two of mat on the underside.

Neil's use of 3/8" Extren backing reinforcement is plenty strong. Since the chain gypsy is down low, the forces on the windlass retaining bolts are shear, (in the horizontal).

All this to say that if your primary winch is strong enough, you do not have to worry about perceived weakness of balsa core under the windlass. Neil's installation and writeup sets a very high standard. Salutations.82D1D89B-001C-47DF-AA08-E18113E4023A.jpeg
 

carljsalvo

New Member
That would be very practical (and logical)
If one can get at the hose clamp, then the shell that comprises the anchor well in the 32-3 could be removed reasonably easily (to check/maintain bow deck hardware attachments) - if you can break the 5200 seal under its lip.
That would be very practical (and logical)
If one can get at the hose clamp, then the shell that comprises the anchor well in the 32-3 could be removed reasonably easily (to check/maintain bow deck hardware attachments) - if you can break the 5200 seal under its lip.
Hi nquigley,

First, I'd like to thank you for doing a GREAT job on both your windless job and the document you wrote describing it. What I'd be most interested in is you describing in either words or even pictures the "actual path you used to run the windless cables back to both the battery box and where you placed the breaker. Thank you in advance for anything you could provide as I venture forward on this job in my new (to me) E32-3.
 

nquigley

Sustaining Member
Hi nquigley,

First, I'd like to thank you for doing a GREAT job on both your windless job and the document you wrote describing it. What I'd be most interested in is you describing in either words or even pictures the "actual path you used to run the windless cables back to both the battery box and where you placed the breaker. Thank you in advance for anything you could provide as I venture forward on this job in my new (to me) E32-3.
Hi Carl,
From bow to battery bank …
The solenoid was mounted near the top port side of the forward bulkhead (cables went through a hole to the windlass in the anchor well). I build a simple, easily removed, plywood box to go over to solenoid to protect it and the wires from stuff I might want to stow (jam in) there.
Then the red and black cables were just laid along the port side shelf in the forepeak. Then, they went through a new hole in the bulkhead at the aft end of that shelf… into the head (from memory, I think it went into a cupboard in there). Then, inside the cupboard to, and through, the main saloon bulkhead, coming out at the forward end of the port side shelf in the main saloon, then lying on that shelf aftwards. As I recall, I routed the cables through the short partition separating the nav. station from the saloon shelf (new hole). I think it was a bit of a dogleg to get into the nav area. I mounted the high-amp breaker on the outer side wall of the nav area - I can’t recall if it was in the upper or lower shelf area. Then the wiring went from the breaker, through the little bulkhead at the aft end of the nav shelves, into the area behind the distribution panel. As I recall, the cables were then passed down through a gap behind the hull inner shell and the hull, and into the top side of the battery box (2 new holes), connected to the starter battery.
I sold the boat at this time last year (I now have a very different boat - Westsail 32). I hope my memory is accurate. Oh, and I upsized the cables one size above what the windlass’ specs said so I could switch it for the next size up windlass in case the model I chose turned out to be too weak. But, it was fine in the end (Maxwell RC-6)
The cable is very expensive per foot - maybe see if your local West Marine will tell you when wire/cable will next go on sale, or shop around (Defender, others?)

Cheers,
Neil
 

carljsalvo

New Member
Neil,
Hi Carl,
From bow to battery bank …
The solenoid was mounted near the top port side of the forward bulkhead (cables went through a hole to the windlass in the anchor well). I build a simple, easily removed, plywood box to go over to solenoid to protect it and the wires from stuff I might want to stow (jam in) there.
Then the red and black cables were just laid along the port side shelf in the forepeak. Then, they went through a new hole in the bulkhead at the aft end of that shelf… into the head (from memory, I think it went into a cupboard in there). Then, inside the cupboard to, and through, the main saloon bulkhead, coming out at the forward end of the port side shelf in the main saloon, then lying on that shelf aftwards. As I recall, I routed the cables through the short partition separating the nav. station from the saloon shelf (new hole). I think it was a bit of a dogleg to get into the nav area. I mounted the high-amp breaker on the outer side wall of the nav area - I can’t recall if it was in the upper or lower shelf area. Then the wiring went from the breaker, through the little bulkhead at the aft end of the nav shelves, into the area behind the distribution panel. As I recall, the cables were then passed down through a gap behind the hull inner shell and the hull, and into the top side of the battery box (2 new holes), connected to the starter battery.
I sold the boat at this time last year (I now have a very different boat - Westsail 32). I hope my memory is accurate. Oh, and I upsized the cables one size above what the windlass’ specs said so I could switch it for the next size up windlass in case the model I chose turned out to be too weak. But, it was fine in the end (Maxwell RC-6)
The cable is very expensive per foot - maybe see if your local West Marine will tell you when wire/cable will next go on sale, or shop around (Defender, others?)

Cheers,
Neil

Hi Neil,

First, THANK YOU. This is so exciting. Sitting here on my E32 dreaming I'm going to go back to this thread & you're going to have replied!! And just like xmas morning, I arrived here and YOU had replied! What a gift. Best gift yet this boating season. Appreciate ALL your efforts documenting your windless installation experience, it's been so helpful! I'm off with the courage and determination of not going this adventure alone because of your efforts. BRAVO ZULU! Stay in the groove and enjoy that new boat. I'll bet she's a beauty. Carl
 
Top