I found the problem that was making my starter burn up. A pull -a- part 8 pin connector, looks like OE from "88 and made by Medallion. full of corrosion and shorted out. I have taken it out of the system and went wire to wire and everything works now. Do I need this connector? Was it for just release if the motor was pulled? I have keep the wires in group, but if I need it where can I buy one like that? Please do yourself a favor and pull yours apart and inspect before it goes out and burns things up. Where can I get a new one of this type?
You are using an out of date browser. It may not display this or other websites correctly.
You should upgrade or use an alternative browser.
You should upgrade or use an alternative browser.
mherrcat
Contributing Partner
You can probably use an automotive type connector. Make sure it is rated for the maximum current any of the wires is carrying; remember, current is different than voltage. The problem with trying to use another connector is sometimes they require a special tool to crimp the male and female terminals to the ends of the wires. Once the terminals are installed they usually are pushed into the back of the housing and snap into place. The crimping tool alone may cost several hundred dollars...
Last edited:
www.digikey.com
All things electrical including connectors: Waterproof, dustproof, soldered or crimped. whatever you need
www.mouser.com is another very good source
All things electrical including connectors: Waterproof, dustproof, soldered or crimped. whatever you need
www.mouser.com is another very good source
Age and Resistance
If this is about the rectangular black plastic multi-wire connector from the engine area to the cockpit panel... AFAIK that's there to facilitate assembly of the new boat.
We have one that is in the engine compartment and routes all the engine-related wiring from there back to the panel in the cockpit.
When they built the boats this allowed separate areas of the boat to be assembled and finally the plug was put together and taped up with black plastic tape.
Like Ralph, I have run into a case of internal resistance in this plug. Back when trouble shooting our electric fuel lift pump I found a voltage drop in the supply wire to the pump (and other parts on that circuit) and bypassed that one wire with a new wire direct to the cockpit panel.
I have sometimes pondered if it might be a good idea to simply install a piece of flex conduit and pull new wiring, in all of their glorious different colors, between both ends...

OTOH, perhaps by the time the next wiring failure occurs (?) we will have enough time on the old engine to justify a new engine package! And then the next owner can worry about these problems in another 25 years.
Best of Luck Ralph!

I sure enjoyed sailing with you on your visit to Portland!
Loren
If this is about the rectangular black plastic multi-wire connector from the engine area to the cockpit panel... AFAIK that's there to facilitate assembly of the new boat.
We have one that is in the engine compartment and routes all the engine-related wiring from there back to the panel in the cockpit.
When they built the boats this allowed separate areas of the boat to be assembled and finally the plug was put together and taped up with black plastic tape.
Like Ralph, I have run into a case of internal resistance in this plug. Back when trouble shooting our electric fuel lift pump I found a voltage drop in the supply wire to the pump (and other parts on that circuit) and bypassed that one wire with a new wire direct to the cockpit panel.
I have sometimes pondered if it might be a good idea to simply install a piece of flex conduit and pull new wiring, in all of their glorious different colors, between both ends...
OTOH, perhaps by the time the next wiring failure occurs (?) we will have enough time on the old engine to justify a new engine package! And then the next owner can worry about these problems in another 25 years.
Best of Luck Ralph!
I sure enjoyed sailing with you on your visit to Portland!
Loren
Last edited:
mherrcat
Contributing Partner
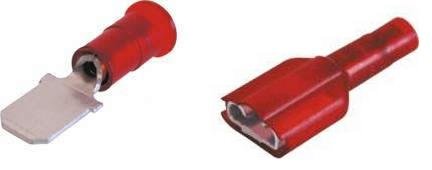
Another, perhaps easier, option might be to use insulated push-on connectors (I would use the heat-shrink type so the wire to terminal connection is well sealed) on the individual wires if you need to maintain the ability to disconnect them in the future. That way you can use a much cheaper crimping tool, which you may already own.
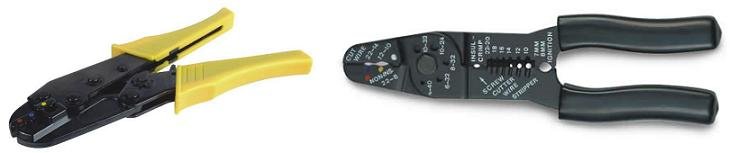
The ratcheting crimper tool below with the yellow handles is much better than the non-ratcheting on the right and can be found in most hardware stores for less than $50.
The ratcheting crimper tool below with the yellow handles is much better than the non-ratcheting on the right and can be found in most hardware stores for less than $50.
Attachments
-
 nylon_double_crimp_pushon_big.jpg7 KB · Views: 40
 -
 l_5011f-outlined.jpg13.3 KB · Views: 37
Last edited:
Bill Sanborn
Member III
When I replaced my engine/panel wiring I ran it thru a terminal strip mounted in the engine compartment. I figured it would facilitate troubleshooting.
Fortunately I haven't had to test that theory yet.
Fortunately I haven't had to test that theory yet.
mherrcat
Contributing Partner
Terminal strip would work, too. Might be nice to have a cover on it to prevent anything shorting across terminals. You will still want to put crimped-on ring connectors on the ends of all the wires.
Just came back from the auto parts store where I saw a ratcheting crimper for $39.
Just came back from the auto parts store where I saw a ratcheting crimper for $39.
Last edited:
Bill Sanborn
Member III
Huge thumbs for ratcheting crimper. Well worth the investment.
Lawrence B. Lee
Member III
Wiring Harness Connector
We bought our 1988 E32-200 in late 2007. For two and a half years I never knew if I cut the motor off if it would ever start again. I think it started 1 out of 4 times on the first try. If I really needed it to start (blowing up on a lee shore or a large tanker approaching) it would not start. I did everything recommended in this web site. Ten gauge wire from starter button to solenoid, separated the glow plug switch from the starter button, replaced the starter button, cleaned every terminal I could find, re-did the ground connection to the motor, bought new batteries. I was moving on to animal sacrifice when Smokey, my diesel guy, suggested the next time it failed to start I wiggle the harness connector on the motor side while someone tried to start it.
BANG! That was it! I cut that sucker out and hardwired each and every wire in the harness to its mate. Since 2009 the motor has never failed to start until last week. That turned out to be the #10 wire on the solenoid which had simply worked loose from vibration. I fixed that and we are back in business as far as starting is concerned.
Now I have to figure out why my 2 year old tach stopped working. I am betting on another bad or loose connection somewhere.
Hope this helps someone.
Larry Lee
Annabel Lee E-32-200
Savannah, GA
Lawrence B. Lee
Member III
Bad vibrations
Well, as I predicted in my last post my tachometer's failure was due to a loose connection. The field current wire had wiggled out of its connector on the alternator. Tricky to replace because there is an isolation washer that keeps the post and the wire coming off of it from touching the case of the alternator. Anyway, the tach is working again.
Larry Lee
Annabel Lee E32-200
Savannah, GA
Sure did sound like my problum too...
How did you know that my "Tac" is not working... even thou all the wires are now with out connecter but stright to each other. When you figure out about the Tac please let me know nicaralph@gmail.com
How did you know that my "Tac" is not working... even thou all the wires are now with out connecter but stright to each other. When you figure out about the Tac please let me know nicaralph@gmail.com
Lawrence B. Lee
Member III
Tach Problems
When something that has been working just stops all of a sudden I figure it's a wire or lose connection.
With the tach, I started the engine and went into to the wiring box behind the tach and other instruments and while the Admiral watched the tach I moved and wiggled every wire in the box. No change...tach still silent. I was also using my volt meter. Motor off. Then I turned the start key to "on" (with out starting) and noted that the tach needle did not move when I turned the key. It usually jumps up to 1000rpm and back at such a move.
So I went to the motor. With the key still in the "on" position (but the motor not running) I noted my regulator (Balmar ARS 5) was not showing any numbers or any other sign of life. At that point I wiggled every wire on the the regulator and heading toward the regulator. I wiggled the now hard wired insrument harness. Nothing. So on to the tach. When I wiggled the field current wire on the back of the tach the regulator lit up and then went dark. I figured that was it. I took the field wire off and cut the ring connector off, trimmed the wire back a tad and crimped a new connector on. The vibrations on the tach are brutal and the wire shaking eventually wore through right next to the connector.
It's tricky working with this part of the tach because the post coming out of the tach cannot touch the tack case so a paper insulator washer keeps if from doing so. The post is not connected to anything in the tach and depends on the nut being tightened down on it to make it hold. I hold the post with a pair of needle nose pliers while I reattach the nut. When I finished, I restarted the engine and watched the tach needle cheerfully run up and down as I played with the throttle.So there you have it. My method is "wiggle and watch."
Larry Lee
Savannah,GA
Last edited: