When we bought Rhumb Ration, one of the issues that I had to fix right away was a comment from the surveyor. The main house batteries were not secured in any manner, neither was the engine battery actually. Three batteries were in the original battery box, just sitting there due to friction and gravity, and lack of space. One more was in the port side storage under the seats of the dinette, along with the engine battery sitting on its original mount. At least the two under the seat were in battery boxes, so that was a token nod to safety....
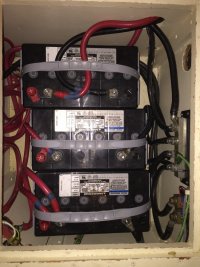
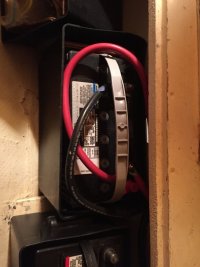
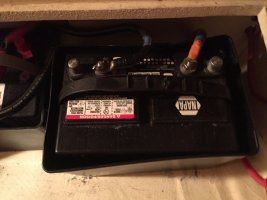
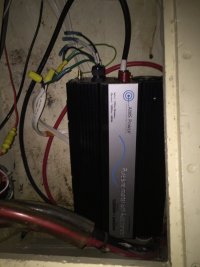
In addition the wires seemed to be way too long and of various lengths. Oh, and we found the inverter under the nav station, also just rattling around, with the 120v house wires put together with some wire nuts. All excellent things.
Here is a diagram of the system as it stood when we got the boat:
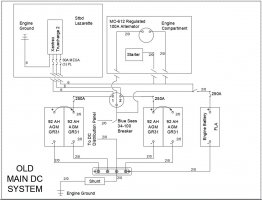
It looked like the PO wanted redundant house batteries, and had gone through a lot of trouble, including buying a double output Balmar alternator to do it. However, there were several issues with this setup, some technical, and some use based. On the technical side the three legged shore power charger was fused a little high, but the bigger issue is this only had one ground going from the charger back to the engine ground. No matter which leg or legs were delivering power to the batteries, the ground has to provide the other half of the loop. It looks like they didn't understand that you have to size the wires for the length of the LOOP not the run. So the ground was well undersized. This wasn't a fire issue, put a 6 gauge wire into any calculator and it will be fine for the 40 amps our charger is rated for, however, the voltage loss is very high, and this is a dip switch charger, so it just outputs a value, no compensation for temp or at-battery readings.
One of the other big problems with this layout, is there is no guarantee the batteries are charged or discharged equally. Since the ground wires for all batteries were lead to a common bussbar, the electricity could choose to go where it wanted.
So I started by taking all the batteries and wires out, removing the inverter, and I took the wire nuts off the 120v wires, put ring terminals on them and terminated them to a strip mounted to the enclosure wall. We still haven't put the inverter back on, so far never had a need for more than what a 200watt portable square sine inverter can do (movie night on a laptop). I might at some point hook it up again to find out if it would be more efficient than the little one, and it might power some tools in time of need.
Next I tested all the batteries, turned out one of them had gone bad, only read 9ish volts, so now we had 3 "good" AGM batteries, and the starting battery. The shelf for the starting battery still had the holders for the straps underneath it, and I found the brand new straps in a drawer, so I put that together, and voila done!
When taking the wires out, all of the wire ends were electrical taped, not heat-shrinked, though the terminals looked good. I took the tape off one though, and was dismayed at what I found. It looks like someone bought the right power lugs, but then soldered them into the lug, no crimp could be seen. Also, a lot of wire was sticking out past the sheath, and I wasn't sure if the wire was getting hot and melting the end of the insulation, or if it had happened during the soldering, but you can see damage to the jacket.
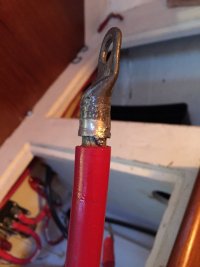
Kinda sad, good ancor wire, good ends, bad execution. So now we have wires to fix, battery boxes to figure out, and the charging needed to be fixed.
Oh....and that ground wire to the charger, I can't find a picture of it right now, but turns out it was welding wire, and the end had been crimped into a fitting, smashed with a hammer and shaped to go into the chargers port, not so awesome.
**Note, I am not a certified electrician, these are my own opinions, and certainly can be wrong, YYMV****


In addition the wires seemed to be way too long and of various lengths. Oh, and we found the inverter under the nav station, also just rattling around, with the 120v house wires put together with some wire nuts. All excellent things.

Here is a diagram of the system as it stood when we got the boat:

It looked like the PO wanted redundant house batteries, and had gone through a lot of trouble, including buying a double output Balmar alternator to do it. However, there were several issues with this setup, some technical, and some use based. On the technical side the three legged shore power charger was fused a little high, but the bigger issue is this only had one ground going from the charger back to the engine ground. No matter which leg or legs were delivering power to the batteries, the ground has to provide the other half of the loop. It looks like they didn't understand that you have to size the wires for the length of the LOOP not the run. So the ground was well undersized. This wasn't a fire issue, put a 6 gauge wire into any calculator and it will be fine for the 40 amps our charger is rated for, however, the voltage loss is very high, and this is a dip switch charger, so it just outputs a value, no compensation for temp or at-battery readings.
One of the other big problems with this layout, is there is no guarantee the batteries are charged or discharged equally. Since the ground wires for all batteries were lead to a common bussbar, the electricity could choose to go where it wanted.
So I started by taking all the batteries and wires out, removing the inverter, and I took the wire nuts off the 120v wires, put ring terminals on them and terminated them to a strip mounted to the enclosure wall. We still haven't put the inverter back on, so far never had a need for more than what a 200watt portable square sine inverter can do (movie night on a laptop). I might at some point hook it up again to find out if it would be more efficient than the little one, and it might power some tools in time of need.
Next I tested all the batteries, turned out one of them had gone bad, only read 9ish volts, so now we had 3 "good" AGM batteries, and the starting battery. The shelf for the starting battery still had the holders for the straps underneath it, and I found the brand new straps in a drawer, so I put that together, and voila done!
When taking the wires out, all of the wire ends were electrical taped, not heat-shrinked, though the terminals looked good. I took the tape off one though, and was dismayed at what I found. It looks like someone bought the right power lugs, but then soldered them into the lug, no crimp could be seen. Also, a lot of wire was sticking out past the sheath, and I wasn't sure if the wire was getting hot and melting the end of the insulation, or if it had happened during the soldering, but you can see damage to the jacket.

Kinda sad, good ancor wire, good ends, bad execution. So now we have wires to fix, battery boxes to figure out, and the charging needed to be fixed.
Oh....and that ground wire to the charger, I can't find a picture of it right now, but turns out it was welding wire, and the end had been crimped into a fitting, smashed with a hammer and shaped to go into the chargers port, not so awesome.
**Note, I am not a certified electrician, these are my own opinions, and certainly can be wrong, YYMV****
