• Untitled Document

    The 2024-2025 Fund Raising Season has Opened!

    EricsonYachts.org has opened the season for raising funds to support the expenses of the site. If you would like to participate, please see the link below for additional information.

    Thanks so much for your continued support of EricsonYachts.org!

    2024-2025 Fund Raising Info

  • Untitled Document

    Join us on January 24th, 7pm EDT

    for the CBEC Virtual Meeting

    EY.o January Zoom Meeting

    All EYO members and followers are welcome to join the fun and get to know the people you've met online!

    See the link below for login credentials and join us!

    January Meeting Info

    (dismiss this notice by hitting 'X', upper right)

Ericson 35 Mk II Oscillations

Glenn McCarthy

Glenn McCarthy
Sooooo, we got a new larger mainsail, got rid of the undersized original rudder, installed a new Foss rudder, tuned the mast to vertical, went out in a good breeze in two 30 mile races - and she sails like a sailboat. The oscillations are gone. We also happened to win both races - quite a different experience from last year.

Thank you all for your input.

Now for the new problem, I spent 60 days in the past year getting this boat ready for the 2018 Chicago Mackinac - the whole purpose of getting this boat. All of the work we did worked flawlessly and none of it broke, there is nothing that needs repair. But then again, we only went 4-1/2 hours up the course before returning to harbor. 17-26 knots of wind, 6'-8' seas with some 10'. Nobody volunteered to bucket the boat for the predicted winds of the next 24 hours. We had our #3 and double reefed main, still a bit overpowered with the rail solidly in the water. The boat was taking on water. Not just a little, a lot. We bucketed probably 300-400 gallons and still had water over our ankles. It just kept coming in. We straightened up, pumped the boat dry, she stayed dry. I am 100% sure that the rubrail screws leak. Or let me say it a different way, with the boat some 40 years old, I am sure the rubrail has been pulled out by pilings a few times through the years, they pulled the rubber out of the aluminum extrusion, pulled the screws out that were pulled out of the fiberglass, moved them over an inch or two to solid glass, drilled new holes screwed them in, pushed the rubber rail back on and called it a day. And did not fill the old holes. I haven't had the time to check, but it is the only thing that makes sense.

The plan this weekend is to remove the rubrail for good (hey, the new rudder actually steers the boat in and out of the slip now, the rubrails aren't needed anymore. It doesn't look like Mr. Magoo steering the boat anymore), epoxy all of the holes, sand her smooth and put on a coat of paint. Never ever deal with leaks from the rubrail ever again.

Question - these screws in the rubrails don't hold the deck to the hull as a hull/deck joint do they?
 
Last edited:

bradh

Member II
Wow - What a race this year. I have done the BayMack a couple times but not the ChiMack. I missed the BayMack though this year - which was the polar opposite, a drifter.

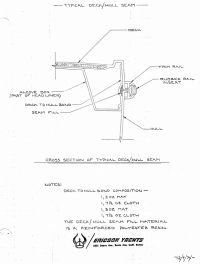
Are you sure it's the rub rail? That would be a lot of water to get through there. Diagram attached.

Brad
 

Attachments

  • Screenshot from 2018-07-26 15-38-25.png
    Screenshot from 2018-07-26 15-38-25.png
    117.3 KB · Views: 213

gadangit

Member III
The plan this weekend is to remove the rubrail for good (hey, the new rudder actually steers the boat in and out of the slip now, the rubrails aren't needed anymore. It doesn't look like Mr. Magoo steering the boat anymore), epoxy all of the holes, sand her smooth and put on a coat of paint. Never ever deal with leaks from the rubrail ever again.

Question - these screws in the rubrails don't hold the deck to the hull as a hull/deck joint do they?

Glenn-
We did this with our E39 a few years back. We ground out a bevel and laid up several layers fiberglass along the seam to ensure that it would never open up. It was a bit more work, but the results look fantastic. I'm afraid Mr. Magoo still occasionally takes the wheel, but he looks good doing it!

Sounds like the right decision to turn around.

Chris
 

Glenn McCarthy

Glenn McCarthy
Thanks Brad.

I intend on inspecting first, before doing anything. I will look for holes that are not plugged. If there were 6 to 8 holes not plugged, that would be adequate to have caused us our problem.

The deck hull joint shown in your diagram appears not to include the screws as part of the connection. It appears to be just a fiberglass joiner, yes?

- Glenn


Wow - What a race this year. I have done the BayMack a couple times but not the ChiMack. I missed the BayMack though this year - which was the polar opposite, a drifter.

Are you sure it's the rub rail? That would be a lot of water to get through there. Diagram attached.

Brad
 

Loren Beach

O34 - Portland, OR
Senior Moderator
Blogs Author
The short screws are just there to hold on the external cover - cosmetic - where the flanges were cut off after the inside os the joint was glassed over.
The roving was glassed over, on the inside, and joins the hull and deck. The resulting structure becomes 'one piece'.

Nuisance leaks have appeared, years later, in areas where the roving might have been starved a bit for resin. This left pin holes where - typically rainwater - would migrate in during the wet season. I know of one Ericson that had this problem. Also, there might not have enough sealant pushed into the thin slot from the outside before those screws were driven.

If you have a lot of water coming in, check on other possible places. Does the 39 have a ventilator molded into the edge of the deck on one side like the 38?

Let us know how your detective work goes.

Another thought: some friends of ours found their faithful old Cal43 taking in a lot of water tacking up the WA coast in the summer a few seasons ago. Enough that they canceled their trip partway up the coast.
They later found problems with a head plumbing drain, sink, and thru hull. When you continuously heel it down Hard, stuff will be under water that never had been the rest of the year.
 
Last edited:

gadangit

Member III
The short screws are just there to hold on the external cover - cosmetic - where the flanges were cut off about the inside was glass over.
The roving glassed over, on the inside, joins the hull and deck. The resulting structure becomes 'one piece'.

Does the 39 have a ventilator molded into the edge of the deck on one side like the 38?
Hi Loren-
I know your question is for Glenn, but I'm not sure what a ventilator is? I can say that our construction was exactly that detail posted above without the alcove. There is an alcove looking thing in the V-Berth for storage.

Grinding out the outward flange is actually a pretty big job, it was pretty substantial with the adhesive material in between the layers.

Chris
 

Christian Williams

E381 - Los Angeles
Senior Moderator
Blogs Author
Glenn,

If it's the rub rail, the interior sides of the boat where the leak is would be soaked. Should be apparent.

That much water--water over the floorboards--sounds like something else. A siphon from the head or a sink or bilge pump hose. Or an issue with the rudder tube gland.

As Loren said, a leak that stops when the heel goes away suggests much apart from just rub rail.

Keep us posted. Keep us posted, that's a lot of water.
 

Loren Beach

O34 - Portland, OR
Senior Moderator
Blogs Author
Chris, I am not sure how many (or few) models had a molded-in vent aft on the side deck. I have only seen it on the 38. There is an internal drain for it, so it can function as a 'dorade' vent. I always wondered how much water on deck would overwhelm that little drain.

Edit- just looked at a 39 on the web, and there is no aft vent like they did later for the 38.

The mystery continues........
 
Last edited:

Christian Williams

E381 - Los Angeles
Senior Moderator
Blogs Author
It would be awful, for certain. I sealed the deck plate in permanently, removed the dorade hose, and plugged the side-hull drain.

The idea of the port-side aft dorade was to ventilate the quarterberth, but it didn't really work despite the expensive joinery. And the hose took up a lot of room I needed behind the instrument panel.

A fan moves 100 times as much air.
 

fool

Member III
The idea of the port-side aft dorade was to ventilate the quarterberth

That vent is a potential culprit. The drain tube for the dorade box on my 35 III was clogged and would dampen my outlook periodically should it overflow into the quarterberth. A wire coat hanger cleared the obstruction when applied with care. The design had me scratching my head. Why would an engineer put an outlet to the salty sea behind an electrical panel?

All that head scratching might have contributed to my male pattern baldness.
 

Rocinante33

Contributing Partner
Glenn,

Have you looked at the scuppers/cockpit drain hoses and their through hulls as a possible source of water leaks? If they are cracked, a prodigious amount of water can gain entry. It’s not apparent in the slip but only when the boat is heeled.

The sink drain hose could be a culprit too.
 

Glenn McCarthy

Glenn McCarthy
The head water intake valve was closed.
There is no overboard thru-hull for the head, it goes to a holding tank.
We have had water in the port bunk pad after rains, but we were not there when it happened. Ran a hose all over the deck/windows/fittings/etc. with nothing coming in. Ran the hose over the rubrail for a few minutes over a 5' length, nothing came in. Now I realize that rain is hitting the full length of the rubrail and taking a while to fill the interior of the rubrail up to a level that allows the water to go through a screw hole.
We sailed on port tack for an extended time when this occurred Saturday, when we tacked, water came flying off the shelf above the galley counter. This is indicative that the rubrail is the source.
We'll find out either tomorrow or Sunday with visual inspection first!
 

Mark F

Contributing Partner
Blogs Author
Hi Glenn,

Something to look for when inspecting the rubrail is a 1" piece of wood between the flanges of the deck/hull joint. I think I remember someone here mentioning that some early 35-2's had a wood spacer there to effectively raise the cabin ceiling for more headroom. If that is the case you might be looking at a bigger project than filling holes and painting - something more along the lines of what Chris did on his E39. I had a leaky rubrail on an E23. I removed, ground down the flanges, filled holes and painted. It worked great, no more leaks (from the rubrail).

Also it's helpful if you put your boat model/year in your signature. I see some responses referring to a E39 rather than your E35-2.
 

Glenn McCarthy

Glenn McCarthy
The drawing Bradh provided was very helpful. We removed the rubrail, clearly a replacement one from original. The fiberglass flanges sticking out the side of the boat (one from the deck section, one from the hull section) were not close together like that drawing, but rather about 3/4" apart from one another. Prior to the installation of this newer rubrail, whoever did it, filled this gap/trench with bondo. We scraped out all of the bondo, filled each individual hole with epoxy, then put a piece of white duct tape covering it all up (and protecting the backs of our legs when hiking as there are fiberglass shards sticking out). We'll grind down the flanges, do some filling, and paint the area white to match the hull and deck once the boat is out of the water and stable to work on. As we replaced the original rudder that didn't steer the boat at all at low speeds going in and out of docks with the new bigger Foss rudder this spring, which does steer the boat nicely now at all speeds, we do not see any reason to keep the rubrail any longer.

Did I see any holes that clearly were at fault? Yes and no. As time was of the essence to get the work done (after work two evenings with the sun going lower quicker), I didn't really study each hole, nor studied how well the bondo might have sealed to prevent water from going through the old original holes. The caps at both ends of the rubrails on both sides clearly had multiple open holes through to the inside at least 1/4" in diameter having been moved to new positions at least twice each.

The final test will be to go out on a 30 knot day, sail on port for 1 hour, and sail on starboard for 1 hour. While I am sure the rubrail was the problem, I need the complete piece of mind that we proved it, and will never ever have this happen again.
 

Glenn McCarthy

Glenn McCarthy
We did go out for a sail on a windy evening with friends I affectionately called "Crash Test Dummies." I looked with a flashlight to see if any water was coming in at the rubrail height. This was after my 90 year old dad filled the screw holes after we removed the rubrail. And I did see water coming in two places. Then I remember that his hands shake full time like no tomorrow, and filling little screw holes with epoxy was probably not the right guy to give the job to! The boat now is in the shipyard, I am grinding those ridges off, not deep enough to install a layer of fiberglass cloth and using West Epoxy with a filler. Considering the surface area and thickness of the epoxy where the holes were, I'm not concerned about "weeps." There is no doubt in my mind that my dad missed some holes, but it is important to understand that the rubrail was a channel to hold water. I could easily imagine it being filled with water from the front to the back end. At the front end there definitely were very large holes, now filled.

Is there a chance water was coming in other places, some have asked? Why yes, this boat is a much better screen than it is a door. We've attacked 30 leaks in the deck, taped over the leaky windows (I'm rebuilding all of them over this winter), the cockpit drain hoses were replaced (one was cracked 50% through), the gate valve under the head sink did not close all the way and on starboard tack allowed water into the boat (new ball valve and hose ready to be installed in my next trip), no hatch had any gasket (all do now), the prop shaft dripped more than it should (the nut on the gland was tightened slightly to slow it down), and the packing gland on the rudder shaft is leaking (not horribly and the packing material will be replaced this winter). I have checked all other thru-hull fittings, none of them leak.

As they say, on a sunny day, you had to put your rain gear on to go into your bunk. Or the Wildlife and Natural Resources Police dropped in and wanted to see our permit for the trout stream running through the boat.

Chasing leaks isn't the only thing I'm doing, so far I've knocked off 190 projects. But I admit, I insist on a dry boat and this one is really taking me for a ride!
 

Christian Williams

E381 - Los Angeles
Senior Moderator
Blogs Author
I don't know any other way to do it than the way you're doing it, and the solace is we're the ones doing it, because nobody else could, and so the small successes are all ours. And I don't have any advice, and have slept in many a wet bunk.

But lately, what I do for mysterious leaks is to direct a stream of high pressure hose water at the suspected source (it helps to have good water pressure on the dock).

You can do that when the sun is high and warm and the boat stable, and it feels like Sherlock Holmes with a magnifying glass. Need a helper to hold the hose. You can keep the stream on the point for as long as it takes to reveal an issue, or convince yourself the issue is not there.

For leaks above the waterline this works for me better than midnight deductions or lines of flour or taped paper towels.

I've come to believe that if a fitting or seam or hatch won't leak after five minutes of having a pressure nozzle stuck down its throat, it won't leak in a gale.

For what it is worth.
 

Glenn McCarthy

Glenn McCarthy
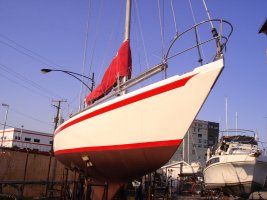
Fairwell rubrails, you will not be missed. With the new larger Foss rudder last year we learned you steer well at all speeds plus going in and out of docks, which you couldn't before. You rubrails hid a number of holes that allowed water to enter the boat, especially when healing with the rubrail underwater. We learned our deck is 1" higher (or better said the ceiling is 1" higher) than a standard E35 MkII. I first ground off with a 4-1/2" angle grinder with an abrasive disc the two fiberglass tears that were used to clamp the deck to the hull that were hidden behind the rubrail. I just filled the recess with West Epoxy with the purple powder filler, made a "mini longboard" that held 1/3 of a sheet of 40 grit sandpaper, once filled and faired, one more thin layer of the West Epoxy mix with powder over the top, then palm sander with 80 grit. Mask and slap on a few coats of paint - Voila!

DSC02548.jpg
 

Ed Valente

Member II
Glen,

In addition to solving some leaks, that's a clean look. How did you suspend your spinnaker pole? I'm looking for a better solution than deck mounts.

Ed
 

Loren Beach

O34 - Portland, OR
Senior Moderator
Blogs Author
Pole Storage Ideas

Glen,

In addition to solving some leaks, that's a clean look. How did you suspend your spinnaker pole? I'm looking for a better solution than deck mounts.

Ed

Different person and boat.... but on our previous smaller boat I used large SS D-rings seized to the pulpit at one end and to a stanchion at the other, and clipped the pole into those.
On the O-34, I got tired of tripping over the pole on deck with the standard Forespar pole end chocks, and changed to their rubberized pole holders mounted on a couple of stanchions.
Pole is off the deck now and going forward is a lot easier and safer.
Link: https://www.forespar.com/products/sail-stanchion-mounted-pole-chock.shtml
 
Top