• Untitled Document

    Join us on November 22nd, 7pm EDT

    for the CBEC Virtual Meeting

    Adventures & Follies

    All EYO members and followers are welcome to join the fun and get to know the people you've met online!

    See the link below for login credentials and join us!

    November Meeting Info

    (dismiss this notice by hitting 'X', upper right)

Exhaust Rebuild?

Nick J

Contributing Partner
Moderator
Blogs Author
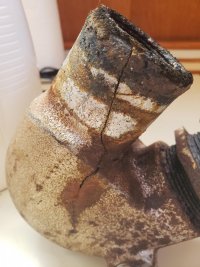
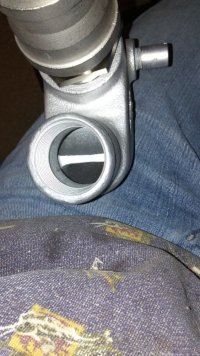
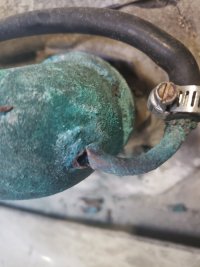
My surveyor noted the exhaust elbow on the 2006 Yanmar 3Ym20 had some external rust, should be considered a consumable item, and replaced every 5 years. I put it on the to-do-list and moved on. A few weeks ago, while I was removing the old engine wiring harness, I noticed the elbow had a small crack under the rust. It didn’t seem to be leaking water or exhaust, but I figured this was a good sign to replace it before we take any trips with the boat.
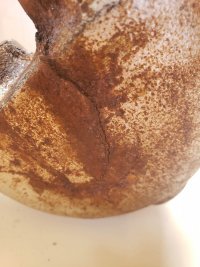
20200410_121618.jpg
20200410_121627.jpg
After some research, I found HDI marine and ordered a new stainless kit including the elbow, coupler, and mixing elbow. I figured all I had to do was remove the 4 bolts, water inlet hose, and exhaust hose and install the new kit. The 4 bolts and water hose were easy to remove, but the exhaust hose was stuck. I struggled with it for an hour or so without getting very far. For a quick sanity check, I called Harbor marine and asked how much 2’ of reinforced 2” exhaust hose was. When I heard it was around $25 I told him I would pick it up in an hour and I cut the old hose off. This is where the project went south.

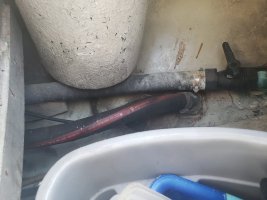
The other end of the exhaust hose connects to a water lift muffler, but the muffler only has 1 5/8” inlet and outlets. To reduce the 2” hose to the 1 5/8 muffler, there was a small section of 1 5/8 hose inside the 2” hose.
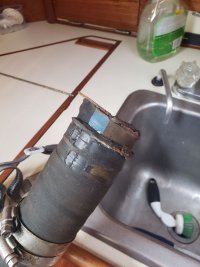
20200410_121852.jpg
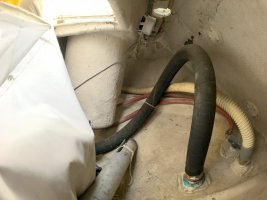
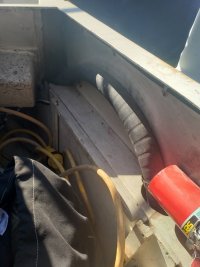
From the top of the muffler, they used 1 5/8 hose to a new Marelon valve that was threaded onto the old thru hull elbow. The old thru hull has the original siphon brake hose, but it has been plugged with a bolt under the cockpit seat and the connection is loose. I haven’t seen water or exhaust leaking from this area, but I don’t see how it wouldn’t. The thru hull looks like it’s seen better days.
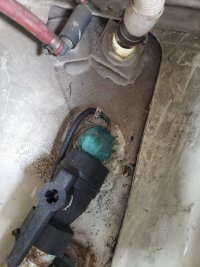
20200321_124141.jpg

Now I’m trying to figure out what I should do. I need to do something to get from the 2” exhaust elbow to the 1 5/8 water lift muffler. As I see it, my options are:

  • Glass around the 1 5/8 inlet to build it up to 2” and install a new 2” hose from the elbow to the muffler.
  • Purchase a new water lift muffler with a 2” inlet and 1 5/8 outlet
  • Replace the whole system with a new muffler, 2” hose all the way back to the thru hull, and a new thru hull / sea cock.
Obviously, the best solution is replacing everything, but that will cost around 1 boat buck and take some time. I’m also not planning on hauling the boat out until July or August (maybe later if we are still under quarantine). I think I could replace the thru hull in the water, but that seems difficult. I’d like to be able to use the boat before

One idea I’m kicking around is going with option 1 for the summer, then completing the rebuild when I pull the boat out of the water and have better access to the thru hull. What would you guys do? Any recommendations on the thru hull?
 

Kenneth K

1985 32-3, Puget Sound
Blogs Author
I rebuilt my exhaust system in 2016. https://ericsonyachts.org/ie/ubs/ma...r-elbow-replacement-with-support-bracket.541/

Here are my thoughts:

A. That was a "serious" crack in the exhaust elbow. The interior of those elbows has two channels. Water is not injected into the exhaust (gas) channel until the downhill side of the elbow, to prevent water from getting into the valves/cylinders. Once the interior channel is cracked or rusted through, that is one of the dangers. You were lucky.

20170429_223715.jpg

B. My second biggest concern would be the "bolt" in the siphon break hose. Unless there is some other kind of siphon break installed, siphoning can cause various fatal harms if the water-injection inlet is below the waterline (when heeling or not), if you also happen to be missing any blades in your water pump impeller (see attached PDF file, below).

C. I had the same situation with the hose-within-a-hose to step-down from 2" to 1 5/8" at the Vernalift. Apparently, this was standard industry practice back in the day. I put mine back together the same way (with new hose, of course). The hose-within-a-hose is not the weak link in the system (it actually held up very well over 30 years)--the weak link is the riser/injection elbow. By today's standard, no one uses less than 2" hose for the whole exhaust system. Some claim their engines run better after upgrading to 2" hose all around. On the other hand, I figure my engine has been running fine for 30+ years and 2200+ hours with the 1 5/8" hose. The expense of upgrading to 2" didn't seem to make sense on a 30 year old engine. If I replace the engine, I'd go with 2" hose, of course. The hose-within-a-hose coupling has been trouble free since I reinstalled it.

D. The Marelon ball valve threaded onto a bronze elbow (at the through-hull) is also another "technical" no-no. Marelon valves are NPS thread (straight) and bronze is NPT (tapered). However, it seems to be another standard Ericson practice from the 80s. If you want to keep the ball valve in the system, you either live with the "mis-match" or replace the valve/elbow/through-hull combination to all bronze. Again, I didn't think the payoff for replacing all the above was worth the time and cost, so I re-installed as-is, though I did put in a new Marelon valve. Note, the interior opening of a 1 1/4" Marelon ball valve is only 15/16"--so that is your biggest restriction in the exhaust line. I have a spare 1 1/2" Marelon valve that I'll probably getting around to swapping around to one of these days.
 

Attachments

  • Exhaust System Basics.pdf
    717.7 KB · Views: 23
Last edited:

Nick J

Contributing Partner
Moderator
Blogs Author
Kennith,

thanks for the reply. I'm about to sit down with a beer and go over the document.

I'm tempted to keep the 1 5/8s run from the water lift on. I find it hard to believe the 2" was an engineering decision when the 3ym15, 20, and 30 all share the same exhaust elbow with the same 2" outlet. It seems like a manufacturing decision to simplify their supply chain. However, my thru hull doesn't look good and if I'm going to replace that with a new valve, an extra $200 for the 2" hose doesn't seem that bad. Clearly, I'm still undecided.

I don't have a siphon break anywhere in the system. the raw water outlet goes directly to the mixing elbow and the outlet of the water lift muffler goes in a high loop under the cockpit seat then gently sweeps down to the seacock. The siphon break hose with the bolt is left over from the old engine. Having this connected to the hose you are trying to break a siphon on doesn't seem correct, but it looks like that was a standard Ericson thing. I don't believe the mixing elbow is below the water line on any point of sail, but I may be wrong on that. Regardless, installing a anti siphon before the exhaust elbow seems like a good idea. Does your system have an anti siphon loop after the water lift muffler?
 

Loren Beach

O34 - Portland, OR
Senior Moderator
Blogs Author
I seem to remember that our former M25XP used a 1 5/8 exhaust hose and the rest of the system was matched to it. That's why I had to change out the exhaust transom thru hull to the larger size. Your M25 is a very similar engine and may have the same exhaust sizing. I do not know why they would had a mismatch requiring a step down, however.
Our old water lift muffler was replaced for the same hose sizing reason.
I passed my old re-chromed exhaust part along to another O-4 owner, by the way.

Per one of my mechanic friends, one reason that the new diesels from Betamarine have the larger exhaust ID is to help generate a bit more horsepower, because any restriction in the exhaust system lowers efficiency for an air-guzzling diesel engine. This gets more important as you run it up into the main power band under load.

The Betamarine 25 does not require the use of a separate syphon break, so we did not continue with that 1/4"hose run. FWIW, the install manual does state that a syphon break hose (a la Ericson) may be advisable in some installations.
 

Nick J

Contributing Partner
Moderator
Blogs Author
Lauren,

The M25 was replaced with a Yanmar 3YM20 in 2006 at which time they replaced everything in the exhaust system but the thru hull and sized the hose by the thru hull not the engine. I didn't get the full story from the previous owner, but it sounds like they were sailing in the San Juans when the M25 quit and they decided to re power in Friday Harbor. I imagine it was a get it done as quickly as possible situation. A few corners were cut including the exhaust (Maybe 1 5/8 is what they had on hand) and cleaning up the engine bay or removing the old engine wiring harness wasn't done. It's frustrating from a new owners perspective, but I understand timing is rarely perfect and if I was in the same situation I might have made the same decision. If everything was done perfectly on the boat and it was well maintained, I wouldn't have been able to afford it. This is the kind of stuff we signed up for.
 

Christian Williams

E381 - Los Angeles
Senior Moderator
Blogs Author
I just replaced a lot of hoses and found many subtle disparities in predicted diameter. Compromise can be OK, in my opinion, for connections that aren't critical or pressurized.

Nothing wrong with a sleeve to reduce the waterlift connection. And speaking as an amateur, if the fit was anywhere near close I'd first try a hose clamp and see if the bigger hose will squeeze to securely close the gap. If the connector tube on the muffler is long, and two hose clamps fit easily, the result might be acceptable and you'd know it by observation. Somebody correct me if this is bad practice.
 

Frank Langer

1984 Ericson 30+, Nanaimo, BC
Christian, I don't know about bad practice, but when I recently replaced the exhaust hose from the exhaust elbow/riser to the Vernalift muffler, both the old one and the new one I installed had wire coil in the hose, and the hose was very stiff/firm. There is no way that I would be able to clamp it down from 2" diameter to 1 5/8", which is what the initial poster stated was the measurement. But then, I'm just a little old guy! :)
Frank
 

Nick J

Contributing Partner
Moderator
Blogs Author
2" to 1/58" is too much of a gap to make up with hose clamps. I really don't like the idea of using a hose inside of a hose either. I found Centek makes fiberglass reducers:


The guy at Harbor marine said he thought my muffler might be under sized and after reading through the document Kenneth posted it does seem to be small. Centek says the 8 x 8, which i currently have, holds .78 gallons. 2' of 2" (elbow to muffler) and 3' of 1 5/8 (muffler to top of drip loop) holds .65 gallons but the document says you should use a factor of 1.3. I think I have room for a 10 x 10. I also noticed the drain on my muffler is cooroded and there are a few cracks in it. It isn't leaking, but everything considered, I'm thinking it should be replaced.

My current plan, I think I'm on 4th or 5th iteration in two day, is:
Now:
  • New 2" from elbow to Muffler
  • New 10 x 10 2" in and out Centek water lift muffler
  • Centek 2" to 1.63" reducer from the outlet of the muffler to the existing 1 5/8 hose
At Haul Out:
  • Replace 1 5/8" with 2"
  • replace thru hull with 2"
One of the questions I'm still wondering about is should I replace the valve or just go without? If I do put a valve in the system, can I place it at the top of the loop in the cockpit lazarette so I can access it easier?
 

Kenneth K

1985 32-3, Puget Sound
Blogs Author
If one of your "drivers" here is that the through-hull NEEDS to be replaced, then I think you definitely put in a 2" through-hull now. My through-hull and backing plate were in great shape so I made the original 1 5/8" hose/hardware work.

With the 2" through-hull in, you still have the now-or-later option on upsizing the hose:

-If later, I'm sure you could use a bronze bushing or two to fit the existing 1 5/8 hose to the new 2" through-hull/bronze elbow combo at the stern. This saves time & money, doesn't' cut into your sailing season, and still allows you to finish the project later. A problem with that Centex reducer (between the injection elbow and the muffler) might be that this section of 2" hose is at a fairly tight bend radius. The reducer adds a 6+" of straight section to that curve. I think you'd probably have to move the muffler aft to make it fit.

-If "now", I think you're on the right track to get a larger Vernalift. The 2" hose will allow 50% more water to spill-back into the muffler than the smaller hose (from the top of the "high loop") when you shutdown the engine. However,
2' of 2" (elbow to muffler) and 3' of 1 5/8 (muffler to top of drip loop) holds .65 gallons but the document says you should use a factor of 1.3.

I believe you only need to count the "muffler to drip loop" length in the calculation--this side is all water "burped" up from the muffler. The "elbow to muffler" side is mostly exhaust gas with a little water vapor.

I don't think a shutoff ball valve is required in an exhaust run. Seems I've heard some owners say they don't have one. I reinstalled mine and I keep it closed over the winter months. If you put one back in, I can't imagine that the location matters. The outer diameter of a 2" ball valve is going to be fairly large though--it might not fit under the cockpit bench easily.

I don't believe the mixing elbow is below the water line on any point of sail, but I may be wrong on that. Regardless, installing a anti siphon before the exhaust elbow seems like a good idea. Does your system have an anti siphon loop after the water lift muffler?

I reinstalled the existing anti-siphon loop on the raw-water injection hose--didn't want to rely on my own calculations of where the waterline might be under all possible situations. The exhaust hose itself has only the "raised loop" you mentioned, under the stbd cockpit bench.
 
Last edited:

Loren Beach

O34 - Portland, OR
Senior Moderator
Blogs Author
Adding to Ken's observations about a valve for that particular place, I only know a few folk that have ever added a valve for the exhaust outlet. They had boats where the internal routing of the hose was limited enough that there was a concern about following seas flooding that hose and the muffler and..... :(
But these sailors were never (or seldom) planning on using the engine once they cleared the coast for Hawaii or further South.
And, they said they put a large warning sign on the engine key to remind them to open that valve first.
Our exhaust hose run has a significant high loop just under the front lip of the cockpit locker, and I have not heard of sisterships having a problem during multiple trips to Hawaii and back. (?)
 
Last edited:

Nick J

Contributing Partner
Moderator
Blogs Author
Although not the initial driver, I am concerned about the state of the thru hull. It is heavily corroded and the anti siphon piece is spinning freely and doesn't seem to be connected. If the thru hull was in good shape and the valve had a larger internal diameter, I would probably keep the 1 5/8" section from the muffler to the thru hull and order the new muffler with a 2" in and 1 5/8 out.

It's reassuring to hear the valve is not necessary. To my eye, the loop seems adequately high and the valve is buried under gear most of the time, so I don't ever imagine using it. I'm trying not to make cost a huge factor, but it always is and a valve with 2 hose barbs is a substantial piece of the pie.

For the reducer, I was planning on using it on the outlet of a new muffler to transition to the existing 1 5/8 run. This would buy me time until I haul out later in the year. I think I can install the thru hull in the water, but I'd feel better being able to drill from the outside in to reduce the chance of chipping the gel coat or awl grip beyond where the flange would cover. Hearing Christian and a few other peoples' advice about the 1 5/8 not being too big of a deal also reassures me that waiting a few months isn't going to be a big problem.

While I'm on the boat measuring for the larger muffler, I was going to try to get all the measurements relative to the waterline. This might be a dumb question, but how does everyone get an accurate water level? I was thinking I could pull the salt water foot pump connection off the thru hull, attache a piece of clear tubing, then take that to the engine compartment and open the thru hull. Is there an easier way to do it?
 

Christian Williams

E381 - Los Angeles
Senior Moderator
Blogs Author
For the record, the E381 doesn't have a (small, odd) vacuum break at the end of the exhaust hose--unlike the 80's 32-3 and Tricked Hat's 35.

The E381 exhaust hose does have two emphatic loops in it. Presumably the loops do the first work of preventing water from backing up into the engine. And on the exhaust elbow there is a deck-level vacuum break on the heat exchanger seawater outflow hose.

x Exhaust hose transom Ericson 381.JPG...x Exhaust hose cockpit Ericson 381.JPG...antisiphon loop .jPG
 

Nick J

Contributing Partner
Moderator
Blogs Author
Christian,

Pictures clear everything up. I have a similar loop in the cockpit lazarette. I've been searching everywhere trying to find a 2" replacement thru hull with a 90 degree. I can't find anything over 1 1/2, but seeing your run go directly to a straight thru hull looks more direct. It would create a section that would collect water, but that might be the best option. After looking at your second picture, I'm wondering if the previous owner stuck with the 1 5/8 because the OD of a 2" pipe wouldn't fit through the holes in the area marked "No Step". I really like the placement of your siphon break. Can't get much higher than that.
 

Christian Williams

E381 - Los Angeles
Senior Moderator
Blogs Author
Regarding finding an elbow: Two of my cockpit scupper drains have 90-degree bronze elbows on Marelon through-hulls.

The surveyor wanted the elbows changed to Marelon, so the thread types would be the same--or just remove the elbows.

He didn;t think elbows were necessary. That's good , because I never could find Marelon elbows to fit.
 

Kenneth K

1985 32-3, Puget Sound
Blogs Author
Regarding Christian's pictures--that's an interesting setup: it seems to create two "high loops."

That brings up a point I always wanted to ask a marine diesel mechanic. Everyone talks about the reduction in back pressure gained from moving up to 2" hose exhaust. It's always seemed to me that the most "back pressure" would be created by having to pump a column of water up the height from the top of the muffler to the top of the "high loop," and not so much from the size of the hose that the water/air mix flows though on its way out the thru-hull (which is usually a down-hill run from the high loop).

In a setup with 2 high loops, it seems this problem could be magnified if the second loop were higher than the first. Can't tell from Christian's pictures, but maybe the first loop is the highest one and, from that point, gravity does work of pushing water out through the second, lower loop.
 
Last edited:

eknebel

Member III
Adding to Ken's observations about a valve for that particular place, I only know a few folk that have ever added a valve for the exhaust outlet. They had boats where the internal routing of the hose was limited enough that there was a concern about following seas flooding that hose and the muffler and..... :(
But these sailors were never (or seldom) planning on using the engine once they cleared the coast for Hawaii or further South.
And, they said they put a large warning sign on the engine key to remind them to open that valve first.
Our exhaust hose run has a significant high loop just under the front lip of the cockpit locker, and I have not heard of sisterships having a problem in their trips to Hawaii. (?)
As I sit restricted on the dock, I am tinkering, and this thread started me thinking...
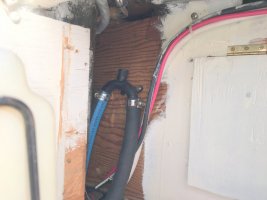
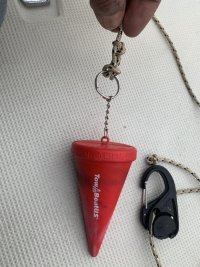
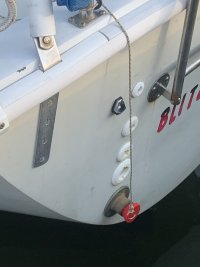
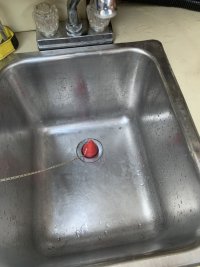
I have the standard universal vacuum break at the raw water injection at the elbow, as well as a exhaust loop the comes up to the bottom of the port lazarette. I still have concerns with a following sea, and a cockpit full of crew, and came up with a cheap way to sooth my fears. A keyfloat from west marine fits the exhaust at the stern and pops out by itself when engine cranks. It also fits as a sink stopper!IMG_2007.jpgIMG_2009.jpgIMG_2010.jpg
 

Loren Beach

O34 - Portland, OR
Senior Moderator
Blogs Author
Neat idea.... Simple and Effective!
Observation: someone has, by appearance or my misperception, already replaced the original cockpit/transom "plastic" thru hulls with Marelon. If so, Great move! (When I did that for our boat I chose SS, but Marelon would have been quite acceptable.)
 
Last edited:

eknebel

Member III
Good eye, Loren! I replaced all above water thru hulls twenty years ago. I figure it is getting time to them and do hoses again too. 9 out of ten sinkings happen at the dock, according to insurance claims. Drip by drip. I better do it soon before l lose more body suppleness, as paying someone goes against my moral fiber!
 

Nick J

Contributing Partner
Moderator
Blogs Author
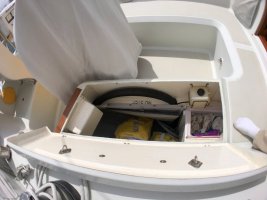
Got a chance to stop by the boat this afternoon to go over the exhaust run and take some pictures
  • The elbow on the thru hull is worse than I thought. I'm actually taking this as a positive since it affirms my decision to pull everything out... at least that's what I'm telling myself.
  • The route for the exhaust looks fairly straight forward. I may have to enlarge the holes where the hose pass through the plywood in and out of the high loop, but still not bad
  • I may have enough drop from the cockpit sole to go directly to a straight thruhull if I purchase a corrugated or some other flexible hose.
  • I'm thinking I can remove the old backing plate, put a hole in a piece of g10 and epoxy it in place, then use a router with a guide bearing and spiral up cut bit to enlarge the thru hull opening. All from the comfort of my slip
All things considered, I'm feeling pretty good about this job. I've said that far too many times. I guess I never learn. just need to order up and get to work.
 

Attachments

  • 20200415_163923.jpg
    20200415_163923.jpg
    96.1 KB · Views: 27
  • 20200415_163943.jpg
    20200415_163943.jpg
    185.4 KB · Views: 27
  • 20200415_164055.jpg
    20200415_164055.jpg
    112.1 KB · Views: 26
Top