• Untitled Document

    The 2024-2025 Fund Raising Season has Opened!

    EricsonYachts.org has opened the season for raising funds to support the expenses of the site. If you would like to participate, please see the link below for additional information.

    Thanks so much for your continued support of EricsonYachts.org!

    2024-2025 Fund Raising Info

  • Untitled Document

    Join us on January 24th, 7pm EDT

    for the CBEC Virtual Meeting

    EY.o January Zoom Meeting

    All EYO members and followers are welcome to join the fun and get to know the people you've met online!

    See the link below for login credentials and join us!

    January Meeting Info

    (dismiss this notice by hitting 'X', upper right)

Stuffing Box - in the weeds

Ethanknox

Junior Member
There are plenty of stuffing box threads on here for general reference, but I could use some help with specifics. My ‘69 E35 Mark I had her motor upgraded to a Yanmar YG20 a few years back; I assume the prop shaft and stuffing box are still the original setup, but could be wrong. I picked up the boat in June and in the survey it was noted that a stuffing box service was due (on my todo list) - unfortunately that went from “todo” to “do now” on Monday, when a steady stream of water started running from the aft of the nut.
I picked up packing compound in 3 sizes (1/8, 3/16 and 1/4) so no matter what’s in there I’m covered. I cut my rings, made a little pvc plunger to push them in, got a corkscrew thing to remove the old packing, sprayed down the very green nut(s) with pbb (twice now). I am struggling to get the nut off - here’s where the details get fuzzy and I could use some input.

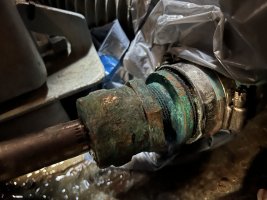
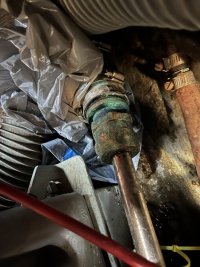
I know there’s supposed to be 2 nuts, the primary and a lock nut, and this primordial shape does sort of appear to have 2 different nut faces… but boy do they feel like the same nut when I’m turning on them in 2 different directions.
If I turn either one by itself, the threads also begin to turn. That seems like a very bad thing, like I’m going to rip out the box in the process. I can’t see anything to grab on to aft of the threads - it goes direct to the big hose and then to glass.

Is someone able to confirm that those are in fact 2 nuts, just really frozen together, or one nut? And any tips on where I can secure the wrench to other than the nut to make sure I don’t rip out the housing?

I am not really in a position to put the boat on the hard or remove the shaft etc at the moment - I fully intend to do a serious overhaul on the hard in the spring that will take most of 2025, and if I need to do major service earlier I can/will, but Philly is not the place to do that if I can at all avoid it. Plus if she’s got to come out, getting her there from this marina will not be pretty or cheap. Unless I run the motor with this hemorrhaging stuffing box, which seems like a bad idea.
 

Attachments

  • IMG_3258.jpeg
    IMG_3258.jpeg
    181.8 KB · Views: 28
  • IMG_3257.jpeg
    IMG_3257.jpeg
    170.3 KB · Views: 27
  • IMG_3256.jpeg
    IMG_3256.jpeg
    138.7 KB · Views: 26

Christian Williams

E381 - Los Angeles
Senior Moderator
Blogs Author
There's such a thing as a "stuffing box wrench," which might help with the awkwardness. And a big pipe wrench on the nut for massive leverage. It looks like a standard box to my eye, although been a while since I had one. PB Blaster and a precision hammer. I just like saying "precision hammer," but probably I would try whacking the thing harder.

You are confident about repacking in the water? I've never done it, but might well have tried.


Ethanknox

Junior Member
I cannot put into words how much better I feel seeing the same nuts assembly here ^^ as what is in my boat. Every video/photo I've found has looked slightly different, usually with more of an assembly to the (right in this photo) aft that could be grabbed onto. So it's pretty clear, I just need to keep at it with the PB, get a second pipe wrench for the lock nut (I've been using a flat wrench that has way less grip). Also good to see that the thread (at least in this video) goes the same way as I have been turning, so it just needs more muscle!

I am very jealous of all that work space he's got there; I had to rig up a line between my winches, drop it down into the starboard lazarette and hook it under my chest as I lowered myself down head first to just barely get one arm and half a wrist in there - and then hoist myself back out with the tail of the line from the winch :egrin:
 

Ethanknox

Junior Member
Looks like you have a good start on it. I wonder if further cleanup, including wire brushing the whole assembly might provide more clarity.
I wish I could offer some concrete ideas, but what's needed is someone with an early Ericson to check in.
Is this the model: https://sailboatdata.com/sailboat/ericson-35-1/?units=imperial
??
That is her! I will take a brush and more PB to her tonight/tomorrow and report back, now that I know I'm headed in the right direction
 

Alan Gomes

Sustaining Partner
That is her! I will take a brush and more PB to her tonight/tomorrow and report back, now that I know I'm headed in the right direction
Be careful with the PB Blaster. Rubber parts do not like it, and this includes your transmission seals. It's great on the metal stuffing box and lock nut, though. Using a brush is a good idea for that reason, as you are doing.
 

Ethanknox

Junior Member
There's such a thing as a "stuffing box wrench," which might help with the awkwardness. And a big pipe wrench on the nut for massive leverage. It looks like a standard box to my eye, although been a while since I had one. PB Blaster and a precision hammer. I just like saying "precision hammer," but probably I would try whacking the thing harder.

You are confident about repacking in the water? I've never done it, but might well have tried.

I certainly wouldn't say confident. I'd go with "more terrified of the bilge pump giving out from extended " so in
Be careful with the PB Blaster. Rubber parts do not like it, and this includes your transmission seals. It's great on the metal stuffing box and lock nut, though. Maybe brush it on? But in any case, shield the rubber parts from coming in contact with it.
good call - that gray stuff in the background of the photo is garbage bags, I used them to mask off all the non-metal bits when applying.

i don’t think pb has always had the flow control thingy on the bottle, but it’s got one now that you can turn the flow out to basically a trickle, which is really smart. Totally perfect for this job
 

Alan Gomes

Sustaining Partner
There are plenty of stuffing box threads on here for general reference, but I could use some help with specifics. My ‘69 E35 Mark I had her motor upgraded to a Yanmar YG20 a few years back; I assume the prop shaft and stuffing box are still the original setup, but could be wrong. I picked up the boat in June and in the survey it was noted that a stuffing box service was due (on my todo list) - unfortunately that went from “todo” to “do now” on Monday, when a steady stream of water started running from the aft of the nut.
I picked up packing compound in 3 sizes (1/8, 3/16 and 1/4) so no matter what’s in there I’m covered. I cut my rings, made a little pvc plunger to push them in, got a corkscrew thing to remove the old packing, sprayed down the very green nut(s) with pbb (twice now). I am struggling to get the nut off - here’s where the details get fuzzy and I could use some input.

I know there’s supposed to be 2 nuts, the primary and a lock nut, and this primordial shape does sort of appear to have 2 different nut faces… but boy do they feel like the same nut when I’m turning on them in 2 different directions.
If I turn either one by itself, the threads also begin to turn. That seems like a very bad thing, like I’m going to rip out the box in the process. I can’t see anything to grab on to aft of the threads - it goes direct to the big hose and then to glass.

Is someone able to confirm that those are in fact 2 nuts, just really frozen together, or one nut? And any tips on where I can secure the wrench to other than the nut to make sure I don’t rip out the housing?

I am not really in a position to put the boat on the hard or remove the shaft etc at the moment - I fully intend to do a serious overhaul on the hard in the spring that will take most of 2025, and if I need to do major service earlier I can/will, but Philly is not the place to do that if I can at all avoid it. Plus if she’s got to come out, getting her there from this marina will not be pretty or cheap. Unless I run the motor with this hemorrhaging stuffing box, which seems like a bad idea.
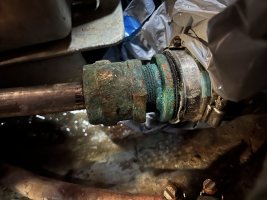
I can confirm 100% that your photos show the packing nut and a separate lock nut behind it. Absolutely.

The PB Blaster will help, as you mentioned in another post. The lock nut is a cast piece, I think, and is not very precisely made. I do not like the adjustable wrenches for that but purchased a large open-end wrench to accommodate it. But because of said irregularity in the lock nut you may find that the wrench fits more snugly over certain of the flats compares to others. I also cut the handle of the wrench shorter with a cutting wheel since the wrench handle was too long to work within the confines of the space I had.

And yes, it is not a good thing if the entire stuffing box turns and torques the stuffing box hose. With the proper wrenches you should be able to hold the packing nut in place and get the lock nut loose.
 

Alan Gomes

Sustaining Partner
I certainly wouldn't say confident. I'd go with "more terrified of the bilge pump giving out from extended " so in

good call - that gray stuff in the background of the photo is garbage bags, I used them to mask off all the non-metal bits when applying.

i don’t think pb has always had the flow control thingy on the bottle, but it’s got one now that you can turn the flow out to basically a trickle, which is really smart. Totally perfect for this job
The PB Blaster I have always used has been in an aerosol spray, hence the concern about overspray getting on the rubber parts.
 

willo

Member II
If you need a safety measure, get a wax toilet ring from the hardware store. Snorkel/dive down and pack the shaft with the wax. That'll reduce the flow while you have things apart.
I also suggest a high flow spare bilge pump. I have a large rule pump (like a 1500gph) with a long hose and wiring that saved me a ton of stress while I was dealing with a similar issue.
 

Alan Gomes

Sustaining Partner
Just as a data point: I repack my packing with the boat in the water. On my E26-2 my dinky bilge pump keeps up with the flow easily.
 

Pete the Cat

Sustaining Member
I think you know that you will need to replace the stuffing box tube (this is not exhaust hose) when you haul (and probably the whole business to be safe). You could tighten (or replace) the hose clamps on the hose in the interim to reduce the tendency to twist the hardware while you are trying to break the nuts free. I assume you know that you want to pull the locking nut toward you while pushing the outer portion away from you to break it free (when attacking it from the Port side). PB will likely work over time. If your shaft is 1' you use 3/16' packing, not 1/8th as suggested in the owners manual. It is terribly important to get all the old stuff out of there before putting any new packing in there. I have never found the store bought tools usefull and make my own hooks from watch makers screwdrivers. I find it helpful to turn the packed down after each ring (slowly and carefully in clean threads to seat each ring before putting the next one in. I do not think you will have an unmanageable flood. I have used a towel to slow the flow with good results. This is a major pain in the butt, but once you have it all cleaned up and have done it right, you will have accomplished an important and oft neglected piece of maintenance and learned a good deal about your boat.
 

Ethanknox

Junior Member
I
If you need a safety measure, get a wax toilet ring from the hardware store. Snorkel/dive down and pack the shaft with the wax. That'll reduce the flow while you have things apart.
I also suggest a high flow spare bilge pump. I have a large rule pump (like a 1500gph) with a long hose and wiring that saved me a ton of stress while I was dealing with a similar issue.
I weirdly think I’m going to get a toilet ring just to have here in case this or any other thing that can’t be easily plugged with a wooden plug needs to stop leaking out in the wild
 

Ethanknox

Junior Member
First off, success! Well kinda. I finally got the nuts apart, stuffed up the water flow with a rag while I fished out the old flax, added the new packing rings coated in the syntef stuffing box packing lube I got at west marine (it’s like Vaseline consistency) , closed it back up, no drips. I argued with it for an hour and either got zero drips or 1+ drip a second, couldn’t get anything in between. This is all with the motor off.
running the motor in forward and then reverse loosened it so I got back to a drip every 2 seconds with the motor off (after waiting 10 minutes to make sure it wasn’t going to slow down). I tightened it a hair, now there’s no drips at all. The outer forward edge of the packing nut is wet where the water would come out, but nothing I’d call a drip.
Do you all think I’m good? The lubricant says it reduces bilge water, so maybe that’s why I’m struggling to get drips? I can’t imagine this is too tight if 1/32 of a turn would set me back to 1 drop a second, but I could be wrong
 

Christian Williams

E381 - Los Angeles
Senior Moderator
Blogs Author
As I understand it, the only issue is the box getting hot from overtightening.

Motor a while and put yer hand on it....you should not say ouch!
 

Pete the Cat

Sustaining Member
As Christian says. Also, you will need to check the tightness and heat for the first 20 hours or so. Break in helps. Should not be too hot to touch, but can be warm (140 F). Can drip or not (I know I will get flack for this statement) but it should not be too hot to hold your hand on at cruising speed. You can tighten or loosen the nut 1/8th turn to get this right. Once there with the heat controlled, you will not have to check it that often. I have mine set for the last 500 hours, no drips, no significant heat. But it took some careful adjustment with new packing and Syntef lube. I use the clay stuff if the shaft has been scored.
 

Ethanknox

Junior Member
This is remarkably helpful thank you! Feels like a huge win today; I arguably un-sinking’d my boat for the first time! Thank you everyone for all the input and guidance, this is such a great forum
 
Top