significant water ingress to the bilges - 32-3

Dave G.

1984 E30+ (SOLD)
I've been on the hard at a marina in Mobile AL for a month - bottom paint, cutlass bearing replacement,
Not sure if you have access to where your strut is attached to the hull ? If so take a close look in that area. Replacing the cutlass can sometimes become a bear to break it loose so maybe a little too much force/pounding ? Hope that's not it but as that is what you had done while on the hard that or the packing gland would be my first suspect.
 

nquigley

Sustaining Member
Does anyone else have mysterious drainage into the bilges that you can't track down? ...
I finally sourced my leak today ... I found a small puddle (~1/2 cup,~1" deep) on the forward side of the fiberglass rudder tube, where it's 'bonded' to the hull (which is V-shaped in that spot). It is sending a steady trickle down the hull to the bilges. Back in Knoxville, I had battled for years a persistent small amount of water in the bilges that didn't correlate with rain (or stern-squatting), but it wasn't always there. I think this makes sense now, if I've always had a very small crack there.
The hull surfaces under the present puddle feel a bit slimy - I imagine that's accumulation of TN River silt over time. But why has this become a steady trickle now (~1-2 gallons per hour)? I wonder if the original small crack at the hull/rudder-tube interface opened up as a result the boat being lifted out, put on stands and then lifted back in here at the marina - maybe the hull got tweaked just a little - enough to open the crack up more? Previously, I've only hauler her out on a marine railway - producing much milder forces on the hull, I think.

What to do now? ... the advice I've received is to try to clean that little cup area (I can't dry it out, of course), and then press epoxy putty that sets under water into that area, building it up maybe an inch or two - perhaps via sequential application of several small dollops of putty.
If I can't fix it that way, I will haul out again ($ka-ching - haul-out plus blocking charge), thoroughly clean and dry the area and add lots more epoxy - maybe thickened West System. The reason I'm probably not doing this first is that, I wouldn't know if I've sealed the crack until I go back in the water. But, they may let me clean the area and add more putty while the boat is in the sling - avoiding a blocking charge).
 
Last edited:

nquigley

Sustaining Member
Not sure if you have access to where your strut is attached to the hull ? If so take a close look in that area. Replacing the cutlass can sometimes become a bear to break it loose so maybe a little too much force/pounding ? Hope that's not it but as that is what you had done while on the hard that or the packing gland would be my first suspect.
They used a puller tool and it apparently came out easily, and the replacement went in just as easily - thankfully!!
 

nquigley

Sustaining Member
Also, here are some pictures from my PSS leak in 2020. The flow of water would be similar for a rudder post leak.

Water from the prop shaft log (or rudder tube) flows forward along the hull, then goes under the engine pan (you can see the leaking water flowing just below the arrow):
View attachment 51538 Under the engine pan.

When it comes out from under the engine pan, water is first visible again in the bilge with the small, single keel bolt.
View attachment 51539 Small, single keel bolt.

Between the engine pan and this first bilge pocket, water is not visible (flows under the TAFG). Here's what it looks like if you pull up the floorboard:
View attachment 51545

After this, water is free to flow under the TAFG in the bilge areas and will be begin filling each bilge pocket from below, as it rises to the level of their limber holes.

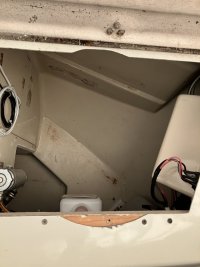
If you can remove your water heater (and the wood plate that it sits on), it gives you a good inspection of the rudder tube and strut areas.
View attachment 51540
There is a molded-in "pocket" just forward of the rudder tube that fills with water (and debris) before water can flow forward along the hull:
View attachment 51542 Pocket.
This report is awesome! It seems like the same as I probably have. Today I felt what seemed to be a rubber knob just forward of the rudder tube - maybe debris, but it felt a little like a plug, so I didn’t mess with it :)
Tomorrow I’ll try to rinse and clean the area (without being able to actually see it)
For that reason, I’m consider removing the water heater - haven’t used it in 14 years of ownership and can’t imagine ever doing so now that I’m heading south. I seem to recall it must be cut in half to get it out via the stbd locker ??
 

Christian Williams

E381 - Los Angeles
Senior Moderator
Blogs Author
removing the water heater


Important unsolicited personal opinon: Water heaters are great! Hot water for doing the dishes. A hot shower after a cold swim. Right up there with refrigeration when it comes to luxury you never knew you wanted. And helps cool the engine (I think, probably, maybe). But to be even more efficient, instead of a water heater, obtain a "hot water heater," which does the job faster, semantically, anyhow.
 

peaman

Sustaining Member
@nquigley,
My probably original (6 gal.?) water heater had a cubical steel casing with a cylindrical aluminum tank. I removed the casing and insulation, leaving the bare tank. I was able to remove it with only minor cutting at the starboard locker as seen in the photo below. I replaced it with a new Isotherm 5.6 gallon water heater which fit through the same opening.
IMG_0129.jpeg
The wood “cleat” at the inboard side of the opening was temporarily removed and then reinstalled.
 

bigd14

Contributing Partner
Blogs Author
press epoxy putty that sets under water into that area, building it up maybe an inch or two
This situation would bother me until I made a proper repair. I would want to do some digging and hogging out of the area in front of the rudder post to expose the void area and find out its extent. Who knows how big the void is and where else water might be able to enter? Once exposed the void could be properly filled with thickened epoxy and glassed over, never to reappear again.

Of course that requires a haulout and gaining decent access to the area and maybe even dropping the rudder. Ugh.
 

nquigley

Sustaining Member
I wonder if one of these inspection cameras might prove useful to you.
Thanks for the prompt - it reminded me that I bought one a year ago - I came across it again yesterday while restowing stuff, but didn't think at the time to use it now, until I saw your post last night. It has turned out to be pivotal been in finally working out what my real problem is ....

I made a bit bigger gap beside the rudder tube by trimming back the hard inner shell in that areas (which created some very handy white dust...), and then lowered the camera down beside the rudder tube. I could easily see the puddle I had felt yesterday, but it was below the level of where the rudder tube is glassed to the hull - that joint seems entirely intact and dry. I soon saw my white dust moving in a circle/spiral in that puddle. The swirl was centered over ... guess what ... the anchor point of the rope-stopped that hangs down just a little forward of the rudder. I sucked out as much water as I could, while watching in the camera, and, sure enough, new water was coming up around the attachment point of the rope-stopper, swirling, and then heading downhill (forward) toward the bilges.

New question for the forum ... does anyone know for certain how the rope-stopper is attached to the hull?
It feels like a rubber knob, but sort-of looks like a hex nut in the camera (but I can't feel anything hard down there like a nut).
I'm planning now to use an underwater adhesive caulk to surround (and cover?) the terminus that I can see/feel down there, providing a flexible adhesive seal, instead of a rigid one that underwater epoxy putty would provide.
 

Kenneth K

1985 32-3, Puget Sound
Blogs Author
New question for the forum ... does anyone know for certain how the rope-stopper is attached to the hull?
It feels like a rubber knob, but sort-of looks like a hex nut in the camera (but I can't feel anything hard down there like a nut).
I don't know what you mean by a "rope stopper," and am not aware of any type of drain installed in that area.

Some people install garboard drains to aid in winter storage, but those are placed in the lowest part of the hull/bilge, not up high by the rudder.

Is the "hex nut" vertical (threaded into the hull), or horizontal (threaded into the rudder post). If the latter, could it be a zerk fitting installed at the bottom on the rudder tube?
 
Last edited:

nquigley

Sustaining Member
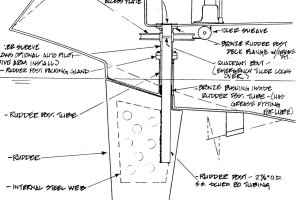
Can you locate the area of issue on this 32-3 diagram?

Can you observe or feel the "lump" on the inside hull which locates the strut attachment?

View attachment 51565
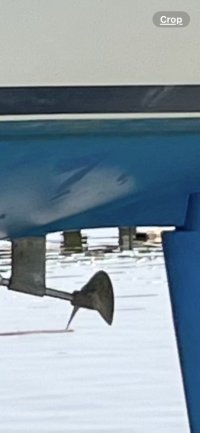
It's a ~4-inch long, ~3/8" wide ss rod, sticking down from the hull about half way from the upper leading edge of rudder and the point on the hull that the prop blade gets closest to. Inside, it's anchor point is about 4" forward to the rudder tube.

I can't reach far enough back to the strut attachment point - the platform for the water heater is in the way.
 

nquigley

Sustaining Member
I don't know what you mean by a "rope stopper," and am not aware of any type of drain installed in that area.

Some people install garboard drains to aid in winter storage, but those are placed in the lowest part of the hull/bilge, not up high by the rudder.

Is the "hex nut" vertical (threaded into the hull), or horizontal (threaded into the rudder post). If the latter, could it be a zerk fitting installed at the bottom on the rudder tube?
I felt it by hand today - it's a small nut (maybe 1/4" across), but it seems to have become separated from what whatever it was screwed into - seems to be floating on a rubbery knob, which is probably sealant they used when it was installed ... all those years ago.
 

peaman

Sustaining Member
If it were me, I'd be planning on removing that thing and patching the hole. From your description of what's inside the hull, and the photo, it looks like a poorly executed DIY project. Hopefully, you will be able to easily knock it up inside for removal.
 

nquigley

Sustaining Member
Picture of my rope stopper is attached - a little hard to make out ... hanging down just forward of the rudder.View attachment 51570
If it were me, I'd be planning on removing that thing and patching the hole. From your description of what's inside the hull, and the photo, it looks like a poorly executed DIY project. Hopefully, you will be able to easily knock it up inside for removal.
Yeah - next time the boat is out, I'll plan to remove it and properly fill the hole. Until then, hopefully I can block ingress with flexible adhesive.
Of course, I assumed this was an OEM standard fitting. I guess there were a lot of available options (up-sells ?) to new boat buyers. This thing had to be installed before the water heater and it's platform - so, probably before the hull and ceks were joined. I'm curious how many other 32-3s got this curious appendage. :)
 

Dave G.

1984 E30+ (SOLD)
Of course, I assumed this was an OEM standard fitting
I personally have never seen or heard of a "rope stopper" installed there on a Ericson(or any other maker) and don't think that was a factory option. Not sure of the purpose either ? Maybe someone can enlighten me... :)
 

Captain Pete

Junior Member
Mine does not have that. Up here in the northeast I have seen those on partial skeg hung rudders and full keel boat rudders and are used to deflect lobster pot and other lines that might get hung up in there. As others, i suspect it is a prior owner add on.
 
Top