Replacing rubber seals on main (large) windows/ports [Master Thread]

kapnkd

kapnkd
Still working on our "Never Ending Project" of refurbishing our E-32 Mk II ("CaryOn").
We're currently replacing all of the rubber seals on ALL of the ports.

The smaller ones went fairly easy (not really) but the larger ports/windows are a REAL problem on the small hard radius corners. The rubber seal just won't allow the aluminum frames to go back. Beyond the obvious of coating the rubber with soapy water, using clamps and a rubber mallet - is there anyone out there who has replaced their window/port seals and if so - what did you do to resolve the tight fit issues???
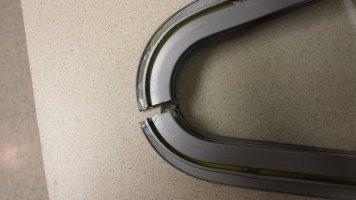
20151028_131444.jpg...flatning the seal.jpg

I'm slowly making progress with the large ports. The old glass is slightly thicker than the new glass used in the smaller ports and the new rubber seal is a tiny bit thicker. This is why I've invented a whole lot more four letter sailing terms. ;-))
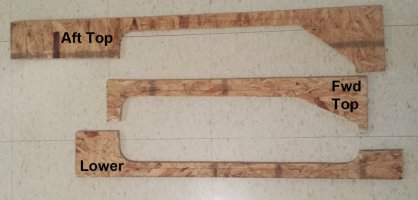
Large Ports Compression Jig.jpg
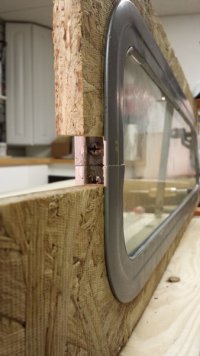
Frame Screw Access.jpg

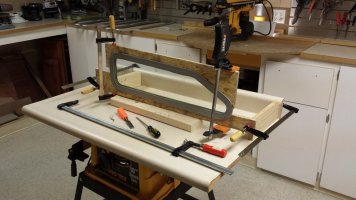
The biggest problem is clamping the two frames together tightly to get the screws and backing plates back in place due to the overly tight fit. I made up a jig that allows the clamps to still hold on the angled design of the ports (photos now attached). It's still difficult but at least do-able now. Of course the forward port is slightly smaller than the aft so two top frames had to be created. (Be sure to leave enough room to access the screws for the locking plates.)

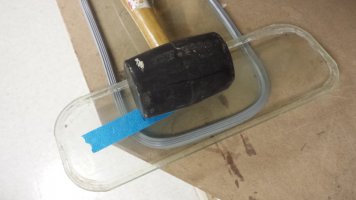
Worth noting is the rubber seal has a mind of it's own when it comes to the radius. I placed a heavy object on top of the seal in place to help get it to take the shape (attached photo). A little bit of heat from the heat gun also helps relax the rubber.
Hope this will be of help to others!

12-09-15 Just a couple more photos to better show how I managed to get the larger port windows back together....FINALLY, the last large window/port is complete!
Port Clamping Jig.jpg

The two new photos show the last port sitting in the template/jig I made to allow better clamping pressures on the tapered ends to get the two halves back together. Note the extra long clamp in the photo. I had to use that horizontally on the two ends to align them up as it went together. Seems they didn't want to meet up perfectly and this brought them back in line and avoided pinching the rubber seal and/or damaging it.

The last photo shows a detail of the area I left between the two wood jigs to allow putting the frame screws back in before releasing the clamps.
...Hope all of this can be of help to any of you taking on this project. (It IS a tough one to say the least!!)
 
Last edited by a moderator:

paul culver

Member III
I'm in the process of doing this as well and it is very difficult. I'm doing it with the ports in place, not removed. I apply soap to the frame and push the molding into place with the blade of a screwdriver one inch at a time, then applying rolling pressure with the back of the screwdriver handle to force the molding to seat. Repeat with the next inch, and so forth. The corners are the worst part.

Paul
E29 "Bear"
 

kapnkd

kapnkd
I'm in the process of doing this as well and it is very difficult. I'm doing it with the ports in place, not removed. I apply soap to the frame and push the molding into place with the blade of a screwdriver one inch at a time, then applying rolling pressure with the back of the screwdriver handle to force the molding to seat. Repeat with the next inch, and so forth. The corners are the worst part.

Paul
E29 "Bear"

Thanks Paul....

I hear you!! ...It all went well except for the hard radius corner (a REAL "Bear" for sure!!). Pretty much did the same and I've now got it to where the inside frame matches up close but not the more critical outside edges by about an 1/8th of an inch or so. (I've reluctantly trimmed some of the excess new seal away but feel it will be OK due to the VERY tight fit in this area.)

Just wonder what they did at the factory (or if they had a special jig to force it all in)??? Whatever I figure out/end up doing to make it all work - I'll let you know too!

THANKS again!!!! - kerry
 

Jenkins

Member II
This job is on my list. Can you provide any information on where you got the rubber seal material? specs?

thanks,

Peter

E29 - Zephyr
 

kapnkd

kapnkd
This job is on my list. Can you provide any information on where you got the rubber seal material? specs?

thanks,

Peter

E29 - Zephyr

Hi Peter,

Another sailor friend of mine with a Pearson gave me the rubber seal he had left over from when he did his. I will probably see him this weekend and ask him for the contact information. Also, I have been told that Catalina has kits and materials for sale. (I never checked it out once I was given the seal material from my friend.)
...What he gave me was PERFECT fit and size for the job - other than being a REAL pain to re-install the glass. Guess for it to be water tight - this is just part of the process.
-kerry
 

kapnkd

kapnkd
Still trying to find info for you on where to get rubber window/port seal materials

Hi Peter,

Another sailor friend of mine with a Pearson gave me the rubber seal he had left over from when he did his. I will probably see him this weekend and ask him for the contact information. Also, I have been told that Catalina has kits and materials for sale. (I never checked it out once I was given the seal material from my friend.)
...What he gave me was PERFECT fit and size for the job - other than being a REAL pain to re-install the glass. Guess for it to be water tight - this is just part of the process.
-kerry

Hi Peter,
Sorry for the long delay on getting the info you desire. ...Finally made contact with my friend, he is going through his records to jog his memory.
FYI - think I solved my problems of getting the rubber seals to fit properly and will create a photo story of what was done - MORE TO COME!!
 

toddster

Curator of Broken Parts
Blogs Author
FWIW: The seal kit from Catalina fits the old laminated glass in my boat perfectly. When I'm fitting tight seals in the lab, I usually lubricate them with a light coat of silicone grease or glycerine. The Catalina instructions say to put a bead of silicone sealant in the aluminum track and another inside the gasket. And they provide a tube of it. I was pretty skeptical of that, thinking forward (n) years to the next time this job is done.

However, that old glass is some antique size (almost 3/16) that is difficult to get any more. I cracked a couple of mine, getting them out, and the rest are fogged from water penetration or decay of the plastic laminate. Local glass shops have all kinds of 1/4" laminated glass in stock, but it will not fit with these seals. One might make it fit using some liquid sealant or butyl tape. The glass shop had to special order the 3/16 glass and the supplier had to custom make it for me.

One of my lites had been sealed at some time in the past with butyl tape, instead of the gasket, and all I can say is that one seemed to leak a bit less than the others, after (n + Y) years.

Cleaning up the old mess in the aluminum channel: Heat gun and spatula for the butyl stuff, Goof-Off and wire brush for the silicone stuff.
 

kapnkd

kapnkd
FWIW: The seal kit from Catalina fits the old laminated glass in my boat perfectly. When I'm fitting tight seals in the lab, I usually lubricate them with a light coat of silicone grease or glycerine. The Catalina instructions say to put a bead of silicone sealant in the aluminum track and another inside the gasket. And they provide a tube of it. I was pretty skeptical of that, thinking forward (n) years to the next time this job is done.

However, that old glass is some antique size (almost 3/16) that is difficult to get any more. I cracked a couple of mine, getting them out, and the rest are fogged from water penetration or decay of the plastic laminate. Local glass shops have all kinds of 1/4" laminated glass in stock, but it will not fit with these seals. One might make it fit using some liquid sealant or butyl tape. The glass shop had to special order the 3/16 glass and the supplier had to custom make it for me.

One of my lites had been sealed at some time in the past with butyl tape, instead of the gasket, and all I can say is that one seemed to leak a bit less than the others, after (n + Y) years.

Cleaning up the old mess in the aluminum channel: Heat gun and spatula for the butyl stuff, Goof-Off and wire brush for the silicone stuff.

Same with my E-32 from 1973. The glass is a safety glass (double laminate) and the plastic also fogged up on the smaller ports. Thank goodness the larger windows/ports are still unfogged and I was able to get them apart without breaking any glass.

I too got my hands on some silicone grease and it made all the difference. I also made a jig of plywood that squares the angled frame up making it easier to clamp and squeeze the two frames back together without damaging the rubber seal. ...LOTS of patience needed for sure. I'll be posting some photos in the next couple of days.
-kerry
 

kapnkd

kapnkd
This job is on my list. Can you provide any information on where you got the rubber seal material? specs?

thanks,

Peter

E29 - Zephyr

Hi again Peter,

...Never heard back from my friend who gave me the rubber seal. BUT!! ...I've been checking on-line and found a site with possibly what you are looking for.
Here's a link to their pdf file showing various glazing seal actual sizes - just print the first page so you can compare. (I found #GC728 to be the closest to what I have)

Moderator Update 2022 : here is a link to Blainewindow:


<!--[if gte mso 9]><xml> <w:WordDocument> <w:View>Normal</w:View> <w:Zoom>0</w:Zoom> <w:punctuationKerning/> <w:ValidateAgainstSchemas/> <w:SaveIfXMLInvalid>false</w:SaveIfXMLInvalid> <w:IgnoreMixedContent>false</w:IgnoreMixedContent> <w:AlwaysShowPlaceholderText>false</w:AlwaysShowPlaceholderText> <w:Compatibility> <w:BreakWrappedTables/> <w:SnapToGridInCell/> <w:WrapTextWithPunct/> <w:UseAsianBreakRules/> <w:DontGrowAutofit/> </w:Compatibility> <w:BrowserLevel>MicrosoftInternetExplorer4</w:BrowserLevel> </w:WordDocument> </xml><![endif]--> http://pdf.blainewindow.com/window_screen.pdf
<!--[if gte mso 9]><xml> <w:LatentStyles DefLockedState="false" LatentStyleCount="156"> </w:LatentStyles> </xml><![endif]--><!--[if gte mso 10]> <style> /* Style Definitions */ table.MsoNormalTable {mso-style-name:"Table Normal"; mso-tstyle-rowband-size:0; mso-tstyle-colband-size:0; mso-style-noshow:yes; mso-style-parent:""; mso-padding-alt:0in 5.4pt 0in 5.4pt; mso-para-margin:0in; mso-para-margin-bottom:.0001pt; mso-pagination:widow-orphan; font-size:10.0pt; font-family:"Times New Roman"; mso-ansi-language:#0400; mso-fareast-language:#0400; mso-bidi-language:#0400;} </style> <![endif]-->
The supplier contact info is:
Blaine Window Hardware, Inc,
<!--[if gte mso 9]><xml> <w:WordDocument> <w:View>Normal</w:View> <w:Zoom>0</w:Zoom> <w:punctuationKerning/> <w:ValidateAgainstSchemas/> <w:SaveIfXMLInvalid>false</w:SaveIfXMLInvalid> <w:IgnoreMixedContent>false</w:IgnoreMixedContent> <w:AlwaysShowPlaceholderText>false</w:AlwaysShowPlaceholderText> <w:Compatibility> <w:BreakWrappedTables/> <w:SnapToGridInCell/> <w:WrapTextWithPunct/> <w:UseAsianBreakRules/> <w:DontGrowAutofit/> </w:Compatibility> <w:BrowserLevel>MicrosoftInternetExplorer4</w:BrowserLevel> </w:WordDocument> </xml><![endif]--> 17319 Blaine Drive
<!--[if gte mso 9]><xml> <w:WordDocument> <w:View>Normal</w:View> <w:Zoom>0</w:Zoom> <w:punctuationKerning/> <w:ValidateAgainstSchemas/> <w:SaveIfXMLInvalid>false</w:SaveIfXMLInvalid> <w:IgnoreMixedContent>false</w:IgnoreMixedContent> <w:AlwaysShowPlaceholderText>false</w:AlwaysShowPlaceholderText> <w:Compatibility> <w:BreakWrappedTables/> <w:SnapToGridInCell/> <w:WrapTextWithPunct/> <w:UseAsianBreakRules/> <w:DontGrowAutofit/> </w:Compatibility> <w:BrowserLevel>MicrosoftInternetExplorer4</w:BrowserLevel> </w:WordDocument> </xml><![endif]-->
<!--[if gte mso 9]><xml> <w:LatentStyles DefLockedState="false" LatentStyleCount="156"> </w:LatentStyles> </xml><![endif]--><!--[if !mso]><object classid="clsid:38481807-CA0E-42D2-BF39-B33AF135CC4D" id=ieooui></object> <style> st1\:*{behavior:url(#ieooui) } </style> <![endif]--><!--[if gte mso 10]> <style> /* Style Definitions */ table.MsoNormalTable {mso-style-name:"Table Normal"; mso-tstyle-rowband-size:0; mso-tstyle-colband-size:0; mso-style-noshow:yes; mso-style-parent:""; mso-padding-alt:0in 5.4pt 0in 5.4pt; mso-para-margin:0in; mso-para-margin-bottom:.0001pt; mso-pagination:widow-orphan; font-size:10.0pt; font-family:"Times New Roman"; mso-ansi-language:#0400; mso-fareast-language:#0400; mso-bidi-language:#0400;} </style> <![endif]--> Hagerstown, Md 21740


<!--[if gte mso 9]><xml> <w:LatentStyles DefLockedState="false" LatentStyleCount="156"> </w:LatentStyles> </xml><![endif]--><!--[if !mso]><object classid="clsid:38481807-CA0E-42D2-BF39-B33AF135CC4D" id=ieooui></object> <style> st1\:*{behavior:url(#ieooui) } </style> <![endif]--><!--[if gte mso 10]> <style> /* Style Definitions */ table.MsoNormalTable {mso-style-name:"Table Normal"; mso-tstyle-rowband-size:0; mso-tstyle-colband-size:0; mso-style-noshow:yes; mso-style-parent:""; mso-padding-alt:0in 5.4pt 0in 5.4pt; mso-para-margin:0in; mso-para-margin-bottom:.0001pt; mso-pagination:widow-orphan; font-size:10.0pt; font-family:"Times New Roman"; mso-ansi-language:#0400; mso-fareast-language:#0400; mso-bidi-language:#0400;} </style> <![endif]-->
<!--[if gte mso 9]><xml> <w:WordDocument> <w:View>Normal</w:View> <w:Zoom>0</w:Zoom> <w:punctuationKerning/> <w:ValidateAgainstSchemas/> <w:SaveIfXMLInvalid>false</w:SaveIfXMLInvalid> <w:IgnoreMixedContent>false</w:IgnoreMixedContent> <w:AlwaysShowPlaceholderText>false</w:AlwaysShowPlaceholderText> <w:Compatibility> <w:BreakWrappedTables/> <w:SnapToGridInCell/> <w:WrapTextWithPunct/> <w:UseAsianBreakRules/> <w:DontGrowAutofit/> </w:Compatibility> <w:BrowserLevel>MicrosoftInternetExplorer4</w:BrowserLevel> </w:WordDocument> </xml><![endif]--> Toll Free: 800-678-1919

<!--[if gte mso 9]><xml> <w:LatentStyles DefLockedState="false" LatentStyleCount="156"> </w:LatentStyles> </xml><![endif]--><!--[if gte mso 10]> <style> /* Style Definitions */ table.MsoNormalTable {mso-style-name:"Table Normal"; mso-tstyle-rowband-size:0; mso-tstyle-colband-size:0; mso-style-noshow:yes; mso-style-parent:""; mso-padding-alt:0in 5.4pt 0in 5.4pt; mso-para-margin:0in; mso-para-margin-bottom:.0001pt; mso-pagination:widow-orphan; font-size:10.0pt; font-family:"Times New Roman"; mso-ansi-language:#0400; mso-fareast-language:#0400; mso-bidi-language:#0400;} </style> <![endif]-->[FONT=&quot]www.blainewindow.com

[/FONT]

<!--[if gte mso 9]><xml> <w:LatentStyles DefLockedState="false" LatentStyleCount="156"> </w:LatentStyles> </xml><![endif]--><!--[if gte mso 10]> <style> /* Style Definitions */ table.MsoNormalTable {mso-style-name:"Table Normal"; mso-tstyle-rowband-size:0; mso-tstyle-colband-size:0; mso-style-noshow:yes; mso-style-parent:""; mso-padding-alt:0in 5.4pt 0in 5.4pt; mso-para-margin:0in; mso-para-margin-bottom:.0001pt; mso-pagination:widow-orphan; font-size:10.0pt; font-family:"Times New Roman"; mso-ansi-language:#0400; mso-fareast-language:#0400; mso-bidi-language:#0400;} </style> <![endif]-->
 
Last edited by a moderator:

dt222

Member III
From some earlier posts on our site, the original manufacturer of the glass weather strip and the channel weatherstrip was Wefco Rubber, which is still in business. I called them and they do still have the channel one, but not the same one for the window. They were still the same price as below, and I believe a 25 foot minimum.

Window channel - Die Number 2154 - 2.00 per foot
Window Filler - Die Number 1256 - 2.00 per foot
Rub Rail - Die Numer 4107 - 2.75 per foot

Their address is wefcorubber.com

As an alternative (again from previous posts here) many have used the Catalina 25 kit:
http://www.catalinadirect.com/index.cfm?fuseaction=product.display&product_ID=1055&ParentCat=376

I've decided to go that route. I'd hate to order 25 feet of the widow filler if it wasn't going to fit and the price was about the same (and you get more product)

Don
 

kapnkd

kapnkd
I'm in the process of doing this as well and it is very difficult. I'm doing it with the ports in place, not removed. I apply soap to the frame and push the molding into place with the blade of a screwdriver one inch at a time, then applying rolling pressure with the back of the screwdriver handle to force the molding to seat. Repeat with the next inch, and so forth. The corners are the worst part.

Paul
E29 "Bear"

Hi Paul,

Guess I'm confused. How did you get the old seals out without removing the glass? Or, are you just inserting a new bead on the outside portion? (Either way, like you say - it's a real effort to do for sure!)
 

kapnkd

kapnkd
From some earlier posts on our site, the original manufacturer of the glass weather strip and the channel weatherstrip was Wefco Rubber, which is still in business. I called them and they do still have the channel one, but not the same one for the window. They were still the same price as below, and I believe a 25 foot minimum.

Window channel - Die Number 2154 - 2.00 per foot
Window Filler - Die Number 1256 - 2.00 per foot
Rub Rail - Die Numer 4107 - 2.75 per foot

Their address is wefcorubber.com

As an alternative (again from previous posts here) many have used the Catalina 25 kit:
http://www.catalinadirect.com/index.cfm?fuseaction=product.display&product_ID=1055&ParentCat=376

I've decided to go that route. I'd hate to order 25 feet of the widow filler if it wasn't going to fit and the price was about the same (and you get more product)

Don

Hi Don,

OUCH! That DOES seem expensive at $2 per foot!
I measured the perimeter of the glass on all the ports and the aft large window glass comes in at 62", the forward large window glass comes in at 60" along with the smaller port glass at about 32" each. On my E-32, I have 6 small ports so it adds up in a hurry!
THANKS FOR THE INFO AND SOURCE! (Thank goodness I've got my window channel already!)

-kerry (kapnkd)
 

kapnkd

kapnkd
This job is on my list. Can you provide any information on where you got the rubber seal material? specs?

thanks,

Peter

E29 - Zephyr

Hello again Peter....

I FINALLY heard back from my Person friend!! ...He had to dig up his old invoice which is why it took so long.
I've also posted the info for other Ericson owners but wanted to send the info more directly to you.

Lengths I needed for each of my ports is as follows: <!--[if gte mso 9]><xml> <w:WordDocument> <w:View>Normal</w:View> <w:Zoom>0</w:Zoom> <w:punctuationKerning/> <w:ValidateAgainstSchemas/> <w:SaveIfXMLInvalid>false</w:SaveIfXMLInvalid> <w:IgnoreMixedContent>false</w:IgnoreMixedContent> <w:AlwaysShowPlaceholderText>false</w:AlwaysShowPlaceholderText> <w:Compatibility> <w:BreakWrappedTables/> <w:SnapToGridInCell/> <w:WrapTextWithPunct/> <w:UseAsianBreakRules/> <w:DontGrowAutofit/> </w:Compatibility> <w:BrowserLevel>MicrosoftInternetExplorer4</w:BrowserLevel> </w:WordDocument> </xml><![endif]-->[FONT=&quot](62” largest rear port, 60” forward lard port and 32” standard size ports)

Contact Information:

[/FONT]<!--[if gte mso 9]><xml> <w:LatentStyles DefLockedState="false" LatentStyleCount="156"> </w:LatentStyles> </xml><![endif]--><!--[if gte mso 10]> <style> /* Style Definitions */ table.MsoNormalTable {mso-style-name:"Table Normal"; mso-tstyle-rowband-size:0; mso-tstyle-colband-size:0; mso-style-noshow:yes; mso-style-parent:""; mso-padding-alt:0in 5.4pt 0in 5.4pt; mso-para-margin:0in; mso-para-margin-bottom:.0001pt; mso-pagination:widow-orphan; font-size:10.0pt; font-family:"Times New Roman"; mso-ansi-language:#0400; mso-fareast-language:#0400; mso-bidi-language:#0400;} </style> <![endif]--><!--[if gte mso 9]><xml> <w:WordDocument> <w:View>Normal</w:View> <w:Zoom>0</w:Zoom> <w:punctuationKerning/> <w:ValidateAgainstSchemas/> <w:SaveIfXMLInvalid>false</w:SaveIfXMLInvalid> <w:IgnoreMixedContent>false</w:IgnoreMixedContent> <w:AlwaysShowPlaceholderText>false</w:AlwaysShowPlaceholderText> <w:Compatibility> <w:BreakWrappedTables/> <w:SnapToGridInCell/> <w:WrapTextWithPunct/> <w:UseAsianBreakRules/> <w:DontGrowAutofit/> </w:Compatibility> <w:BrowserLevel>MicrosoftInternetExplorer4</w:BrowserLevel> </w:WordDocument> </xml><![endif]--> LK Technology, Inc.

5116 Warrensville Ctr Rd

Cleveland, OH. 44137


(888) 663-9830


www.technologylk.com
Link to their page for vinyl glazing material -http://www.technologylk.com/__1209/weatherstripping-and-glazing-vinyls.html


Part: # D752C

Description: CRL Glazing Vinyl; 11/32” Channel Depth 9/32” Metal Opening for 3/16”
Glass – 100 ft Roll

Price: $41.57 (purchased in 2009, so prices may have gone up??)

Hope this will be of help to you - kerry

<!--[if gte mso 9]><xml> <w:LatentStyles DefLockedState="false" LatentStyleCount="156"> </w:LatentStyles> </xml><![endif]--><!--[if !mso]><object classid="clsid:38481807-CA0E-42D2-BF39-B33AF135CC4D" id=ieooui></object> <style> st1\:*{behavior:url(#ieooui) } </style> <![endif]--><!--[if gte mso 10]> <style> /* Style Definitions */ table.MsoNormalTable {mso-style-name:"Table Normal"; mso-tstyle-rowband-size:0; mso-tstyle-colband-size:0; mso-style-noshow:yes; mso-style-parent:""; mso-padding-alt:0in 5.4pt 0in 5.4pt; mso-para-margin:0in; mso-para-margin-bottom:.0001pt; mso-pagination:widow-orphan; font-size:10.0pt; font-family:"Times New Roman"; mso-ansi-language:#0400; mso-fareast-language:#0400; mso-bidi-language:#0400;} </style> <![endif]-->
 

Jenkins

Member II
Kerry and others - thanks! LK Technolgy has an amazing inventory of stuff.

Peter

PS - price listed today is $41.16 for the 100 ft roll
 

dt222

Member III
To all engaged in this fun task this winter- kudos to Kerry for the design of the wooden clamping frames. that helped save my sanity. Another tip when disassembling the old frames- a PO has used silicone around the exterior glass weatherstripping. To break this seal I ran a utility knife between the rubber and the glass on both sides (several times). This made the glass removal much easier.

Next question, when you are ready to reinstall the frames in the boat, are you going to fill the gap between the exterior cabin and interior cabin, and if so, with what? The gaps run from 0 to 1/4 inch around some of my rough openings.

Don
 

toddster

Curator of Broken Parts
Blogs Author
To all engaged in this fun task this winter- kudos to Kerry for the design of the wooden clamping frames. that helped save my sanity. Another tip when disassembling the old frames- a PO has used silicone around the exterior glass weatherstripping. To break this seal I ran a utility knife between the rubber and the glass on both sides (several times). This made the glass removal much easier.

Next question, when you are ready to reinstall the frames in the boat, are you going to fill the gap between the exterior cabin and interior cabin, and if so, with what? The gaps run from 0 to 1/4 inch around some of my rough openings.

Don


Oh, thanks. For giving me another thing to worry about. In other threads, it has been concluded that the gap should be filled with something. My "gap" was mostly zero and I did nothing. But one of my big lites cracked the day after installation. I have been waiting for a stretch of good weather to do anything about it. It seems likely that I tightened it down on a rough opening that was not flat - possibly due to variations in the gap.
 

Christian Williams

E381 - Los Angeles
Senior Moderator
Blogs Author
Lake Erie Viking
I used this kit from Catalina Direct on my E27.

Aluminum Window Reseal Kit C-30, C-36

Catalina Direct, publishers of the Catalina 22 and Catalina 25 Owner's Handbooks and the largest supplier of parts and Lewmar winches for Catalina Yachts in the country
www.catalinadirect.com

Chris
 

JPS27

Member III
I used thickened epoxy to fill the gap you are referring to. Also, I have a blog of my portlight journey. Some of the pictures have disappeared but others are there.
 

kapnkd

kapnkd
To all engaged in this fun task this winter- kudos to Kerry for the design of the wooden clamping frames. that helped save my sanity. Another tip when disassembling the old frames- a PO has used silicone around the exterior glass weatherstripping. To break this seal I ran a utility knife between the rubber and the glass on both sides (several times). This made the glass removal much easier.

Next question, when you are ready to reinstall the frames in the boat, are you going to fill the gap between the exterior cabin and interior cabin, and if so, with what? The gaps run from 0 to 1/4 inch around some of my rough openings.

Don
Hi Don,

My son did fill the lower portions of the gaps with resin and added filler to thicken it up into a more workable thickness similar to cake frosting so it stayed put when applied.
 
Top