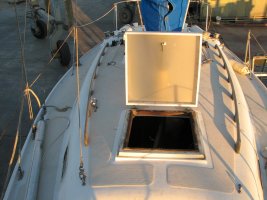
1973 E27 forward hatch replacement

ignacio

Member III
Blogs Author
Howdy all,

This is my first post, so please bear with me! I just purchased a '73 Ericson 27 ... to put it mildly, some areas have lots of "deferred maintenance." The hull, rigging, interior, and outboard were all fine (had it surveyed), but there are a few items that need some help (I got the boat at a price reflecting its condition).

1. Forward hatch needs replacement. I've been looking at Lewmar's, but can't seem to find anyone else that has done this. Open to ideas too!

2. Portlights (all) need replacement or resealing: Not sure where to start with this. Most of the 6 leak. Could this be as "simple" as removing them, re-caulking them, and putting back? I also noticed a rubber seal missing .... anyone know where I can get these? Or for that matter, maybe I need to go about this differently?

Many thanks for your help!
 

Dave Hussey

Member III
Welcome!
I am an E27 owner too, and I've been slowly catching up on much of the same maintenance you describe. My forward hatch was already replaced with a LEWMAR, and it is the model called the high profile Ocean hatch. It looks perfectly natural, and has been trouble free.
The side windows are another issue, and there are a bunch of posts about repairing those which should pop up if you do a quick search. Good Luck, and have fun.
Dave
 

Loren Beach

O34 - Portland, OR
Senior Moderator
Blogs Author
Seek, and ye shall find

Howdy all,

This is my first post, so please bear with me! I just purchased a '73 Ericson 27 ... to put it mildly, some areas have lots of "deferred maintenance." The hull, rigging, interior, and outboard were all fine (had it surveyed), but there are a few items that need some help (I got the boat at a price reflecting its condition).

1. Forward hatch needs replacement. I've been looking at Lewmar's, but can't seem to find anyone else that has done this. Open to ideas too!

2. Portlights (all) need replacement or resealing: Not sure where to start with this. Most of the 6 leak. Could this be as "simple" as removing them, re-caulking them, and putting back? I also noticed a rubber seal missing .... anyone know where I can get these? Or for that matter, maybe I need to go about this differently?

Many thanks for your help!

Ignacio,
Welcome to our little corner of the boating internet!
Get yourself a cup o' coffee and settle down for some searching (and subsequent bookmarking). The Search function will overwhelm you a bit with catch-all words like "hatch" or "port"... so you might try the Advanced Search functions.
I went to the Advanced Search, after clicking on Search... and put in the word Hatch. Then, after reading some threads around the site and seeing that Martin King has a lot of cabinet making information posted, I put "Martin" into the next part -- Search by User Name, and unchecked the box for exact name. That brought up a list of threads on one page, all seemingly helpful.
For Port, or Portlight, you might try variations of that idea.
The thing is.... there are a LOT of posts here from and about the Ericson 27. The construction methods and detailing for that model are shared with other Ericsons of the same era such as the 29 and all those legions of 32-2's and 35-2's as well.
OK, make that two cups of coffee!
If you have questions just ask. The owners here are a helpful and considerate bunch, violent Viking proclivities not withstanding! :rolleyes:

Like many others here, I have some past sailing time (as crew) on a 27, and still like that design.

LB
 

ignacio

Member III
Blogs Author
Thanks fellas

Many thanks for your replies! I've been lurking around doing some searches these last few weeks, and haven't turned up anything yet specific to the Lewmar hatch

Dave: do you know which size Lewmar hatch is on your boat? I think they number them as 44, 60, 70, etc... on their website.

Thanks!

:egrin:
 

Patti Wood

Member I
E27 hatch

Hi Ignacio,

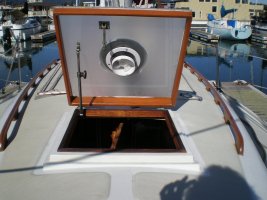
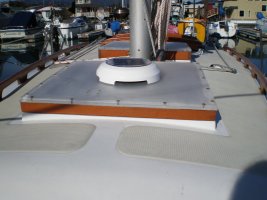
I replaced or rebuilt all 3 of the hatches on my '78 e27. For the forward two hatches, I removed, repaired, and refinished the teak frames and had new lexan cut and pre-drilled for the lenses. I took the old lenses to use as templates and had it done at TAP plastics in Oakland. The cost of all of this was very reasonable, and of course looks completely original. I don't know how much the lewmar hatches cost in comparison, but it was probably around $100-$200 for the materials, and a few hours of my time.

The sliding companionway hatch was a whole 'nother story! I had that one custom-made out of teak at one of the last wood boatyards (North Bay Boatworks), in Sausalito. It is a beauty, and I get a lot of compliments on it. Those few touches of teak on my deck - handrails, hatch frames, sliding hatch cover - look very nice, and are not too much teak for me to maintain.
 

wintu

Member I
front hatch

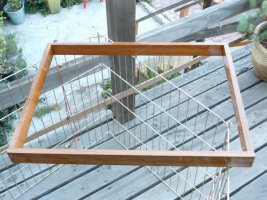
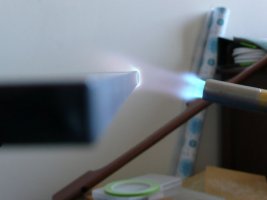
i did build new hatch too . its really easy and cost is about $100/ per hatch. i used acrylic from tap plastic and teak from http://macbeath.com/ they have good prices. i didn't use the screws to hold the glass down instead i used 3M vhb tape. ( will see how it will hold up) here is some pictures . i will take the picture of complete hatch when i go to my boat this weekend
 

Attachments

  • forward hatch frame.jpg
    forward hatch frame.jpg
    84.4 KB · Views: 178
  • flame polishing.jpg
    flame polishing.jpg
    31.7 KB · Views: 168

wintu

Member I
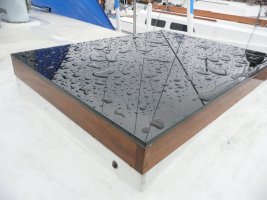
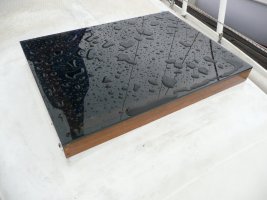
here is some pictures of finished hatch :egrin: no ugly screws :))
 

Attachments

  • P1060219.jpg
    P1060219.jpg
    71.2 KB · Views: 209
  • P1060221.jpg
    P1060221.jpg
    61.1 KB · Views: 167

ignacio

Member III
Blogs Author
Forward hatch next steps

Hi Patti,

Do you have any pictures of the results? My E27 has wooden interior "liner" slats (not sure if that's the correct phrase) that cover what would normally be exposed cross sections of the deck core on the four sides of the hatch cutout. These are pretty wasted too. Did you replace these as well? Finally, how did you make it more watertight, if at all?


Hi Ignacio,

I replaced or rebuilt all 3 of the hatches on my '78 e27. For the forward two hatches, I removed, repaired, and refinished the teak frames and had new lexan cut and pre-drilled for the lenses. I took the old lenses to use as templates and had it done at TAP plastics in Oakland. The cost of all of this was very reasonable, and of course looks completely original. I don't know how much the lewmar hatches cost in comparison, but it was probably around $100-$200 for the materials, and a few hours of my time.

The sliding companionway hatch was a whole 'nother story! I had that one custom-made out of teak at one of the last wood boatyards (North Bay Boatworks), in Sausalito. It is a beauty, and I get a lot of compliments on it. Those few touches of teak on my deck - handrails, hatch frames, sliding hatch cover - look very nice, and are not too much teak for me to maintain.
 

Attachments

  • IMG_1363.jpg
    IMG_1363.jpg
    97.8 KB · Views: 1,329
Last edited:

ignacio

Member III
Blogs Author
How is it holding up?

Hi Wintu: How is the VHB tape holding up? Did you put anything on the side that touches the gelcoat to make it more watertightt? Also, note my question to Patti about the inner wooden liner.

Finally, you wouldn't happen to have the dimensions you provided Macbeath handy, would you? I'm travelling at the moment and won't get a chance to go out to the boat for a few weeks. :esad:

here is some pictures of finished hatch :egrin: no ugly screws :))
 

Emerald

Moderator

Patti Wood

Member I
Watertightness?

Hi Ignacio,

I'll try to remember to take some photos this weekend when I'm at the boat. Nothing is needed for weatherproofing around the lower edge of the wooden hatch frame, because of the way the top fits down over the bottom - there is about an inch of fiberglass overlap. Before I replaced the lenses, there was some leaking from the top, because the acrylic was cracked, but nothing since I replaced them. I think those wood liner strips on the inside are a little weathered on mine, as well, but I'm leaving them alone for now. I could be wrong, but I think they are only for looks and don't have anything really to do with weatherproofing. If your hatch is leaking it is more likely between the edge of the acrylic and the wood frame, or through the screw holes, or maybe if there are cracks at the corners of the wood frame. When I attached my acrylic lenses to the wood frames I ran a bead of marine sealant around the edge, and to each screw hole.
 

Patti Wood

Member I
Hatch pics

Ignacio,

Sorry it took so long to get these pics. The interior wood pieces look a lot like yours, and I don't plan to replace 'em anytime soon. I guess it doesn't bother me enough to do something about it. I installed the solar ventilation fan recently, and am very happy with it - keeps the cabin smelling fresh - much higher on my priority list.

My hatches aren't quite as nice as Wintu's, but they're a huge improvement over what was there before. ;)
 

Attachments

  • hatches 004.jpg
    hatches 004.jpg
    93.5 KB · Views: 457
  • hatches 008.jpg
    hatches 008.jpg
    87.2 KB · Views: 209

wintu

Member I
hi guys
sorry for no responses but i was super busy and didn't have chance to go to the boat for last 3 weeks. i replaced interior frame pieces with L shape teak molding . the only problem was that molding didn't
go deep enough inside to cover the gap so i had to rip it on table saw little bit. so if you can save yours , do it. much less work :egrin:
 

wintu

Member I
to ignacio:
i didn't put there any seal or gasket i left it as it was originally. regarding the teak lumber (if you still need it) i think the boards from macbeath was like $28 and you will need thickness planer , table was and other tools to make it work. as carpenter i have all these so it wasn't problem for me. btw. vhb tape is still good
 
Last edited:

ignacio

Member III
Blogs Author
Update

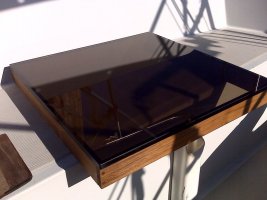
Ok, so I liked the idea of using teak, and definitely liked of using the darker acrylic. So wintu, they say imitation is the best compliment right? I didnt varnish the teak though....I think I'm just going to oil it regularly. Also, I ended up using 3M 5200. Let's see how it holds up!
 

Attachments

  • IMG00355.jpg
    IMG00355.jpg
    75.1 KB · Views: 983

Jenkins

Member II
In Post #6 wintu wrote " i didn't use the screws to hold the glass down instead i used 3M vhb tape."

In Post #9 wintu wrote - " btw. vhb tape is still good". Only about two months later though.

Peter
 

Tin Kicker

Sustaining Member
Moderator
What did you both use to attach the plexiglass to the frame?? Thanks!

The site has plenty of threads on how to replace the acrylic.
Basically, bed it with butyl tape or VHB then finish the seam with Dow 795 or another sealer.

I replaced the seal with this and it's good months later.
 
Top