32-3 Exhaust Manifold Removal

JohnW

Member I
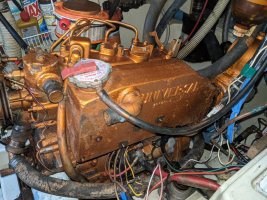
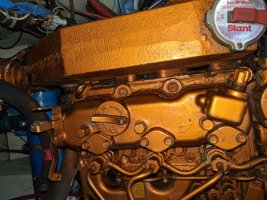
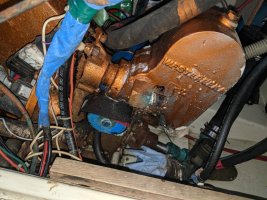
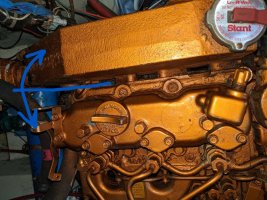
I am in the process of installing the revised alternator bracket. I have removed the 6 stud nuts but the exhaust manifold is stuck on. I searched for past articles and it seems like once the nuts are removed the exhaust manifold should come right off. I tried Kroil on the studs and the engine block/manifold seams, then tapping with a dead blow hammer, but still cannot remove the exhaust manifold.

I've also remove the hoses from the exhaust elbow to get better leverage to pull on the whole assembly, but that didn't work either.

What's causing the exhaust manifold to be stuck on? Rust? The hastily sprayed paint? Should I tap harder with the dead blow hammer or try using a pry bar?


thanks,
John
 

Attachments

  • Ericson32-3_20250213_ExhaustManifold_1.jpg
    Ericson32-3_20250213_ExhaustManifold_1.jpg
    347.3 KB · Views: 28
  • Ericson32-3_20250213_ExhaustManifold_2.jpg
    Ericson32-3_20250213_ExhaustManifold_2.jpg
    337.1 KB · Views: 29
  • Ericson32-3_20250213_ExhaustManifold_3.jpg
    Ericson32-3_20250213_ExhaustManifold_3.jpg
    303.4 KB · Views: 29

Christian Williams

E381 - Los Angeles
Senior Moderator
Blogs Author
See if the new bracket will fit on the existing studs. On my M25 that worked. I believe the stud length on that engine varied and some could take the bracket without new studs. If you've already tried that, disregard message with appropriate muttering.
 

Kenneth K

1985 32-3, Puget Sound
Blogs Author
John, I did this job in 2017. With the nuts removed from the studs, the only thing holding the manifold to the block should be the compressed gaskets. I suppose it's possible you might have some rust bonding one or two of the studs to the manifold, but the gaskets should have kept the manifold and the block from "rusting together."

20170417_212013.jpg

I'd probably try some prying, and maybe prying and tapping together till something breaks loose. If you can get a bar in from the back side, that might give you the best leverage.
Ericson32-3_20250213_ExhaustManifold_2.jpg

The block and manifold are both solid, so I don't think you'll damage anything with some light-to-medium duty prying.
 

gabriel

Live free or die hard
with a rubber mallet you will be able to put a nice shock to the piece that might dislodge it. Harbor freight.
 

JohnW

Member I
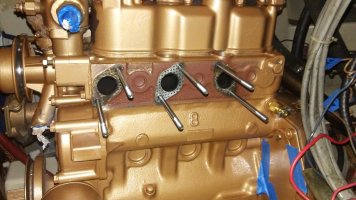
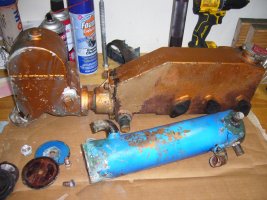
I ended up using a couple pry bars plus Kroil working from top and bottom to get the exhaust manifold off.

It looks like some sort of adhesive was used in addition to the rubber gasket between the elbow and the exhaust manifold. I saw Christian's video on using Barnacle Buster for cleaning out the heat exchanger so can I dunk the heat exchanger and the entire exhaust manifold into the Barnacle Buster or should I remove some of the fittings, like the ones with salt?/calcium?/corrosion? around the threaded interface, and separate the elbow from the heat exchanger first?

Cumay_20250321_ExhaustManifold_P1080680.JPG
 

bigd14

Sustaining Partner
Blogs Author
Nice work. While you have that apart it would be a good time to replace the exhaust riser. Those are a known failure point in the system. If you can’t get the riser apart from the flange on the end of the manifold like I couldn’t, replacement flanges are available at Catalina Direct
Risers are also available but this one looks like it has more accessory parts than you might need. https://www.catalinadirect.com/shop...t-system/exhaust-riser-c-350/?SearchResults=1
 

JohnW

Member I
oh' the joy of newbie sailboat ownership. . .

It took a while to find the exhaust riser solution. CatalineDirect version looks like it clamps to another flange coupling. I searched for various exhaust riser solutions on the forum, talked to other sailors, and read about how it functions on Calder's Marine Diesel Engines book. At the end I found an exact replacement on Westerbeke's website, part #200266, KIT - RISER EXHAUST 1.25NPT. I also ordered the flange part #298599, and the 1.25NPT brass nipple, part #038525, to connect the two. That was back in August 2025.

The replacement heat exchanger gasket kit (from Catalina Direct) came with a rubber o-ring for the endcap screw, but I was not successful in using it to seal between the endcap and the bottom of the screw head. Instead I bought a couple stainless sealing hex head screw from mcmaster part #92205A521.

For sealing the 1.25 NPT nipple between the exhaust flange and exhaust riser, I used Key Graphite Paste (High temperature, non-hardening), also from McMaster, part #4586K8. Will also use the same sealant on the fitting and plugs that screws into the exhaust elbow.

I think boat's M25 engine originally came with a 2" heat exchanger and was later upgraded to a 3" heat exchanger. The increase in diameter pushed up against the exhaust riser and that was why I had such a hard time removing the entire exhaust manifold assembly. The old heat exchanger gaskets has evidence of some sort of sealant, but searching online seems to suggest sealant is not needed. Not knowing if I will need to fix future leaks at the heat exchanger endcaps, I enlarged and bent the heat exchanger mounting bracket, thus lowering the heat exchanger. Anyway, with the exchanger no long making contact, the entire exhaust manifold assembly slides smoothing on the mounting studs.

The mechanical parts are mostly done. Now I need to replace the sea water and coolant hoses. I am thinking of using McMaster's High Temperature Vacuum-Rated Cooland Hose for both the 5/8" sea water hose, and the 7/8" cooland hose, https://www.mcmaster.com/5133K334/ Are these type of hoses okay to use? West Marine is another option but their stock availability is sometimes spotty.

Anyway kind of a long post, but maybe someday, someone will have a similar situtation and may find the parts number helpful.
 

Norwester

Member II
Hi John,
Congratulations on the forward motion on this project. Flip up some pictures, if you have time, to show your progress and good work.

Yes, from what I found, the 2" heat exchanger seems to be the norm/orig in M25 installs. I recently read a 2007 post from Westerbeke representative who wrote about reason to increase to larger size.

However, I'm currently keeping my 2" cause we haven't had issues (excepting zinc particles clogging), and I have extra 2" just in case mine really fails.

Did you get the new bracket installed (see my PM)?
 
Top