Bulkhead rot: will a scarf joint work?

tenders

Innocent Bystander
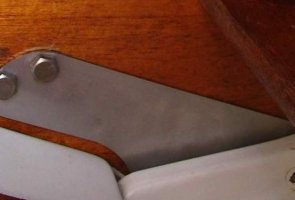
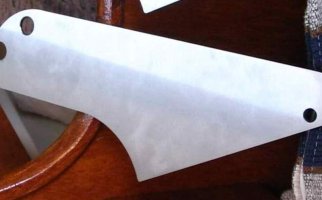
My beloved '69 E32 is starting to overwhelm me with maintenance. Last weekend I discovered that the bulkhead has turned to mush around the chainplates. The wood is solid only around the bottom one or two bolts.

I am not willing to drop $5k or more to hire somebody to disassemble all the joinery and start refabricating bulkheads. It is simply not worth it, and I don't have time to do it myself, though I am as impressed as hell at those of you who have not only done it but have documented it beautifully.

But I would be willing to attempt a less involved repair.

It is possible to repair a 3/4" bulkhead by cutting out a reasonably large area well beyond the rotten chainplate, scarfing and epoxying in a new piece of mahogany plywood (with an 8:1 taper), and remounting the chainplate?

I'm thinking this is the kind of project which can probably be done in a few days. Would I need much in the way of unusual tools beyond a jack, circular and jigsaw, and belt sander?

Theodore Enders
 
Last edited:

windjunkee

Member III
We put new lifelines and stanchions on our boat over the winter and found some rot around several of the stanchions. What we ended up doing with getting a product called "Git Rot". This is a very fluid epoxy. You drill small holes in the affected area and squeeze the two-part epoxy into the holes. It soaks into the rotted wood and hardens. It has been very effective for us, but then, the affected areas are not really large.

hope this helps

Jim McCone
Voice of Reason E-32-2 hull #134
 

Loren Beach

O34 - Portland, OR
Senior Moderator
Blogs Author
Since the taper, when done right, is as strong as the rest of the ply, I would agree with your solution. Getting a nice finish on the surface joint might be a bit tedious, however.
Loren
 

tenders

Innocent Bystander
Thanks gents. I am well-acquainted with Git Rot but this situation is structural and high-strain--not a candidate for topical solutions!

It is REALLY true that an 8:1 scarf joint can be as strong as the wood itself? I'm considering cutting out a triangular area of the bulkhead in the shape of a right triangle. Imagine a very, very large doorstop, rotated 180 degrees so that the 90 degree angle of the triangle is in the upper left corner and the hypoteneuse goes from the lower left to the upper right.

The chainplate (labeled C below) would be attached to the replacement triangle parallel to the left side and from the top. The scarf joint would be the hypoteneuse (shown as "-" below). The rest of the bulkhead is to the right and below this triangle; the deck is above. The scarf would not be perpendicular to the angle of pull. Does this make the joint weaker, or stronger? With 3/4 inch plywood and an 8:1 taper, we're talking a 6" overlap.

Any thoughts?


----C--------------------------
I...C......................-
I...C..................-
I...C...............-
I...C..........-
I...C.......-
I........-
I.....-
I...-
I
 

Martin King

Sustaining Member
Blogs Author
Scarfing wood is simple enough when the pieces are lying on a benchtop.
It's way more challenging to pull it off cleanly on a plywood bulkhead
that's already installed in the boat and a structural member. I hate to
say it, but you might just be better off cutting out the whole thing and
replacing it, than messing around trying to band aid it. My 2 cents.

Martin
 

Gil Aiken

Junior Member
I performed a similar repair on my '74 E35 a couple of years ago. My port side chainplate was holding onto a partially rotted bulkhead. Here is an outline of my repair method;

I removed the decorative wood cover and then removed the chainplate up through the deck. I cut out the bad bulkhead material in a triangular configuration as you are proposing, and removed the salon side wood slats attached to the hull interior.

I abraded the hull interior on both sides of the bulkhead to allow for tab bonding.

Then I installed alternating layers of thin marine plywood (1/8 inch thickness) and fiberglass roving. This way, I essentially created a composite of plywood and fiberglass/epoxy that was tabbed and bonded to the hull interior, the head cabinetry and remaining edge of the bulkhead. You may wish to pre-coat the top edges of the plywood with epoxy for better resistance to any future deck water leaks.

I reinstalled the chainplate (with proper deck bedding this time!) and used this in-place chainplate as a template to drill holes for the bolts. I reinstalled the bolts, cover plate and salon wood siding.

This repair has been heavy-weather tested and appears to be sound. Total repair time was about 15 hours.
 

tenders

Innocent Bystander
Gil,

Ah, this makes pretty good sense to me, thank you. Could you help me out on a few more details?

(1) Was the mast up or down when you did this? If up, what did you do with the shrouds while you were working on it?
(2) Did you need to use a bottle jack to lift up the overhead to get access to the top of the bulkhead? Was the bulkhead bonded to the overhead on your boat?
(3) How did you make sure there were no voids between the roving and the plywood you installed over the roving? Lots of epoxy, or did you let it cure and sand between layers?
(4) After you cut the bad bulkhead material out, what kind of edge did you put on the existing good bulkhead before adding the layers? Squared off from the sawblade? Tapered on one side? Two sides?
(5) You probably didn't rely on the hull tabbing alone to hold this together. How far did you run the roving onto the good wood, and how did you prevent the layers of roving from forming a big bump on the good wood?

Thanks,
Theodore
 

Bob in Va

Member III
Bulkhead problems

We have run into similar problems on many of the Mk 2 E-23 boats. The starboard chainplate ties into a very strong flange that is part of the liner but also strongly attached to the hull. The port side, however, is quite different due to the assymetry of the cabin layout, and the chainplate ties to the plywood bulkhead. A repair that has been very effective involves making up a "chainplate extender" from 316 stainless that actually ties the original chainplate to the liner and hull. This way the bulkhead does not have to be removed or repaired, except for cosmetic reasons, and there is no concern that the repair won't be able to handle the loads. Of course I am talking about a much smaller boat with substantially lower loads, but perhaps you might consider doing this as an addition to your bulkhead repair to lessen the loads on the wood joint. See attached pictures, with 1. the extender plate in position catching the bottom two chainplate bolts (lower flange bolt still to be inserted, original chainplate on the other side of the bulkhead) and one of the extras I made up unmounted. The pics have been rotated 90 ccw to fit.
 

Attachments

  • extendermounted.JPG
    extendermounted.JPG
    25.6 KB · Views: 183
  • twoextenders.JPG
    twoextenders.JPG
    26.4 KB · Views: 157
Last edited:

tenders

Innocent Bystander
Thanks for that Bob (and for your comments too, Martin, I haven't ruled that out yet). The 32's chainplates appear to be somewhat simpler straight strips of stainless that should be pretty easy to extend -- once the cabinetry has been removed, etc. I've been planning on that also -- in fact I want to make those up first to help hold the mast while the repair is being effected.
 
Last edited:

Gil Aiken

Junior Member
adventures in bulkhead repair

Theodore, here are a few more details regarding my bulkhead repair;

1) I performed this repair at the dock with the mast in-place. I removed the upper and intermediate shrouds and taped them to the mast, so they wouldn't knock around. The lower shrouds, with different chainplates, supported the mast during the repair.

2) On my E35 MK II the bulkheads are not secured or tabbed to the underside of the deck. I have always wondered about this. Would the boat be improved from a structural and lateral stiffness standpoint with this additional improvement? The old girl really shudders when I get hit broadside by a big wave. Anyway, I worked (barely) the plywood layers and fiberglass roving up into the cabintop liner slot.

3) I carefully pre-fit the plywood layers (3) and fiberglass roving sections to allow for an all-at-once installation. I also pre-drilled a couple of holes through this pre-fit assembly (using the temporarily reinstalled chainplate as a template) so I could clamp the whole gooey epoxy mess together.

4) I cut out the rotted bulkhead material just and left a square edge. I wish now I would have left a stepped scarf joint which would have been structurally superior.

5) I lapped the outer layers of new roving about two inches onto the remaining bulkhead (more would probably be better). The goals is to have a solidly laminated plywood/roving assembly tabbed onto every possible adjoining surface. I even tabbed into the head cabinetry interior. On the salon side of the bulkhead this installation left a cosmetic compromise; the exposed roving lapped onto the bulkhead. I made matching larger chainplate trim covers to hide this condition.

As mentioned in my first posting, this repair has been heavy weather tested. This weekend in fact, I was out in winds gusting to 30 kts, leeward deck awash, spray curling over the windward side and the repair held fine. It's alot of work, but much less than repalcing the entire bulkhead. Good luck with your repair. If you come across any information about tabbing the bulkheads into the deck underside (not liner) please let me know. Thanks.
 
Top