
Guest viewing is limited

Cabin Top Repair (E35-3) Advice Wanted

Hagar2sail

Member III
Blogs Author
So last season I was moving a rope clutch on the cabin top and had the headliner unzipped. It happened to be drizzling out the next day after I was done, and I still had the headliner open, but all the sudden I felt a drip on me. I looked up and it was coming off the headliner. This lead me on a merry chase where I concluded the Stbd aft most screw of the companionway track was loose and the sealant had failed. Looking below, looked like the PO had added sealant to stop this leak (not good!).

Area is normally under the dodger and doesn’t see water for the whole season, so we added it to this seasons list figuring it would stay dry. However, during last season we saw a lot of deflection of the main winch during use. Enough that stress cracks were showing on the cabin top. Whoops, things are worse than we thought!

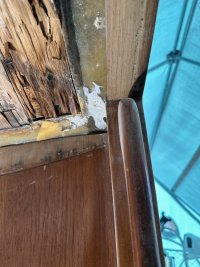
So this spring I have taken on removing the sea hood and then cutting out the bad core in the cabintop and replacing. I have now struggled the sea hood off only to find that the track actually doesn’t go into the core (that I can see) but the core is certainly damp. Even more surprising is the core only seems to be 1/4” plywood, I would have expected more thickness in this high load area.

My plan due to the curvature of the area is to just layup solid glass 2-3 layers at a time with laminating resin as the new core, but when removing the old core it is saturated all the way to the aft cabin bulkhead. What isn’t obvious to me is if the after cabin side is cored, or just a single ply of fiberglass that they then bonded the plywood to?? I believe it might be, but has anyone drilled into theirs to install gauges and can confirm this? I am now worried the damage might go beyond the overhead, and now am also wondering what to do with the last 1” of glass in the aft overhead that I need to tie into, but now has core that has to go.

Looking for opinions or strategies, or maybe even someone else who has been in a similar situation.

Also to add insult to injury, it doesn’t even seem like the hatch track could even have put water into the core…..so where is that water coming from??? We had serviced and resealed the winches 5 years ago so unlikely that is the source, and like I said, that area is dry all season long. It only sees water during spring setup and fall tear down.


IMG_9893.jpegIMG_9898.jpegIMG_9906.jpegIMG_9910.jpegIMG_9911.jpeg
 

Loren Beach

O34 - Portland, OR
Senior Moderator
Blogs Author
Wow. Quite a project! :(
Now that you have fastenings out and parts removed, permanently protect the old (and new) coring. Over drill-epoxy fill-re-drill all the holes. We did that for, iirc, about 200 holes in our cabin and deck, back in 2021.
This is/should be required preventative maintenance, at or after 30 years. (This maintenance interval comes up much sooner on poorer-built boats at the lower end of the production scale, I believe.)
 
Last edited:

Nick J

Contributing Partner
Moderator
Blogs Author
@Hagar2sail, sorry to hear this. On the positive side, you've already done the difficult part in making the first cut and taring into it. We did the same on our 25+. To Loren's point, protecting the new core is priority #1, but I went about it slightly differently. I used pieces of G10 in the high load areas then filled in around that with end grain balsa. It was a lot of work, but when it came time to drill the new holes, it was just a simple 1 step process.


As far as the bottom sheet goes, we used two layers of 1708 that we wetted out on a table then rolled in to place. Overhead isn't fun, but if you take your time and work in small sections it's doable and you get to cover your work with the headliner when you're all done instead of trying to match gelcoat and applying it in a highly visible location for all to see.

The aft bulkhead shouldn't be cored. You should be able to confirm by cutting the top of the plywood veneer to provide a better look. the cut will be covered by the piece of trim that hides the headliner staples.

While you have the companionway hood off. Check the holes the wood block stops are attached to. This was a source for water ingress on mine. It's a good time to drill those out, fill with epoxy, redrill, and replace the fasteners with through-bolts instead of the factory screws. Those blocks get a lot of stress on them when the hatch is slammed open.

Post 30 here:


bigd14

Sustaining Partner
Blogs Author
I had water coming in through the L bracket under the traveler. But probably not enough to cause all the damage you found. Check the seahood fastener holes and hog out the core in those areas and epoxy it before you reinstall the hood. On my 30+ the seahood was simply held down by wood screws into cored material. The core was ok but some of them were damp or wet and could be a source of your leaks. I potted the holes in epoxy and through bolted the hood back on.
1779825797152.png
 

Drewm3i

Marine Surveyor
Wow. Quite a project! :(
Now that you have fastenings out and parts removed, permanently protect the old (and new) coring. Over drill-epoxy fill-re-drill all the holes. We did that for, iirc, about 200 holes in our cabin and deck, back in 2021.
This is required preventative maintenance, at or after 30 years. (This maintenance interval comes up much sooner on poorer-built boats at the lower end of the production scale, I believe.)
This^
 

Drewm3i

Marine Surveyor
@Hagar2sail, sorry to hear this. On the positive side, you've already done the difficult part in making the first cut and taring into it. We did the same on our 25+. To Loren's point, protecting the new core is priority #1, but I went about it slightly differently. I used pieces of G10 in the high load areas then filled in around that with end grain balsa. It was a lot of work, but when it came time to drill the new holes, it was just a simple 1 step process.


As far as the bottom sheet goes, we used two layers of 1708 that we wetted out on a table then rolled in to place. Overhead isn't fun, but if you take your time and work in small sections it's doable and you get to cover your work with the headliner when you're all done instead of trying to match gelcoat and applying it in a highly visible location for all to see.

The aft bulkhead shouldn't be cored. You should be able to confirm by cutting the top of the plywood veneer to provide a better look. the cut will be covered by the piece of trim that hides the headliner staples.

While you have the companionway hood off. Check the holes the wood block stops are attached to. This was a source for water ingress on mine. It's a good time to drill those out, fill with epoxy, redrill, and replace the fasteners with through-bolts instead of the factory screws. Those blocks get a lot of stress on them when the hatch is slammed open.

Post 30 here:

OP: G10 sheets would be an excellent core material for your purposes--definitely wouldn't recommend plywood or resin alone (brittle).

I suggest you do as Nick and Loren have done^.
 

Prairie Schooner

Jeff & Donna, E35-3 purchased 7/21
@Hagar2sail

Back in the summer of 2022 we took out 4 Datamarine instruments and put in two B&G displays. Looking at this old photo from that jogs my memory and I think it's fiberglass layup with wood veneer on the inside.

inst hole fill 7770 sm.jpg

I think this warrants a Golden Can of Worms Award. Good luck!

Can O Worms gold E1 sm.gif
 

Hagar2sail

Member III
Blogs Author
Wow. Quite a project! :(
Now that you have fastenings out and parts removed, permanently protect the old (and new) coring. Over drill-epoxy fill-re-drill all the holes. We did that for, iirc, about 200 holes in our cabin and deck, back in 2021.
This is/should be required preventative maintenance, at or after 30 years. (This maintenance interval comes up much sooner on poorer-built boats at the lower end of the production scale, I believe.)
Yes, we have been working on doing that in sections over the year. One thing we found that was odd, when we went to do the deck organizer holes, it seemed that we were in solid glass?? We had actually done the holes for the clutches and winches in the same time frame 5 years ago, chiseling the pillars of epoxy that were in the wood made me curse the good job we did :p
 

Hagar2sail

Member III
Blogs Author
@Hagar2sail, sorry to hear this. On the positive side, you've already done the difficult part in making the first cut and taring into it. We did the same on our 25+. To Loren's point, protecting the new core is priority #1, but I went about it slightly differently. I used pieces of G10 in the high load areas then filled in around that with end grain balsa. It was a lot of work, but when it came time to drill the new holes, it was just a simple 1 step process.


As far as the bottom sheet goes, we used two layers of 1708 that we wetted out on a table then rolled in to place. Overhead isn't fun, but if you take your time and work in small sections it's doable and you get to cover your work with the headliner when you're all done instead of trying to match gelcoat and applying it in a highly visible location for all to see.

The aft bulkhead shouldn't be cored. You should be able to confirm by cutting the top of the plywood veneer to provide a better look. the cut will be covered by the piece of trim that hides the headliner staples.

While you have the companionway hood off. Check the holes the wood block stops are attached to. This was a source for water ingress on mine. It's a good time to drill those out, fill with epoxy, redrill, and replace the fasteners with through-bolts instead of the factory screws. Those blocks get a lot of stress on them when the hatch is slammed open.

Post 30 here:

The whole sea hood setup has me scratching my head a little. First, there were no stops on our hatch lol, it comes right out. Been that way since we owned the boat. When I took the sea hood off, I found broken blocks of wood. Could it have been hit hard enough to snap them!?!? Either that, or someone struck them with something and broke them off so they could remove the hatch.

Also, the aft 4 screws on each side were just that, machine screws. They seem to go into something embedded in the deck, not sure if it a threaded piece of stainless, more investigation is needed. However the rest of them forward were general wood screws, and like everyone has suggested, we will have to change those out to make sure that the core is protected. Luckily when removing them they and the core seemed dry. Less awesome, the hood was possibly set in silicone, though I by the tenacity of the bond between the hood and the deck, I think they used a medium to light adhesive, then filled the outside trough with silicone later. Sigh, the joys of sanding silicone out of old gel coat.
 
Last edited:

Hagar2sail

Member III
Blogs Author
OP: G10 sheets would be an excellent core material for your purposes--definitely wouldn't recommend plywood or resin alone (brittle).

I suggest you do as Nick and Loren have done^.
To be clear, I wasn't thinking of coring in resin alone, I was going to lay up 15-25? layers of glass until we were built back to up to thickness. I was going to go for G10, but I am questioning how fair I could get that to sit, since this section has a large radius. Not set in stone yet, I do like the idea of G10, but still thinking I am just going to lay up a ton of 1708 in multiple sessions so gravity doesn't get the best of me, using polyester laminating resin so I don't have to worry about working against a clock. The original bottom glass skin is only maybe a 1/16" thick. Again, for how well this boat is generally built, it is odd to find this area so lightly built.
 
Last edited:

Hagar2sail

Member III
Blogs Author
@Hagar2sail

Back in the summer of 2022 we took out 4 Datamarine instruments and put in two B&G displays. Looking at this old photo from that jogs my memory and I think it's fiberglass layup with wood veneer on the inside.

View attachment 55455

I think this warrants a Golden Can of Worms Award. Good luck!

View attachment 55456
Excellent, thanks for the info, that does make me feel better. I am trying not to let the boat project creep get too much the best of me. The top layer of teak on the plywood on the aft cabin bulkhead has lifted in areas I am sure from moisture from cooking, but I am trying to resist the urge to rip that out too. Trying to keep the worms in the can so we can sail this year :egrin:
 

Hagar2sail

Member III
Blogs Author
Thanks guys for all the support and help, I will keep you all posted. Probably be sanding and prepping the under deck area, and need to puzzle out that back area.
 

Nick J

Contributing Partner
Moderator
Blogs Author
The whole sea hood setup has me scratching my head a little. First, there were no stops on our hatch lol, it comes right out. Been that way since we owned the boat. When I took the sea hood off, I found broken blocks of wood. Could it have been hit hard enough to snap them!?!? Either that, or someone struck them with something and broke them off so they could remove the hatch.

Also, the aft 4 screws on each side were just that, machine screws. They seem to go into something embedded in the deck, not sure if it a threaded piece of stainless, more investigation is needed. However the rest of them forward were general wood screws, and like everyone has suggested, we will have to change those out to make sure that the core is protected. Luckily when removing them they and the core seemed dry. Less awesome, the hood was possibly set in silicone, though I by the tenacity of the bond between the hood and the deck, I think they used a medium to light adhesive, then filled the outside trough with silicone later. Sigh, the joys of sanding silicone out of old gel coat.
There are two sets of blocks. One set is bolted to the underside of the sliding hatch and prevents the hatch from sliding all the way out when they engage with the opening trim. One of these is circled in blue on the attached photo. My guess is someone got a thin wrench and removed the nuts holding the blocks to remove the hatch and wasn't able or willing to take the loose blocks out.

20220711_192935.jpg

The second set is screwed to the cabin top and prevents the hatch from sliding all the way open when the back of the hatch hits them. I think these are there to prevent people pinching their fingers between the handle on the top of the hatch and the back of the sea hood. They are the ones in the bottom corner not attached. This is how I found mine when I first got the hood off. The holes they left were the source of my leak. I didn't figure it out until I removed my dodger which allowed rain to collect on the hatch and eventually make its way to these holes.

I found the same fastener configuration as you did. I can't remember for sure, but I think it was a block of aluminum imbedded in the core that the machine screws threaded into. I think its due to the higher loads in this area from the traveler. Either way, replacing the wood screws with bolts, fender washers, and nuts is a much better configuration.

I wish I had an easy fix for removing sealant, but I haven't found one yet. It took days of working a few hours at a time to get to this point for me. I'm pretty sure ours was bedded in 4200 or 5200 and I had to use a few cans of Debond, plastic scrappers and a heat gun. It was horrible work.

20220713_191731.jpg


For your layup plans, solid fiberglass would be a lot of work and extra cost for very little gain. The strength of the structure comes form the two skins being separated by the core. That's how they can be so strong with just balsa in the middle. Your goal is to seal the core and provide some extra strength for the cabin top hardware. Both G10 and the drill-fill-drill method will accomplish that at a much lower cost both in money and time. our 25+ had a more pronounced radius than the 35-3. the small gap between the outer skin and the flat G10 piece gets filled with thickened epoxy. It wasn't much on the 25+ and it will be even less on the 35-3.
 

bigd14

Sustaining Partner
Blogs Author
The Ericson seahood arrangement leaves much to be desired in my opinion. The recessed channel traps debris and water and cause leaks. It should have been a raised area like a toerail profile to prevent this. My stop blocks were made from a leftover piece of rubrail profile. Of course they were broken all to pieces too.


Hagar2sail

Member III
Blogs Author
There are two sets of blocks. One set is bolted to the underside of the sliding hatch and prevents the hatch from sliding all the way out when they engage with the opening trim. One of these is circled in blue on the attached photo. My guess is someone got a thin wrench and removed the nuts holding the blocks to remove the hatch and wasn't able or willing to take the loose blocks out.

View attachment 55459

The second set is screwed to the cabin top and prevents the hatch from sliding all the way open when the back of the hatch hits them. I think these are there to prevent people pinching their fingers between the handle on the top of the hatch and the back of the sea hood. They are the ones in the bottom corner not attached. This is how I found mine when I first got the hood off. The holes they left were the source of my leak. I didn't figure it out until I removed my dodger which allowed rain to collect on the hatch and eventually make its way to these holes.

I found the same fastener configuration as you did. I can't remember for sure, but I think it was a block of aluminum imbedded in the core that the machine screws threaded into. I think its due to the higher loads in this area from the traveler. Either way, replacing the wood screws with bolts, fender washers, and nuts is a much better configuration.

I wish I had an easy fix for removing sealant, but I haven't found one yet. It took days of working a few hours at a time to get to this point for me. I'm pretty sure ours was bedded in 4200 or 5200 and I had to use a few cans of Debond, plastic scrappers and a heat gun. It was horrible work.

View attachment 55460


For your layup plans, solid fiberglass would be a lot of work and extra cost for very little gain. The strength of the structure comes form the two skins being separated by the core. That's how they can be so strong with just balsa in the middle. Your goal is to seal the core and provide some extra strength for the cabin top hardware. Both G10 and the drill-fill-drill method will accomplish that at a much lower cost both in money and time. our 25+ had a more pronounced radius than the 35-3. the small gap between the outer skin and the flat G10 piece gets filled with thickened epoxy. It wasn't much on the 25+ and it will be even less on the 35-3.
Did you use something to hold the g10 into the overhead, or did you find the epoxy could hold it enough?
 

Nick J

Contributing Partner
Moderator
Blogs Author
I approached the port and starboard sides differently. On the port side, I initially tried vacuum bagging. It provided the best hold, but it came with several limitations. I could not get a reliable seal against the existing bottom skin due to many staple holes so I ended up vacuum bagging individual sections of core and then filling the gaps between the new and existing core.
20170521_121334.jpg

20170604_103854.jpg


For those filler sections, I used drywall sanders, extending them a few inches beyond the ceiling height to introduce some spring into the handle. This method worked well and avoided the drawbacks of vacuum bagging, so I used it for the entire starboard side. I completed the work in smaller sections, installing one section per day.


20170623_134156.jpg20170620_181701.jpg


Once all of the core was installed, I formed a fillet around the perimeter where the bottom skin would wrap up around the core and tie into the top skin. I then filled any remaining voids, faired the underside of the new core, and laid up the bottom skin, again working in small daily sections.

20170707_150145.jpg

When the epoxy is thickened to the right consistency, roughly like chunky peanut butter, it has enough initial hold to keep the core and G10 in place while you set up supports or prepare a vacuum bag. That said, it should only be relied on for a few minutes, especially when working with heavier G10.
 

Drewm3i

Marine Surveyor
I approached the port and starboard sides differently. On the port side, I initially tried vacuum bagging. It provided the best hold, but it came with several limitations. I could not get a reliable seal against the existing bottom skin due to many staple holes so I ended up vacuum bagging individual sections of core and then filling the gaps between the new and existing core.
View attachment 55466

View attachment 55467


For those filler sections, I used drywall sanders, extending them a few inches beyond the ceiling height to introduce some spring into the handle. This method worked well and avoided the drawbacks of vacuum bagging, so I used it for the entire starboard side. I completed the work in smaller sections, installing one section per day.


View attachment 55469View attachment 55468


Once all of the core was installed, I formed a fillet around the perimeter where the bottom skin would wrap up around the core and tie into the top skin. I then filled any remaining voids, faired the underside of the new core, and laid up the bottom skin, again working in small daily sections.

View attachment 55470

When the epoxy is thickened to the right consistency, roughly like chunky peanut butter, it has enough initial hold to keep the core and G10 in place while you set up supports or prepare a vacuum bag. That said, it should only be relied on for a few minutes, especially when working with heavier G10.
Impressive work!
 

bigd14

Sustaining Partner
Blogs Author
That’s a huge effort, nice work. Hope you were smarter than I was when doing overhead epoxy work and wore a hat. I was picking chunks of epoxy out of my hair for weeks after re-coring small sections of the side decks on my boat.
 

Nick J

Contributing Partner
Moderator
Blogs Author
That’s a huge effort, nice work. Hope you were smarter than I was when doing overhead epoxy work and wore a hat. I was picking chunks of epoxy out of my hair for weeks after re-coring small sections of the side decks on my boat.
I had full protective coverage in place, including a suit with hood, mask, goggles, gloves, and a hat, and I had masked off the entire area with plastic. However, I made a poor decision on the starboard side and attempted to laminate the bottom skin in a single large section. It did not go well.

The fiberglass never bonded to the new core and instead fell back onto me. I ended up gathering everything into a garbage bag and taking it outside, where I spread it out to prevent an exothermic reaction. There was epoxy everywhere. It was a humbling experience, to say the least.

Lesson learned: break the work into smaller sections, don’t rush ahead, and consider having someone assist.
 
Top