• Untitled Document

    The 2024-2025 Fund Raising Season has Opened!

    EricsonYachts.org has opened the season for raising funds to support the expenses of the site. If you would like to participate, please see the link below for additional information.

    Thanks so much for your continued support of EricsonYachts.org!

    2024-2025 Fund Raising Info

E35-3 replacing fuel tank

Prairie Schooner

Jeff & Donna, E35-3 purchased 7/21
Jeff,
Also. I think that you can separate the tape from the tank without cutting it. Use a putty knife or chisel and the bond will release. This would make reinstall even easier and no worries about cutting liner.
Hi David,
Did you need to remove your sea hood (which for me includes the traveler) to take out your companionway hatch?

- https://ericsonyachts.org/ie/threads/ericson-sea-hood-maintenance-and-removal.15407/
With Christian's post as a guide, I started digging into ours. It looks like we don't have the style that comes off by removing that little fascia.

Jeff
 

Prairie Schooner

Jeff & Donna, E35-3 purchased 7/21
No. I did not have to touch any part of the hood. Just the side aluminum strips.
Thanks David. I'll give it another try. When I took out the visible screws the strip wouldn't move. I was guessing there are screws under the hood, too. Maybe it just needs a little 'encouragement'.
 

Prairie Schooner

Jeff & Donna, E35-3 purchased 7/21
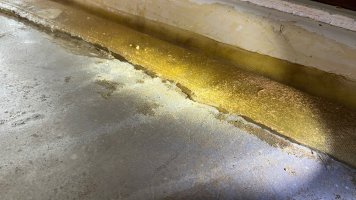
fuel tank remove 4a E35-3.jpg
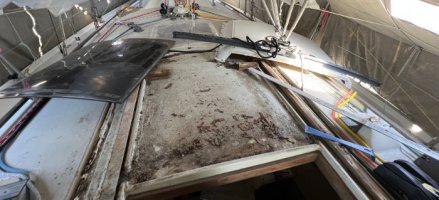
The glass tape bond, probably polyester resin, gave up the ghost long ago. It sliced away easily with an oscillating tool and a diamond blade.

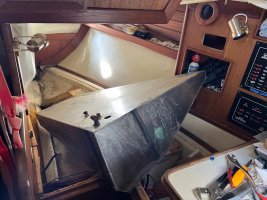
Current state of affairs. As noted above I'm trying to figure out how to get the tank out in one piece. I like to think of myself as a fairly thoughtful person, but as I've been working on the boat I seem rather prone to getting a demolition saw (or equally destructive device) and using a scorched earth approach to getting things done. Rebuild it afterward. I've seriously considered cutting a corner off this tank.
fuel tank remove 4b E35-3.jpg

When I spoke to a fabricator yesterday they said they consider the life of an aluminum diesel tank to be about 20 years. I'll document this tank and it's condition more fully when I have it out of the boat.
Jeff
 

Prairie Schooner

Jeff & Donna, E35-3 purchased 7/21
Looks exactly like mine. You should not have to cut anything to get it out. Skinny part of the tank out of the companion way first. And just barely makes it out.
Thanks David. I'm going back to the boat today and will go at those aluminum hatch strips with a little more 'vigor'.
 

Loren Beach

O34 - Portland, OR
Senior Moderator
Blogs Author
Thanks David. I'm going back to the boat today and will go at those aluminum hatch strips with a little more 'vigor'.
Those parts on our boat were, like everything else that EY installed, adhered with 5200. While pushing thin scraper blades under works, it's a lot easier if you apply heat from a "heat gun" to the metal. This considerably softens the sealant bond. Our ship wright taught us that one, from his experience over the years.
 

Prairie Schooner

Jeff & Donna, E35-3 purchased 7/21
Those parts on our boat were, like everything else that EY installed, adhered with 5200. While pushing thin scraper blades under works, it's a lot easier if you apply heat from a "heat gun" to the metal. This considerably softens the sealant bond. Our ship wright taught us that one, from his experience over the years.
Thanks Loren. I hadn't considered the possibility of adhesive.
 

Nick J

Contributing Partner
Moderator
Blogs Author
Jeff,

I know this is a case of the clasic scope creep, but If your sea hood hasn't been pulled off before, this might be a good time to do it. I pulled mine last summer after finding a leak. I found the stop blocks at the back of the cavity had pulled out leaving open holes through the core to the cabin. The dodger masked the problem by not allowing too much rain to hit the sliding hatch. Removal wasn't too difficult. I removed the traveler bolts from the outboard standoffs and kept it attached to the sea hood, then cut the sealant around the perimeter of the sea hood and used the mainsheet to pull the whole assembly off the boat. A little Debond helped as well. Once removed, I drilled out the core, filled with epoxy and redrilled. Looking at these pictures, you may have to go this route if your aluminum pieces extend under the sea hood like mine. 20220711_192931.jpg20220711_192935.jpg
 

Loren Beach

O34 - Portland, OR
Senior Moderator
Blogs Author
Thanks Nick. I see that I have under-thought the problem...
If you look at the left side of pix #5 in this group, note that our aluminum strips stop at the rear of our sea hood. OTOH, our aluminum strips do not intrude on the opening width. Different boats, different detailing. Oh well. :(

That's a lot of 5200 in your picture. Heat would help with removal, but it looks like a hassle. (Oh well -- if maintaining a yacht was simple they'd let anyone own one!)
 

Nick J

Contributing Partner
Moderator
Blogs Author
Yeah, very different. The O34 has a much better design with the raised section in the deck mold instead of a recess that collects water. The most difficult part was removing all that 5200. Most of it was mechanically removed with a plastic scraper, but the last remaining bits required a lot of debond and heat. One thing to note is Debond eats the vinyl headliner, so you need to tape the underside of the holes while you're using it.
 

Loren Beach

O34 - Portland, OR
Senior Moderator
Blogs Author
Looking at the whole integrated design of the house top, traveler plinths, and shaping of the sea hood, Bruce King must have scored off the scale on the 3D part of the old GATB !
Incredible detailing went into the tooling, and the finished product has very subtle joining seams/ places.:geek:
 

Prairie Schooner

Jeff & Donna, E35-3 purchased 7/21
Jeff,

I know this is a case of the clasic scope creep, but If your sea hood hasn't been pulled off before, this might be a good time to do it. I pulled mine last summer after finding a leak. I found the stop blocks at the back of the cavity had pulled out leaving open holes through the core to the cabin. The dodger masked the problem by not allowing too much rain to hit the sliding hatch. Removal wasn't too difficult. I removed the traveler bolts from the outboard standoffs and kept it attached to the sea hood, then cut the sealant around the perimeter of the sea hood and used the mainsheet to pull the whole assembly off the boat. A little Debond helped as well. Once removed, I drilled out the core, filled with epoxy and redrilled. Looking at these pictures, you may have to go this route if your aluminum pieces extend under the sea hood like mine. View attachment 46806View attachment 46807

Nick, can I thank you and curse you at the same time? - Actually, seeing what might be inside is extremely helpful. Scope creep for sure, but I should expect it by now. Leaving the traveler rail attached to the hood will make this a good deal less of a chore. Big thanks! No curse, you're just the messenger, with welcome information.
 

Nick J

Contributing Partner
Moderator
Blogs Author
no problem, If you go down this path, here's a few helpful tools:

for the last little pieces of 5200 use these:

For larger pieces and bulk removal of the 5200, I cut a piece of acrylic left over from my portlight glass replacement project and sharpened one side. They last a lot longer than the small blades above, but don't keep an edge very long.

Debond softened the 5200, but didn't completely dissolve it, so a heat gun was really helpful as well.

It took a few hours to remove the sea hood, a few days to remove all the 5200 and a few hours to reinstall. I used butyl tape to reinstall because I will need to remove it again when I find time and money to replace the sliding hatch. Once that's done, I'm going to bed the hood with a good sealant. I don't think that will take too much longer than the butyl tape, but thought I would mention it.

I would imagine removing the fuel tank would be much more difficult than this task, so your more than half where there!
 

Prairie Schooner

Jeff & Donna, E35-3 purchased 7/21
I vote for the demolition saw. I can't see going to that much pain to get out an old tank that's near the end of its useful life anyway. Fuel tanks aren't THAT expensive, and you could have a new one fabricated that fits nicely down your companionway and also has a cleanout.
Hi Alan,
It was good to chat tonight on the Zoom meeting. As I said there, I came very, very close to breaking out the demo saw.
My more typical m.o. is:
luggage gorilla 3.jpg
Cheers,
Jeff
 

Prairie Schooner

Jeff & Donna, E35-3 purchased 7/21
The Tank Is Out
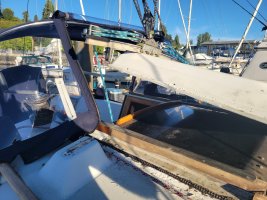
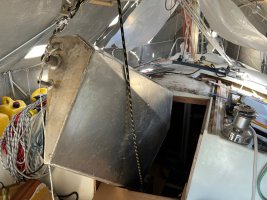
Our hatch configuration ended up being like Nick’s, meaning I had to remove the sea hood to get the tank out. I removed that and got the tank out of the boat over about four hours. The most frustrating part was getting the screws out of the traveler plinth/bracket. During that ordeal I seriously considered taking the recip saw to a corner of the tank. Leaving the traveler on the sea hood tipped the scale for me. Thanks Nick. I’ll post about the hood removal elsewhere.
fuel tank remove 5a E35-3.jpg

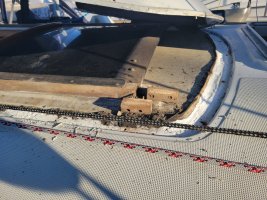
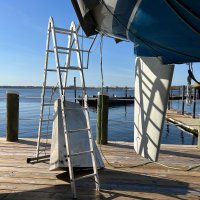
As David said, the tank will fit out through the companionway once the slider is removed. But it did need that last couple inches. Thanks for being the pathfinder David. The tank was light enough to lift easily, but I used a tackle for more control.
fuel tank remove 5b E35-3.jpg

Monday morning we’re off to the fabricators. In the mean time I’ll post some detail pics of the tank, condition and dimensions. It was helpful to discuss options during the Friday night Zoom meeting. Thanks Mark, and all.
fuel tank remove 5c E35-3.jpg
 
Top