You are using an out of date browser. It may not display this or other websites correctly.
You should upgrade or use an alternative browser.
You should upgrade or use an alternative browser.
Coaming Storage Wood Replacement
- Thread starter seadyce
- Start date
-
- Tags
- coaming replacement storage wood
tenders
Innocent Bystander
Yes, it isn't a difficult repair. Scoop out as much of the rotten old plywood as you can get out and make sure everything is dry as a bone. Pour a layer of unthickened West System epoxy over the remaining good plywood. As it's absorbing add several additional layers of thickened West System epoxy, and smooth it out with a squegee (or similar tool). If you tint the epoxy white, you may not even need to paint it.
I made coaming box covers out of 1/2" StarBoard and get no more water in there whatsoever.
I made coaming box covers out of 1/2" StarBoard and get no more water in there whatsoever.
gareth harris
Sustaining Member
That plywood base also forms part of the deck core, and replacing it is a major undertaking. I can supply pictures if you like, but if you can reinforce it as Tenders has described it will save you a LOT of work.
Gareth
Freyja E35 #241 1972
Gareth
Freyja E35 #241 1972
Lucky Dog
Member III
Ok, I give how do they come off
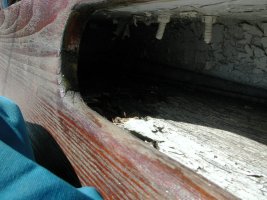
Have pulled the last two pieces of hardware off the deck. The goal is stop the water fall of leaks and remove all the PO great ideas that don't work anymore.
Look at the plywood on our boat is it seem to have the same needs. I also would like to refinish the wood work at home. Removed the half dozen bolts, but it won't budge.
Are the glue on too?
ml
ChrisS
Member III
I did this last fall. There were quite a few screws and bolts--maybe 10 per board. Some were lags, and others were bolts. Once I got the hardware out the wood popped right off. I then cleaned out the rotten wood from the cubbies, let it dry, used CPES to help seal up the wood, and then filled it with thickened West System epoxy. Finally, I painted the cubby and refinished and reinstalled the teak. Be patient and get the cubby wood as dry as possible. Oddly enough, the port side cubby had quite a bit of rot, while the starboard side had very little. Since the teak was previously grey, the cockpit now looks really nice.
I also had a local canvas shop make covers to keep the rain water out from this point on.
This fall: the cabintop grabrails!
I also had a local canvas shop make covers to keep the rain water out from this point on.
This fall: the cabintop grabrails!
tenders
Innocent Bystander
Oh, you have water leaking in from above? I did not--it all came in sideways through the hole in the coaming box.
The boards on my boat were screwed in using about 30 slotted woodscrews, each capped with a plug. Well, originally they were each capped, several of the caps wore down and fell out after 35 years of sanding, varnishing, and neglecting. No bolts. The wood had some caulk on it, I suppose to help keep it against the bulkhead, but it did not have significant adhesive properties.
They weren't that difficult to get off but they were so worn and split that I fabricated new ones out of Starboard. It just wasn't worth refinishing and reinstalling the old ones.
Lucky Dog
Member III
Thanks again
I attack at dawn...well after coffee and the yard opens.
I will have to sand down the coaming a bit to see the plugs.
So far have only found four bolts with nuts (inside the box area) and two screws at the forward end of the boat.
Hopefully tomorrow I will have deck that doesn't leak anymore. And i can finish replacing the core.
If you don't here back I'm stuck in the sail locker with a twisted neck.
ml
gareth harris
Sustaining Member
My teak coaming had nine screws, with anchor nuts that had to be ground off (note E35 not E32).
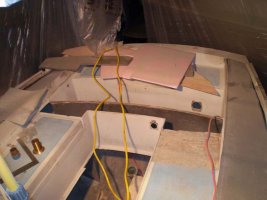
The picture shows replacements for the plywood I made out of 1/2" thermolite; this was part of hurricane damame repair and hopefully your project will not be as large, but you can see how the cockpit fits together.
Gareth
Freyja E35 #241 1972
The picture shows replacements for the plywood I made out of 1/2" thermolite; this was part of hurricane damame repair and hopefully your project will not be as large, but you can see how the cockpit fits together.
Gareth
Freyja E35 #241 1972
Attachments
-
 P2180050.jpg66 KB · Views: 142
gareth harris
Sustaining Member
The nine screws were fairly easy to spot once I had wriggled into the appropriate spaces, the hard part was knowing how many to look for and when they were all removed. The coaming came away fairly easily after they were all removed.
I thought about putting drains into the cubby holes, but decided against it in favour of covers over the openings as the others have described, just to stop large pools of water sitting in there - any small quantities seeping through the covers evaporate fairly quickly after it stops raining. My new build now is not very susceptible to water damage.
If your plywood is seriously rotten, you could try glassing in another piece over the old one. The other way to reach it would be from underneath, but that would involve all sorts of cosmetic work in the interior afterwards.
By 'deck between cockpits' I assume you are referring to the location of the traveller, which was also plywood cored. The boom was ripped off my rig, in doing so exposing some rot to that part of the deck. I replaced it with 3/4" thermolite.
Gareth
Freyja E35 #241 1972
Last edited:
Lucky Dog
Member III
Can't remove coaming
Still won't budge.
I was able to reach in with a socket wrench to remove seven nuts and machine screws.
You have referred to screws from inside the sail locker - twisting your head around to see them. Are these additional screws to the nine bolts?
thanks for your patience,
ml
Still won't budge.
I was able to reach in with a socket wrench to remove seven nuts and machine screws.
You have referred to screws from inside the sail locker - twisting your head around to see them. Are these additional screws to the nine bolts?
thanks for your patience,
ml
ChrisS
Member III
On the starboard side, I had to remove the ignition panel to get to a couple bolts; on the port side, I went through a panel at the aft end of the quarter berth. I have a '75, so things may be different. Either way you should be able to see the location of the fasteners by looking for the plugs.
I may get down to the boat tomorrow, and if I do I will map out the fasteners.
I may get down to the boat tomorrow, and if I do I will map out the fasteners.
Last edited:

gareth harris
Sustaining Member
Can you tell whether a previous owner has bonded it in any other way, such as 5200? Or even tried to glass it in? I can not tell for sure from the picture whether you have got all the screws out, but even if one or two are still remaining you should get most of it to move.
There is a product available for breaking 5200 which works pretty well. If on the other hand somebody has used epoxy, well, we will need a different approach.
Gareth
Freyja E35 #241 1972
There is a product available for breaking 5200 which works pretty well. If on the other hand somebody has used epoxy, well, we will need a different approach.
Gareth
Freyja E35 #241 1972