Cockpit Drainage and Thru-hull Questions

jkenan

Member III
Seth wrote in another thread:

Well, good luck. I would suggest 2 things to look very hard at:

1). Cockpit drains. Increase the diameter of the hoses so that the cockpit will drain as fast as possible-shoot for under 2 minutes.
It WILL get flooded, and the boat is very vulnerable when the cockpit is full of water. This 2 minute test is a requirement for offshore racing yachts.

Seth, et al-

I'm in the process of doing a major overhaul on everything below the waterline (peel, barrier job, replacing all and relocating some thru hulls, etc). A couple of questions for anyone who wishes to comment:

1) I contacted Centek industries, who make fire-retardant fiberglass wet exhaust fittings. They can make a standard 'Y' hose fitting that accepts two 1.5" hoses and outputs them to a single 2" hose (see this link: http://www.centekindustries.com/fittings.html - The 1.5" to 2" fitting is not listed but they are willing to make two of them for me for about $50 each). I was thinking of leading a set of two 1.5" scupper lines to each Y then completing the run to a 2" thru-hull. I would double clamp and use crush sleeves, and since it is rated for wet exhaust, they say it is fine for below WL use. If I maximized the length of the 2" run (ie, placed the Y as close as possible to the aft-most scupper), would this achieve what you are suggesting?

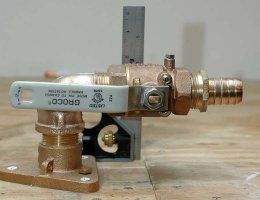
2) In an effort to minimize holes below the waterline and minimize winterization concerns, I'm strongly considering relocating the thru-hulls for the scuppers to just above the waterline. I'd use Groco flange adapters on two 2" thru-hulls, then to a 90-degree street-el, terminating to a valve/barb. That should keep the overall height of the valve assembly as low as possible, and allow a downward slope on the 2" hose from the Y fitting to this assembly. I know the horizontal valve assembly is not as ideal as a seacock, but it is reinforced by the flange, and can be additionally reinforced at the barb end, plus it's above the WL. See the attached photo (thanks to MaineSail's blog on pbase.com, btw, a WEALTH of valuable info - see it at http://www.pbase.com/mainecruising/boat_projects). I might opt for a 45-degree turn instead of 90 degree to accomodate the slope of the hull, to keep the assembly level and prevent it from pointing downward).

Is there anything in my logic or approach that is problematic?
I appreciate any feedback.

Thanks.
 

Attachments

  • 83681399.0KMjWxnd.jpg
    83681399.0KMjWxnd.jpg
    68.8 KB · Views: 1,062

Randy Rutledge

Sustaining Member
John

I would definitely go with a 45 to make sure that there is no water left in the fitting to freeze, with the fittings above the waterline and that far back they would be very vulnerable to freezing. I have looked at this for my E29.

Have you thought about what you are replacing the drains in the cockpit floor with? Would it be crazy to connect the drains with PVC until they reach the lazarette and then use the tubing to the through hulls?
 

Rocinante33

Contributing Partner
John,

Will one 2" hose flow as much water as two 1 1/2" tubes? I doubt it. Won't that mean that your cockpit will take longer to empty if you get pooped? The quicker the drainage, the better.
 

jkenan

Member III
I agree that 4x 1.5" thru hulls will drain faster than 2x 2" thru hulls. However, I don't want a labyrinth of hoses to tread when I'm deep in the lazarette performing feats of bodily contortion, nor do I want so many holes in the hull so close to the waterline.

I always assumed my existing thru hulls were 1.5" because that is the hose size coming off the scuppers. However, after pulling the seacocks and thru hulls, I realized they are 1.25". Yep, a single 1.25" hole drained two (yes two) 1.5" scuppers per the design of the boat when I acquired her. I think going up to 2" will make a big difference, and the fact is, drainage with 1.25" thru-hulls wasn't entirely unrespectable. I believe some alternative ideas for supplemental drainage floated about another thread, which involved the standard scuppers per original design, along with some drainage points higher in the cockpit leading to exit points lower in the Transom, but not at or below the waterline, the logic being that if the water was that high, you would benefit from the extra drainage, but when it's reasonably low, the original scuppers would do the job, and your not putting holes in low parts of your boat making it more vulnerable. I could see doing this if I were interested in going offshore, but my goal is to minimize underwater thru-hulls, and simplify winterization (and at the same time, improve drainage).

Randy, I considered Schedule 80 PVC to connect the scuppers, but I think fitting it all together with proper scuppers that withstand the UV would be more of challenge (I wouldn't want to use PVC drains from Lowes to act as scuppers as they will get brittle in the UV). The fact is, the 1.5" run is about as long as the distance between the two scuppers, then everything is 2". I don't feel there'd be much benefit, except, perhaps, that it might be a cleaner install (if you could fit it together effectively).
 

Randy Rutledge

Sustaining Member
John

I would run 1 ½” from the front to the lazarette and step up to 2” before the rear scupper and use a sweeping T with a larger radius for that connection with a 1 ½” inlet. Be sure to smooth the edges of all ends of the tubing to reduce turbulent and increase flow as well as reduce the ledge for trash to build up. The connection from the scupper to the pipe possibly could be a threaded adapter.

The issue is that a 1 ½” scupper will only have a 1 ¼” hole and a 1 ½” hose ID. The actual area of the hole(s) in two 1 ½” and one 2” is .06 sq in.
 

Tom Metzger

Sustaining Partner
Huh?

Did they change the value of pi while I was away from the dock? :) I think you may have missed a decimal point somewhere.

The area of a 1 1/4" circle is about 1 1/4 sq. inch.
 

Randy Rutledge

Sustaining Member
Tom

The ID area of two 1 1/2 is 2.46 (1.23 each, close to your 1 1/4) and the area of one 2 is 2.4 or a difference of .06 give or take a beer.
 
Last edited:

timday5

Member II
According to the manufacturers, anyway, PVC is made UV resistant. UV radiation doesn't penetrate below the surface of much of anything (why it burns your skin, but not your bones, for example).

On the other hand, I've been told that the flexing of a boat under wave action, etc, will eventually cause PVC to break, so I'm pretty sure ABYC frowns on it.

However, your application is above the waterline...

I used PVC drains in my E27 because I didn't want to shell out for scupppers.

I used pressure-connect PVC fittings (like what you use under the sink) to attach PVC pipe fittings to the drain output. To the pipe fitting, I cemented flexible PVC (used in whirlpool baths, etc). the four hoses lead aft, then join up using standard PVC "T's", which are then connected by a short section of hose to a 2" thruhull (above the waterline, but lower than the cockpit deck). Not pretty, but it seems to work in testing. I imagine I will eventually have to replace this system, especially if I take the boat out of protected waters.

My boat isn't in the water yet, due to other maintenance issues.
 

jthistle

Member II
I did the same with the PVC and short lengths of hose. As for cracking... the short hose runs will absorb and flex. As long as the PVC fitting is not into anything rigid it will "float" on the hose - there should be no issue with flex and crack.

cheers
jt
 

chaco

Member III
Stay Away from PVC Fittings !

Drainage fittings need to be Nylon - Marelon - Brass :nerd:
PVC will fatigue on contact with Salt Water and has no place in the Marine
invironment. PVC also has no resistance to vibration and will CRACK in time.
Would not even recommend PVC fittings for Fresh Water Systems :cool:

Keep it Nautical :egrin: :egrin:
 

Loren Beach

O34 - Portland, OR
Senior Moderator
Blogs Author
ORC advice on drains...

If you search the 'net there are a lot of web sites with copies of the regs.
I have attached just one, found with a quick Google search.

Minimum drainage is spelled out. Even if you never intend to race off shore, these are good guidelines for equiping your boat.

When you do the volume calculation for your own cockpit and truly measure the internal thruhull ID of your drains, prepare to be... surprised...
:rolleyes:

Loren
 

Attachments

  • CategoryRegs.pdf
    254.1 KB · Views: 275

Greg Ross

Not the newest member
PHRF Special Regs

Loren,
Scanned thru the link you provided last night and a question popped to mind;
Reading Para 6.23-maximum cockpit volume. If you use "feet" as the unit of measure for LWL, max. beam and freeboard would you then be determining your Cockpit volume in cubic feet? I didn't see any reference to the units of measure. A quick calc. yielded a maximum of 65 cu ft. for my little E-31. I won't get aboard to actually measure the cockpit until the weekend to crunch any actual volume numbers. I suspect the E-31 with it's large/ deep, spacious, dry cockpit will exceed that volume substantially.
I guess this will likely validate why I've got this determination to add scupper/ capacity.
I was interested to see how cockpit drainage was handled on a trimaran an acquaintance built years ago, and it apparently really works. Large oval ports are cut thru the hull at sole level/ above the waterline that are fitted with covers secured from the inside with "bungee" cord. If flooded with water the weight dislodges the covers. He indicated on the one occasion they got pooped, on a night passage in darkness, the cockpit drained virtually immediately. On a monohull I don't think that type configuration would work because obviously the added weight is going to lower the stern that much more to make that type port ineffective.
Thanks,
Greg
 
Last edited:

Loren Beach

O34 - Portland, OR
Senior Moderator
Blogs Author
I ran 56 cu ft thru the calculator and got 486 gallons.
I have only been aboard a couple of E-31's, but... that gallonage seems high to me, for some reason.
:confused:

Loren
 
Last edited:

gareth harris

Sustaining Member
To pick up where we left an old thread, those regulations say 'one manual bilge pump.' They do not specify whether that can be a scary man with a bucket, I therefore presume not.

Gareth
Freyja E35 #241 1972
 

Loren Beach

O34 - Portland, OR
Senior Moderator
Blogs Author
As I recall, you must have a bilge pump that can be operated with the hatch boards secured in place and hatch closed and secured. The idea is that someone (like the helm person) can operate the handle while someone else finds the leak and/or tends to damage control. Or, you just clear out loose water while continuing on in heavy conditions, where boarding seas will have found some entry around vents, lazerettes, etc.

Loren
 
Last edited:

rwthomas1

Sustaining Partner
I have often wondered why fiberglass tubes, say 3" or 4" diameter could not be installed draining directly overboard through the transom? Rubber flappers would keep water from entering. Seems like a very simple solution. The tubes would need very little angle being so large. RT
 

Glyn Judson

Moderator
Moderator
Tubes instead of hoses.

Rob, Others will correct me if I'm wrong but I think it was Pearson who used fiberglass tubes for the cockpit scupper drains. I can't remember if they had seacocks fitted to them, something makes me think that there were none. They couldn't have been that successful or everybody today would be using them. Glyn Judson, E31 hull #55, Marina del Rey, CA
 

u079721

Contributing Partner
Stress?

I would think the issue with using fiberglass tubes directly would be stress on the joints between the tubes and the inner and outer surfaces. Unless we were talking about a transom that is just solid glass or wood cored, we would usually need to connect an inner cockpit pan with the outer hull. Those two surfaces have got to flex compared to one another, and that would play havoc with any seal on the ends of the tube. Though I suppose you could have one or more ends of the tube mounted in a flexible rubber seat?
 

jkenan

Member III
Here is an interesting site showing a Fuji 32 rebuild to the extreme. Relevant, because, it shows in detail hard scupper lines w/o seacocks. Click on the 2005 tab, and read the 5/30/2005 entry towards the bottom. He describes exactly how he did it. Not saying I would go this route, but here's an experienced boatbuilder opting this route....

http://www.anzam.com/images/fuji/project/work_begins/welcome.htm

Here is a photo after the install...
http://www.anzam.com/images/fuji/project/work_begins/sound_proofing001.jpg
 

Loren Beach

O34 - Portland, OR
Senior Moderator
Blogs Author
We have quite a few ocean crossers in our YC. Many have added cockpit drains with a two or three inch straight tubes to the hull side or transom. In most cases these exit from a point about 4" to 6" above the cockpit sole. This gives them a good down-angle to keep most outside water from sloshing in. Their purpose to drain the major part of the water quickly from a wave filling the cockpit, while the regular drains deal with the remnant. When these are glassed to the side of the boat, they usually are angled back at about 45 degrees to an oval exit on the hull right at the water line.

Loren

ps: thanks for the site link for the Fuji. Note that he combined the sink drain with the engine intake, to me that's a Bad idea. That's no reflection on the other projects, though - many look quite nice.
 
Last edited:
Top