• Untitled Document

    Join us on November 22nd, 7pm EDT

    for the CBEC Virtual Meeting

    Adventures & Follies

    All EYO members and followers are welcome to join the fun and get to know the people you've met online!

    See the link below for login credentials and join us!

    November Meeting Info

    (dismiss this notice by hitting 'X', upper right)

Ericson 41 Florida - Norway

Emerald

Moderator
Hi,

Look carefully at the top of the toe rail where the plugs (bungs) over the bolts are located. If you see discoloration or darker color around the bungs, this shows water in the wood. I tried to sand and varnish over this, and there was enough water in the wood that it just lifted the varnish off about a year later. It was really gross. The varnish was intact, but you could see the water bubbles under it and push it around with your finger. Cut the varnish, and out it came. So, with this in mind and the experience of others, I would really recommend removing the toe rail to do it right (and only do it once). I know this is a big job, but I've resigned myself to doing this one day soon. In the meantime, I have gone back to oiling the toerail to try to displace water and prevent further intrusion. The other problem I see is that the wood will wick the water up from the deck side where the bedding compound has failed. I think you are doing so much work to make her nice that you don't want to run a bead of caulk on the sides, but remove it and put it underneath. In any event, don't use epoxy to seal this. It will not flex enough and I think will ultimately leak again.
 

sveinutne

Member III
Thanks for the warning David.
To put in a new toe rail would be the best, but I want to get the boat on water in July, so it will have to be at a later time. So the thing to do might be just to use several layers of oil on the toe rail, so it will keep the water out, and find some good silicon to put on the joint between toe rail and deck.
I did something like this when I put tails in the bathroom. In the joint between floor and wall, I put some tape 10 mm from the joint. Then with some soap on the finger, I could easily put silicon along the joint. Maybe with silicon like the color of the deck will be OK. Then you will not see it too good. The tape will keep me from making a mess on the toe rail, so it will be a sharp clear line.
 

PDX

Member III
Sanding the top of the rail, replacing bungs (those cylindrical chunks of teak covering the tops of the bolts), and varnishing may help keep water from coming down through the rail bolts. But it won't help with the deck water trying to flow under the rail, fed by gravity, because of the slope of the deck. One of the prior owners of my boat tried to re-caulk the inside rail edge, facing the deck. It didn't work. Maybe there is some secret to it and he didn't do it right, but I doubt it. I just think that once the original sealant has failed the only recourse is to remove and replace the rail.
 

sveinutne

Member III
In Norway we have rain maybe 250 days a year. It feels like 300, so to stop leak from the deck to enter the cabin is very important. I am running out of good suggestions, but to replace the toe rail is not so easy. The metal rail plate is mounted on this toe rail, so I really will try to keep it on. To replace it will be the last resort.
I have one more idea that might work, but I am not sure. I am not finish with putting fiberglass on the deck, and one more layer of fiberglass will only make it stronger. If I make the next layer of fiberglass go half way up on the toe rail, and then put a stainless steel bar only 1 mm thick and maybe 20 mm wide with the top 2 mm bent 90 degrees inwards towards the toe rail, so I can hammer it in slightly along the top, so water will have difficult to get behind the steel. The toe rail will go maybe 10 mm higher then the top of the steel. The I can fasten the steel with screws 100 mm apart.
 

Emerald

Moderator
I just have a gut feeling it will ultimately leak, possibly crack the teak, and be really hard to undo later. I think I would go with running a bead on the inside edge, even though it has already been pointed out by PDX as something that didn't work on his boat. It probably would hold for awhile though and would be easy to undo and address at a later date.
 

PDX

Member III
I agree with Emerald as to the metal plate. And every one of those screw holes will become a potential path for water intrusion.

If you're going to epoxy the inside edge of the toe rail (and I would not do this) there is a technical bulletin by West Systems that discusses undercoating wood with epoxy. In situations where the wood cannot be removed, it recommends undercutting the edge likely to experience water intrusion and filling in the cut-out wedge with epoxy. Again, I would not do this. Getting the rail off again, should you decide to replace it or should you need to, would be extremely difficult.
 

sveinutne

Member III
Thank you all for many good advice. I will do some other work the next 2 weeks, so I have time to think about it befor I choose what to do.
 

Glyn Judson

Moderator
Moderator
Back on to the subject of your rail leak.

Svein, I've hesitated to jump into this thread until now so will offer my humble thoughts and then bow out. If in fact you are hesitant to remove the toe rail and nobody can blame you, do consider a great product called Captain Tolley's Creeping Crack Cure. http://www.captaintolley.com/ This is the most amazing product for irritating small leaks that I think yours might qualify as. If nothing else, you could think of it of as a temporary fix until the time you choose to remove and rebed the teak rail. Here's the page on their web site with a list of distributers closer to your home that carry it. I've used this product with amazing success and can attest to its effectiveness. Good luck, Glyn Judson, E31 hull #55, Marina del Rey, CA (where the Tsunami was less than 1/2 meter high).
 

sveinutne

Member III
It was possible to buy this Captain Tolly’s Creeping Crack in Norway, so I have ordered two bottles for testing. I am sure it will be many places that would be nice to use, but back to my toe rail, the idea to use epoxy in the cut-out wedge might be good. Fist I will do it on the deck side, but if it is easy, I will do it on both sides of the toe rail.
Now the weather has turned back to winter mode with a snowstorm blowing outside, so it will take some time before I get enough heat for the epoxy.
 

sveinutne

Member III
My wife is not a sailor, but she likes to come along for the company. So I would like to make it as comfortable as possible for her. She likes to sun bade or read a book wile sailing with small banking angles. Less then 15 degrees angles is OK. So I have fond a good spot for her on the starboard side, where she could lean her back to the wall that has an angle, and put hear feet’s along the side where people usually sits. Then she will be faced backward looking at me behind the wheel.
Maybe this is just a fantasy, with so much work for some minutes at sea like this, but what would life be without dreams.
The problem is that at that spot there has a big compass mounted, but I am considering removing it, and putting on some more fiberglass to make the wall show no sign of the compass. There is another compass in the consol at the wheel and I have a chart plotter, so I think I can do without this compass in the wall. If this compass is not something special that should be in an Ericson, I think it has to go. If I do not get some good reason for keeping it there it will go soon. On the other hand if someone is looking for such a compass there might be one available now.
 

sveinutne

Member III
I started to work on the toe rail today. I think I made 5 meters in 0.5 hour, and if I should take both sides it will be about 50 meters or about 5 hours of work. And that is just to make a 1mm x 10 mm cut in the toe rail. Also I wonder if 1 mm might be too small, maybe it should be 2mm thick, so it will be easier to get the epoxy in? When I used epoxy as glue on the teak in the cockpit, I filled some small beads into the epoxy. Then it would fasten better to wood. I guess I need to do the same here. I have not started to fill in the epoxy yet, and I wonder how it should be done. Maybe I could us a 50 ml syringe and squeeze the epoxy in. Everything takes about three times more time then planed..grrr.
 

Attachments

  • toe rail.JPG
    toe rail.JPG
    58.3 KB · Views: 45

sveinutne

Member III
Please help with some brass bolts. I need four bolts. Threads are 1” long and 1/4” thick with six sided head for ½” tool all in brass. To get bolts in inches in Norway is difficult, and when you want it in brass, it is even more difficult. There was a shop that could order it for me, but then I had to take whole boxes.
Maybe the bolts got about 16 or 17 threads in 1 inch. I think this is the normal numbers threads, or the most common type used. I even called a shop in USA, but the handling fee was astronomical.
If someone would buy this in a shop in USA, and just put it in a small envelope and send as letter or gift to:
Svein Utne
Gjortlerv. 14
7021 Trondheim
Norway
It would help me a lot, and I will send $20 by paypal. Just tell me the email I should send it to.
 
Last edited:

sveinutne

Member III
Thank you for your advice about silica. I think it might be what I got. I will dry the toe rail first before I apply the epoxy. I will also blow the cut clean for saw dust, but I have the air compressor at the cottage, so it will take 2 week before I can get to that part.
 

Glyn Judson

Moderator
Moderator
Brass(?) bolts, probably bronze, right?

Sven, I'd be glad to send you four bolts but my guess is that you want four hex head, 1/4-20 X 1" bronze bolts. Does that sound right? If so, I can get them into the mail this morning and I'm glad to do it as a gift from me. What does 1/4-20 mean? A 1/4" bolt with 20 threads per inch and you want the threads to be 1" long, thus 1/4-20 X 1". Do you need nuts and washers as well? Cheers, Glyn Judson, E31 hull #55, Marina del Rey, CA
 

sveinutne

Member III
Thank you Glyn,
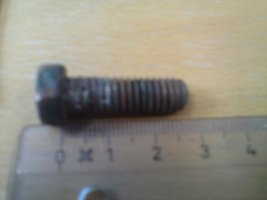
Yes hex head might be the right name for it. I tried to count the threads, and I got 19, but it might be 20. The 10 closes to the head has almost gone.
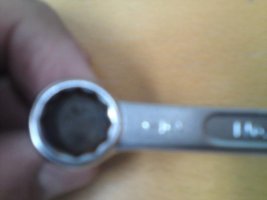
But it fit a 1/2" tool.
I will take a pictue of it and post when I get home in 1 or 2 hours.
If it is brass or bronze I do not know. It is used to clamp on the rudder the 60 degree part of a wheel for the cables. I will take a picture. Then you will know what I mean.
 
Last edited:

sveinutne

Member III
Hello group,

I am about to give my Ericson 41 a name, and I was planning to call it Orbo, but this latest event with Rossi’e Energy Catalyzer (E-Cat) for short has given my two possibilities Orbo or E-Cat. Steorn has mention they will come up with a 15kW solid state device in 4 weeks, but if they do not, I might go for E-Cat that is a Cold Fusion device that actually works. A detailed and quite long (even too much to post here completely) english article on Rossi's Energy Catalyzer has been posted today on Ny Teknik. Here's its summary:
"In a detailed report, two Swedish physicists exclude chemical reactions as the energy source in the Italian ‘energy catalyzer’. The two physicists recently supervised a new test of the device in Bologna, Italy.

http://www.nyteknik.se/nyheter/energi_miljo/energi/article3144827.ece

It's actually a two part article. The second part should prove quite interesting and revealing.
 
Last edited:

sveinutne

Member III
Glyn,
I only need the bolts thanks.
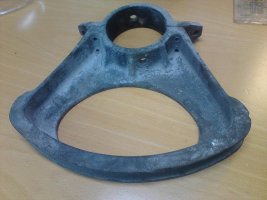
It looks very ugly now, but after some sandblasting, it will return almost like it was new.
The bolts hold this "sexkant looking pice" onto the rudder pole.
I do not want you to have any expenses on this. Please let me know what you have to pay in postage on for the parts.
 

Attachments

  • båt 001-s.jpg
    båt 001-s.jpg
    73.6 KB · Views: 31
  • båt 002-s.jpg
    båt 002-s.jpg
    32.3 KB · Views: 31
  • båt 003-s.jpg
    båt 003-s.jpg
    36.8 KB · Views: 39
Last edited:

sveinutne

Member III
I am not used to teak, and am not sure how it best should be brought back to life and preserved. Many places the teak looks very ugly. It is brown and dry with a layer of dead wood on the surface. But I have been pleasantly surprised how nice it can get with some sanding and oiling. I have used also some extra help on some parts. I have tried several teak restorers, some with color and some with no color. The one with color is like a miracle for teak you think is be one repair, but new teak or teak with a lot of color left get often to dark if I use the restorer with color.
I did this on several places last year, but what I see is that the oil does not last very long, so now I need to go over it again to make it look good.
I was afraid to use varnish, because I thought it would give a “plastic” wrapper that might be too air tight for the teak. But now I see pictures of other that have used varnish and it look so much better.
So my question is:
1 - What is the best way to bring old teak back to life?
2 - Should I sand and oil very old and dry teak and let it rest for some week before varnishing?
3 - Is there some part on the boat you should not varnish the teak, like on the toe tail?
 
Last edited:

Sven

Seglare
I would not oil.

I'm not a finish expert by any means (I still ask "how do I" varnish questions) but oiling teak has never given us enjoyable (exterior) results for long.

When we redid oiled surfaces on La Petite we first used two-part teak cleaner to get back the natural non-dirty, non-oxidized color. We used only soft bristle brushes to avoid gouging out the soft grain in the teak. After that we sanded lightly. I think we also did an acetone rub-down to remove any last oil before putting on varnish.

For exterior teak we only use high gloss varnish, on interior surfaces satin finish survives.

I think it was Guy who suggested putting Smiths Penetrating Epoxy on as a first coat or two, before varnish, and we do that.

Now I've said more than I know about :egrin:


-Sven
 
Top