• Untitled Document

    Join us on November 22nd, 7pm EDT

    for the CBEC Virtual Meeting

    Adventures & Follies

    All EYO members and followers are welcome to join the fun and get to know the people you've met online!

    See the link below for login credentials and join us!

    November Meeting Info

    (dismiss this notice by hitting 'X', upper right)

Ericson 41 Florida - Norway

treilley

Sustaining Partner
Svein, the black wheel attaches to your boat's wheel. A manual can be found at Raymarine.com

The grinding could be a bad cable in the steering system or a rub or a sheave misaligned. You should be going over the entire steering system to ensure it is in good condition.
 

sveinutne

Member III
If this boat has had ST4000 mounted before, it is strange that I can’t find any marks from it. The only thing I can see is four small holes from some small bolts in the pedestal, and a hole on the side for a cable.
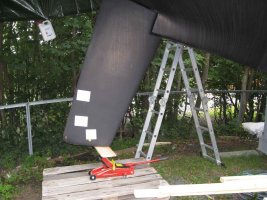
I also want to take out the rudder, so I can inspect the connection, and maybe make it better. I put a hydraulic jack under the rudder, so it would not fall down, and removed the three bolts holding the top connection to the steering pin. To my surprise the top did not get loose. Not even after I installed the steering pin and used some force on it. Is there some trick to take this top off, or should I just use more force? I will take some picture tomorrow, so it is more easy for you to see what I am talking about.

The previous owner told met the rudder was a bit “loose” in the connection, so maybe a Teflon film around the connection rod will tighten this.
 
Last edited:

treilley

Sustaining Partner
Svein, there is a torque bracket that installs on the front of the pedestal that uses 4 sheet metal screws. There could also be a small hole for the cable. Other than that there would be no sign of the ST4000 other than the instrument itself. The drive unit(black wheel) clamps to the boat's wheel. It should be clear once you get the manual from Raymarine.com. Here is a link to the english version:

http://www.raymarine.com/SubmittedFiles/Handbooks/Legacy_Handbooks/Autopilot/ST4000Wheel.pdf

I may have a spare torque bracket I could send you but these are generally cut custom to fit a particular boat so you would be best buying a new one from Raymarine.

If this boat has had ST4000 mounted before, it is strange that I can’t find any marks from it. The only thing I can see is four small holes from some small bolts in the pedestal, and a hole on the side for a cable.
I also want to take out the rudder, so I can inspect the connection, and maybe make it better. I put a hydraulic jack under the rudder, so it would not fall down, and removed the three bolts holding the top connection to the steering pin. To my surprise the top did not get loose. Not even after I installed the steering pin and used some force on it. Is there some trick to take this top off, or should I just use more force? I will take some picture tomorrow, so it is more easy for you to see what I am talking about.

The previous owner told met the rudder was a bit “loose” in the connection, so maybe a Teflon film around the connection rod will tighten this.
 

sveinutne

Member III
Thank you Tim,
Now it is clear to me, I just need to get the right torque bracket before I can install it. The user manual was very informative. I have bought several other instruments from Raymarine, so it will be interesting to see if I can make them talk together.
 
Last edited:

sveinutne

Member III
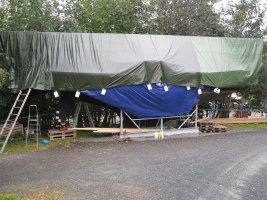
It is raining almost every day, so it is good it is under wrap.
 

Attachments

  • IMG_4706-web.jpg
    IMG_4706-web.jpg
    151.3 KB · Views: 49
  • IMG_4707-web.jpg
    IMG_4707-web.jpg
    118.1 KB · Views: 52

treilley

Sustaining Partner
Thank you Tim,
Now it is clear to me, I just need to get the right torque bracket before I can install it. The user manual was very informative. I have bought several other instruments from Raymarine, so it will be interesting to see if I can make them talk together.

Svein, that ST4000 has a Seatalk connection so it can talk to any other Raymarine device that supports Seatalk.
 

sveinutne

Member III
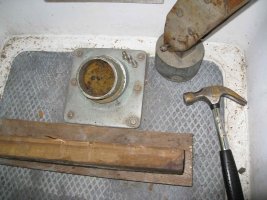
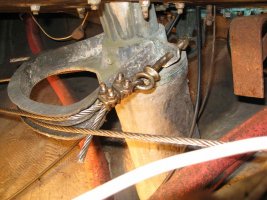
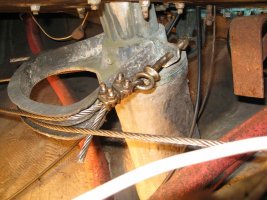
With some gentle tapping with a hammer and some force, the top connection till the stearing pin got loose. Now I need to find out what to loosen to get the rudder out. The wire looks OK, but I guess I will have to remowe the parts that is connecting this wire to the rudder tubing.
 

Attachments

  • IMG_4708-web.jpg
    IMG_4708-web.jpg
    102.3 KB · Views: 32
  • IMG_4711-web.jpg
    IMG_4711-web.jpg
    107.5 KB · Views: 30

sveinutne

Member III
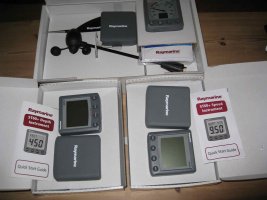
When I open the boxes from Raymarin, I feel like a child on Christmas. I want to mount them in the boat, but I am afraid to do it wrong, so they are just laying here. I guess when I get some more time I will read the installation instruction and see if I am up to it, and then after they are installed I will try to connect them to ST4000 and see if they will communicate, or maybe I will try it on the table first if that is possible without too much hassle.
 

Attachments

  • IMG_4715-web.jpg
    IMG_4715-web.jpg
    68.7 KB · Views: 138

treilley

Sustaining Partner
This is a very simple system to install Svein. Run power to the AP computer and then all you need to do is connect the AP to one of the instruments using the seatalk bus and then daisy chain each other instrument off the first. Seatalk can provide the power to the instruments. The only tricky part will be to install the transducers but they are also relatively simple plug and play once they are all mounted.

Now that I think about it, the most complicated part of this system is the setup and calibration. I would say the manuals are not very user friendly.
 
Last edited:

sveinutne

Member III
Thank you for your help and advice Tim, but I will concentrate on the rudder and later the outside work that is needed before it gets too cold to work outside, and then the instrument will be a bit later. Before I unscrew what looks like holding the rudder, it would be nice to hear from someone that has taken out and replaced the rudder. Is there something to look out for? Is it easy to break or do something very wrong? I think I have gotten the swine flue, so I am not working on the boat today, but I am not too sick so maybe in a day or two I am ready to continue on the rudder.
 

sveinutne

Member III
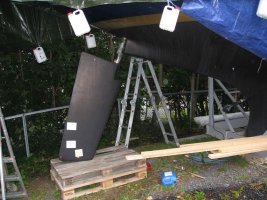
I am not sure if I really got the swine flue, but it is so common in Norway now that they do not test for it anymore if you are not working in a hospital or have a very important position. I guess I have none of it. But I do not fell too sick to work on the boat, so I took the rudder down, but not all the way out. Maybe I do not need to take it all the way down, but clean the rod for the rudder where it is standing.
 

Attachments

  • IMG_4732-web.jpg
    IMG_4732-web.jpg
    114.1 KB · Views: 151
Last edited:

sveinutne

Member III
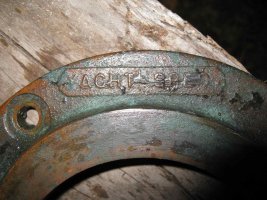
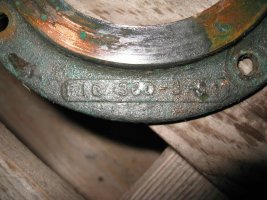
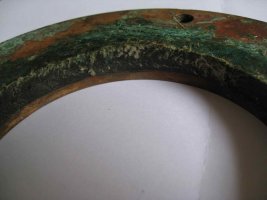
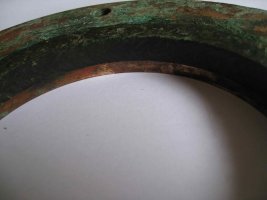
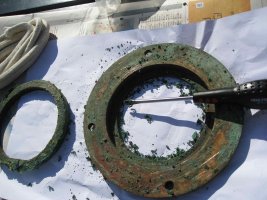
There is a plate that might work as a Simmerring. It looks to have some sort of gasket (bushing)built into it. I am not sure if I should replace this plate with gasket (bushing) or not? I took two pictures of it, and it might be possible to read the inscription on it. To me it looks like YACHT SPEC on the top rim and FIG 360 - 3 : 5
But I am not sure, so I put the plate in 1.5 litre of Coca Cola in hope that it would clear up some more in case I need to order a new plate.
I have never had a boat before, so I am not sure what is needed, so your recomandetion is appreciated.
 

Attachments

  • IMG_4739-web.jpg
    IMG_4739-web.jpg
    125.3 KB · Views: 44
  • IMG_4740-web.jpg
    IMG_4740-web.jpg
    115.7 KB · Views: 28
Last edited:

sveinutne

Member III
This bushing might be the reason for this vibration in the rudder when turning to the left. The bushing is smooth for about 180 degrees, but the other 180 degrees is wrinkled, so it will give more friction in on direction then in the other. Maybe it is possible to just replace this bushing or make it smooth again?
I did not understand it was a bushing at first, I thought it just was used two different sorts of metal. I have removed it from the coke incase that could ruin the bushing. When I think of it, it is strange if there is only one bushing, it should be two, but where is the second bushing?
It might be the ring that is under the boat just on top of the rudder where the steering rod enters the boat? I will go and have a look at it tomorrow when it get light again. When I removed the rudder, I thought that ring was some sort of spacer.
 
Last edited:

treilley

Sustaining Partner
I think this is probably the rudder stuffing box that keeps water from entering the boat via the rudder post. It should have been at the top of the fiberglass rudder tube and below the quadrant. The bushing you speak of would be flexible packing that goes between the top and bottom and the 4 bolts tighten down to squeeze the packing around the shaft..

BTW, Yacht spec is "Yacht Specialties". They supplied many components For our Ericson boats over the years.
 

sveinutne

Member III
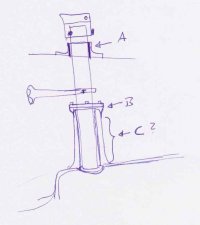
I have made a drawing of how I think the rudder pin is. From the top, under the connection nut for the tiller is a metal to metal connection I have marked A. This might just have some new grease I recon. Then at B it is a bit more difficult. The bushing is not nice and smooth all the way around only for half the circle, so I need to find out what to do with it. If I can not get a new bushing that will fit, I might get one made at work, but I am not sure what material to use. We use a lot of Teflon and peak. Teflon might be too soft, so maybe peak might be better. Then we come to the area C where I do not know what is inside. If there are some bushings inside at C, they might need to be replaced too, but to look there I will need to remove the rubber completely, and that is not so easy by myself, but with some help I guess that is no problem.
 

Attachments

  • rudder-web.jpg
    rudder-web.jpg
    26.4 KB · Views: 32
  • IMG_4741-web.jpg
    IMG_4741-web.jpg
    57.6 KB · Views: 45
  • IMG_4742-web.jpg
    IMG_4742-web.jpg
    49.6 KB · Views: 36
Last edited:

treilley

Sustaining Partner
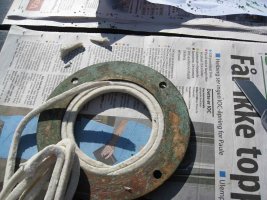
Do not worry about bushings unless your rudder has excessive play. I do not know this boat that well but there is likely only a bushing at the bottom of "C". "B" is your stuffing box for your rudder. There is no bushing here. The rudder shaft should not touch any metal here, just the flax packing compressed between the parts there. The existing packing would have hardened over the years and may seem like a bushing but it is no different than the flexible packing in the drive shaft.

In the second photo you posted the jagged looking edge is packing and you should be able to peel this away from the flange. You will find it is somewhat flexible once you remove it.

Here is some good info at the C34 site about rudder packings.

http://www.c34.org/faq-pages/techdata-rudder-packing-gland.html

Here is what typical packing looks like before it gets compressed:
18935.jpg
 
Last edited:

sveinutne

Member III
Thank you Tim,
It is really nice to have a forum like this where you can get good answers from people that know what they are talking about.
I did some inspections today in better lights and to me it looks like there might be a bushing at A too. At least I can see two different colors, indication a bushing or some sort of stuffing. But I do not want to touch these bushings if I do not need to. I will take the boat on dry land every winter, so if I feel there is too much play in the rudder next summer, I know what I will have to do next winter.
Now, I only want to do what I really need to do to get the boat ready. My plan is to clean the rudder shaft, and maybe put some grease on it if that is advisable to do, and maybe exchange the stuffing in the stuffing box if needed.
 
Last edited:

sveinutne

Member III
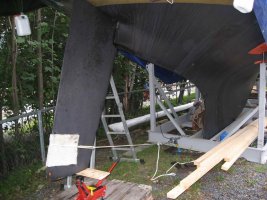
If I got swine flue, then it is less painful then a normal coold, so I think it must be something else I had, so tomorrow I will return to work, but today I enjoyed the sun and did some work on the stuffing box for the rudder. You can see the boat in the background, or at least the green tent covering the top of the boat.
 

Attachments

  • IMG_4747-web.jpg
    IMG_4747-web.jpg
    129.1 KB · Views: 37
  • IMG_4749-web.jpg
    IMG_4749-web.jpg
    104.4 KB · Views: 35

sveinutne

Member III
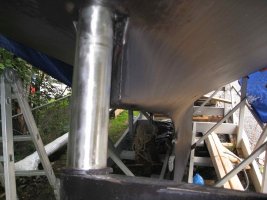
The rudder shaft is cleaned, and put in with Lithium grease ready to be reassembled.
This is an operation I would recommend be done by two people. I was alone, and had to run up and down the lather five times just to check the rudder shaft was aligned properly.
To my surprise did the rudder shaft slide into place on the first try, so maybe I was lucky, or the Ericson is a well build boat.
 

Attachments

  • IMG_4754-web.jpg
    IMG_4754-web.jpg
    86.3 KB · Views: 30
  • IMG_4760-web.jpg
    IMG_4760-web.jpg
    111.3 KB · Views: 32

sveinutne

Member III
Now the rudder shaft is back in place, but the stuffing box is not in place. It looked OK on the table, but when it was back in the boat it was not so easy. I could not make the rudder shaft enter the stuffing box, so I had to take out the stuffing to give room for the shaft. Now I wonder how to get the stuffing around the rudder shaft, and then lower the stuffing box over it. I am open for suggestions here. I have been thinking of using a hose clamp and tighten around the stuffing to get it squeezed to the right radius, and the removed the hose clamp and lover the stuffing box over it and let the bolts squeeze the stuffing to the right size. Any better idea?
 

Attachments

  • IMG_4751-web.jpg
    IMG_4751-web.jpg
    123.9 KB · Views: 36
  • IMG_4711-web.jpg
    IMG_4711-web.jpg
    107.5 KB · Views: 39
Top