Fuel tank Inspection Port Design and Installation

Christian Williams

E381 - Los Angeles
Senior Moderator
Blogs Author
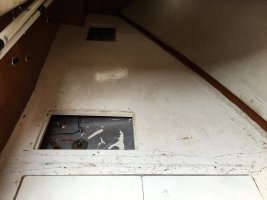
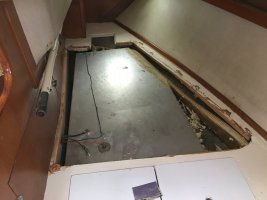
I have exposed the 50-gallon fuel tank in the E38 quarterberth. Interesting that the lid is too wide to fit through the companionway. And, in addition to being screwed down (it forms the surface of the after berth), the seam was then glassed over with 4" fiberglass tape by the factory--screwheads and all. A stick of gum to anybody who can deduce the reasoning behind that that tape.

So, regarding the installation of inspection ports:

1. How best to transfer about 40 gallons of fuel off the boat? Jeff Asbury used a simple drill pump. Anybody else? (I plan to discard the ancient fuel, not try to polish it).

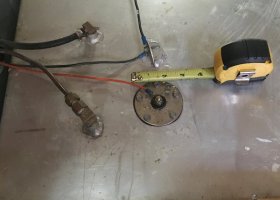
2. I plan to cut inspection ports openings with a jig saw. Or a sabre saw, as Glyn did. The tank wall is 3/16ths aluminum.

3. What port closures? I'm considering simple 8" aluminum plates over 6" round holes, with appropriate gaskets. (Instead of the $200/each Seabuilt fittings, of which I'd need 3.)

4. Attaching the plates. My fuel sender port is about 2" diameter, and the sender and gasket are held down by aluminum sheet metal screws. It doesn't leak.

I don;t see why that method shouldn't work for the inspection ports, too. Lots of screws, maybe every inch around the plate perimeter.

The screw holes would would be tapped, if possible. I don;t know if 3/16ths provides enough material for tapping.

Teh screws method works for the sender, so why not for the plates too?

5. There exist articles warning that sawing aluminum into a diesel tank is dangerous, and to be avoided. I don;t find them persuasive, and many have done it.

Ideas and opinions appreciated.

Christian

One useful thread http://www.ericsonyachts.org/infoexchange/showthread.php?10330-Fuel-Polishing-ASAP/page6
 

Shelman

Member III
Blogs Author
In my experience tapping into 3/16 aluminum works great as long as you can keep corrosion out of the equation, which shouldn't be a problem on your fuel tank anyhow. I would also add that thread sealing tape or goop should be used with caution because the diesel will dissolve them in to the mix and leave it elsewhere in the fuel system.
I think a rubber seal under the inspection port will work fine, that is how my diesel tank inspection port is assembled and it has never leaked a drip.
I also think sawing the aluminum is low risk (if it was steel I would say no way) especially with something like a jig saw which is a relatively slow reciprocating action and the aluminum will not produce sparks. I could see a possibility of a carbide tooth coming off of a skill saw blade and making a spark on the blade, but again I think its low risk. you could fill the tank with water if you were really worried but then would be a pain to get it all back out.
 
Last edited:

Glyn Judson

Moderator
Moderator
Fuel tank inspection ports.

Christian, It sounds as if you already have a good plan laid out. I have three plastic, diesel Jerry jugs available to borrow if you think that would help. Glyn
 

Christian Williams

E381 - Los Angeles
Senior Moderator
Blogs Author
Good reports so far. By the way, the fuel tank would fit through the companionway. But the ply lid is 46" and must have been--well, I don't know how they got it in there.

Thanks, Glyn. I have four 5-gallon jugs, and will just make two trips to the oil recycle tank.

Now, how to pump it out?
 

Christian Williams

E381 - Los Angeles
Senior Moderator
Blogs Author
Cool, wasn;t aware of those. Does the little motor just start a siphon? Or does it actually pump full time?

Now you mention it, I think I can use my regular rattle siphon for this job. The tank is higher than the sole.

Very valuable, these little conversations.

And now I have to recheck my casual measurement of "3/16ths" wall thickness--the standards are apparently .090 (call it 3/32); .125 (1/8th) and .250 (1/4).
 
Last edited:

Joliba

1988 E38-200 Contributing Member
Christian,
Do you plan to use aluminum machine screws for the plates?

Mike Jacker
 

G Kiba

Sustaining Member
Christan,
Threading aluminum is not a bad thing if you don't remove the fasteners too often. Threads tend to wear and strip easily. As a general rule you need a minimum of three threads. So for .125 thickness material a machine screw with 32 threads will give you 4 threads (thickness x pitch). So 6-32, 8-32, or 10-32 would work. I would suggest installing stainless steel inserts or helicoils. Check Mcmaster-Carr. Some sets come with installation tools as well.
 

Tom Metzger

Sustaining Partner
Now, how to pump it out?

You could use the boat's fuel pump. Just put a hose barb on the gazouta side and run the hose to wherever is convenient. Not real fast, but real easy.

It might be faster if you can pull out the primary fuel filter element.
 

markvone

Sustaining Member
Screws per cover

Hi Christian,

I used #10-32 screws in order to get more threads in the tank wall as has been mentioned. I started conservative, planning on 1 screw every inch. I reduced that to 5 screws per side for my 8 x 8 inch fuel tank covers during fabrication. The 16 screws per cover clamp firmly and do not leak around the gasket perimeter. I just finished installing the screw head O-rings, but I have not been sailing to see if they have eliminated my slight weeping. FWIW, the pipe thread sealer I have from ACE hardware states it is acceptable for use with diesel.

I also just finished my water tank access covers using 3 screws per side on the same size cover (4 inches between). They appear to clamp as well as the covers on the fuel tank. I am less worried about weeping a little fresh water but I can always go back and add the additional screws. I have not been out sailing to test these covers yet.

Another tip that may be too obvious: I left my Buna-N gasket the full size of the 8 x 8 inch square covers and did not cut out the center 6 x 6 to make it a perimeter gasket. This eliminates the top gap, between the cover and the top surface of the gasket, as a possible leak path around the perimeter. Fuel can only get access to the bottom gap, between the top of the tank and the bottom of the gasket if the gasket is left cover size.

Mark
 

Navman

Member III
fuel tank ports

Christian,
I too am putting in access ports in my 38 this spring. I have gone into the forum archives and found the "taco" template for the manufacture of the ports have found that McMaster Carr has the diesel gasket material and sheet stock to fabricate everything. I plan on using a bi-metal hole saw to cut the port and plate using my drill press at home and an angle drill on the tank. My questions is this; as you have already removed the plywood, can you see how many baffles there are and how far apart they are? I would like to put a port in each baffle area and would like to have 6" holes with 8" covers but do not know if there is room enough. I want to pre-fabricate all of the pieces at home so I can get the installation done in a weekend. I have gotten my fuel down to about 15 gallons and have a pump to remove the balance. I do want to be able to clean each baffle section which is why I ask. How many ports are you putting in? Could you load some photos so I know what to expect? How was the removal of the plywood? My plywood seems to have become detached from the fiberglass tape where it attaches to the hull toward the aft end so it may make removal easier. Any insite you can post would be appreciated! Look forward to seeing your results.

Thanks and good luck,
 

Christian Williams

E381 - Los Angeles
Senior Moderator
Blogs Author
Don,

I searched for the Taco template, no dice--can you point to where it is?

Two baffles in the tank, so we'll need three inspection ports. I'll post some pictures of the tank tonight--left my phone on the boat again.

I chiseled away the (stupid!) fiberglass tape, but the lid-mount screws, which mount on lip designed to receive them, were covered in resin. I had to drill out about about half of them.

I wound up sawing out the whole lid with a skill saw, and will make a new one later.

Before picture. More tonight.
attachment.php
 

Attachments

  • tank lid b.jpg
    tank lid b.jpg
    61.1 KB · Views: 734

ignacio

Member III
Blogs Author
Fuel removal

Mike Jefferson's presentation for the 2014 Singlehanded Transpac has an interesting diagram on page 8.

http://sfbaysss.org/resource/doc/Jefferson2014-SHTP-ReturnTrip.pdf

I've implemented a variant of this with a three-way valve after the pump, which provides for an option to direct fuel into 5 gallon containers (or the cabin sole when I'm not looking). I wired in a switch for the pump, which makes fuel removal easy. And, since this is a "permanent" installation, it can be used to bleed the engine and bleed air out of the fuel line after filter changes.
 
Last edited:

Christian Williams

E381 - Los Angeles
Senior Moderator
Blogs Author
That is a very good and complete article. Only comment is that a rattle siphon is easiest for fuel transfer from deck jugs.

Here is the 1984 Ericson 381 fuel tank exposed. It is 3/16ths aluminum. The fiberglass tabbing at the right connects the tank to a channel for bilge hose. The tank is foamed in place. The lower area of the tank cradle drains direct to the bilge, meaning that fresh/salt water cannot be trapped under it.

The fuel sender is screwed down into what appear to be tapped holes. One of the screws is loose, probably from over tightening. They bear some black sealer compound. It doesn't leak, though, and the tank is brimming at the moment.

attachment.php
attachment.php
 

Attachments

  • Ericson 38 fuel level sender.jpg
    Ericson 38 fuel level sender.jpg
    60.4 KB · Views: 721
  • Ericson 37 fuel tank exposed.jpg
    Ericson 37 fuel tank exposed.jpg
    60.5 KB · Views: 741
Last edited:

Rocinante33

Contributing Partner
Tanks, a lot

To add to the discussion:

A chunk of dry ice in the tank 20-30 min before cutting The tank will displace the oxygen in the tank with CO2 and could provide an added margin of safety against potential fire or explosion, however unlikely that is.

My aluminum tank, CA 1982-1983 was built by Custom Marine Fabrication of Huntington Beach, CA. They are no longer in business, BTW. I know many Ericson tanks where made by Berry fabrication in Costa Mesa, but mine was not. Mine has a plate on it which identifies the manufacturer, says it was a 40 gallon tank (yeah, right!) and says that the wall thickness was 0.100. It has a single inspection port and it has a single baffle which bisects the tank. So The inspection port only gives me access to half of the tank. I may or may not add another inspection plate to the other end of the tank.

My inspection port is 5" x 5" square. It has a 6 1/2 in.² cover. It has a gasket on it which appears to of been cut from an old tire inner-tube! That gasket was not impervious to diesel fuel. In fact it was holding diesel fuel on top of the gasket but beneath the cover plate. The cover plate itself was secured with a series of stainless steel #10-32 screws. There was no corrosion evident on the screw threads even after 33 years in place, Probably because the diesel fuel bathed the bottom of the screws in oil. A three-quarter inch strip of aluminum scrap was attached all along the perimeter of the inspection port on the inside. That was apparently to double the thickness to provide additional thread for the attachment of the screws which secured the lid. I'm not sure how these strips were originally attached to the inside of the tank along the edges but they may have been tack welded in place. One of the strips upon removal of the inspection plate apparently came loose and became adrift in the tank. I will have to reattach the aluminum strip before I reinstall my inspection plate. I will probably clean the surfaces well and then use JB Weld epoxy to hold it in place.

I am cleaning up my old tank for reinstallation using mineral spirits, as recommended by Markvone. Thanks for all the advice, Mark!

BTW, it passed a leak test done by a nearby radiator shop, except for the leaky top plate (with its bad old gasket).
So where did my fuel leak originate? TBD
 

907Juice

Continuously learning
Dry ice bad idea...

To add to the discussion:

A chunk of dry ice in the tank 20-30 min before cutting The tank will displace the oxygen in the tank with CO2 and could provide an added margin of safety against potential fire or explosion, however unlikely that is.

My aluminum tank, CA 1982-1983 was built by Custom Marine Fabrication of Huntington Beach, CA. They are no longer in business, BTW. I know many Ericson tanks where made by Berry fabrication in Costa Mesa, but mine was not. Mine has a plate on it which identifies the manufacturer, says it was a 40 gallon tank (yeah, right!) and says that the wall thickness was 0.100. It has a single inspection port and it has a single baffle which bisects the tank. So The inspection port only gives me access to half of the tank. I may or may not add another inspection plate to the other end of the tank.

My inspection port is 5" x 5" square. It has a 6 1/2 in.² cover. It has a gasket on it which appears to of been cut from an old tire inner-tube! That gasket was not impervious to diesel fuel. In fact it was holding diesel fuel on top of the gasket but beneath the cover plate. The cover plate itself was secured with a series of stainless steel #10-32 screws. There was no corrosion evident on the screw threads even after 33 years in place, Probably because the diesel fuel bathed the bottom of the screws in oil. A three-quarter inch strip of aluminum scrap was attached all along the perimeter of the inspection port on the inside. That was apparently to double the thickness to provide additional thread for the attachment of the screws which secured the lid. I'm not sure how these strips were originally attached to the inside of the tank along the edges but they may have been tack welded in place. One of the strips upon removal of the inspection plate apparently came loose and became adrift in the tank. I will have to reattach the aluminum strip before I reinstall my inspection plate. I will probably clean the surfaces well and then use JB Weld epoxy to hold it in place.

I am cleaning up my old tank for reinstallation using mineral spirits, as recommended by Markvone. Thanks for all the advice, Mark!

BTW, it passed a leak test done by a nearby radiator shop, except for the leaky top plate (with its bad old gasket).
So where did my fuel leak originate? TBD


while I don't know much about using dry ice for this application, this fall I responded to a couple of dudes that ended up dying from trying to use dry ice to frack their well. I can only imagine using dry ice in the gallows of a sail boat would also constitute as a confined space. Just be careful and make sure you have lots of ventilation.

Juice
 

Christian Williams

E381 - Los Angeles
Senior Moderator
Blogs Author
the gallows of a sail boat

I regret that I have only one ice to give for my country.

If we do not ice together, surely we will ice apart.

However, i ce what you mean.
 

Rocinante33

Contributing Partner
while I don't know much about using dry ice for this application, this fall I responded to a couple of dudes that ended up dying from trying to use dry ice to frack their well. I can only imagine using dry ice in the gallows of a sail boat would also constitute as a confined space. Just be careful and make sure you have lots of ventilation.

Juice

Juice,

Those dudes sound like potential Darwin Award nominees! They must've not only put dry ice in the well, but I guess they also descended into it!? Or perhaps they just sat in an enclosed pump house and waited for the O2 to be expelled!??? And to try fracking, yeah, that sounds brilliant. Well, RIP.

In any case, an open companion way and one or two open ports should be all that is required to ventilate for this. I am not talking about a huge piece of dry ice. One pound is probably more than adequate.
 
Top