Icebox/Refrigeration on Ericson Yachts [Master Thread]

SpudE36RH

Member I
We ussually stay on our boat just for the weekends.
The orginal thermal fridge that came with the boat just doesn't work.
For years because we have just not wanted to pump out the cooler each weekend we have brought food on the boat and stored it in a 48 qt cooler on the starboard side.

It has come time that this to is getting old, What have other 38 owners done for refridgeration etc and how well does it work, we are concerned about putting refridgeration in the large icebox because things roll towards the back and are diffuicult to reach.

Thanks for the input
Jeff
1981 Ericson 38-Shalom
I just installed a conversion on our 36RH which really only had one spot for it.Iimagine you may have more choice in the 38?
We don't need to freeze things but have read at highest setting it will freeze.It runs so nice and quiet.On this boat the insulation around the ice box was 3".
Will put it to good use in a few days in the 80° heat or so. I have since re shaped glued the wood cut out to slide unit into place
Good luck.
 

Attachments

  • 20220812_175921.jpg
    20220812_175921.jpg
    133.8 KB · Views: 27

Jamiem

Member II
Just to add to the discussion in refrigeration. We built a day stern arch with 200 watts of solar panels, 2 days to vacation I decided to put a fridge on our e39. Bought an inverter, a Walmart bar fridge with separate freezer door, hooked it up to house battery and had cold beer for 3 weeks.
 

Christian Williams

E381 - Los Angeles
Senior Moderator
Blogs Author
See also related threads:


Touchrain

Member III
I cut a 1” piece of foam and skinned it in fiberglass to reduce the size of our big compartment. It can be removed easily to expand the space if needed. It increased efficiency remarkably since the area furthest back is very poorly insulated. We have the basic 12-volt AB system and probably use 30-40 AH per day. Easily covered by solar panels.
 

Jamiem

Member II
We added 2 100w solar panels and a bar fridge from Wal-Mart. The inverter has enough capacity for the fridge but make sure you have enough house battery capacity to get you through the night
 

shard7

1974 E27 'Bluey'
Our E27 still has the original ice box. I'm contemplating a portable refrigerator/cooler unit (an efficient compressor-based unit, not a thermoelectric one) and creating an opening where it could 'drop into' the ice box cavity with the lid at the counter surface.

Screenshot_20230128-153714.png

I would add a 12v connection and openings in the ice box to help heat from the refrigerator dissipate.

Upsides include the ability to load it up with stuff at home and bring the entire unit to the boat, and being able to remove it and use elsewhere for road trips, etc.

Curious if anyone else has considered or done this.
 

jtsai

Member III
Our E27 still has the original ice box. I'm contemplating a portable refrigerator/cooler unit (an efficient compressor-based unit, not a thermoelectric one) and creating an opening where it could 'drop into' the ice box cavity with the lid at the counter surface.


I would add a 12v connection and openings in the ice box to help heat from the refrigerator dissipate.

Upsides include the ability to load it up with stuff at home and bring the entire unit to the boat, and being able to remove it and use elsewhere for road trips, etc.

Curious if anyone else has considered or done this.
I experimented with this approach thinking the compact size of the frig/freezer had to be more efficient as it "should" cycle less than the boat's frig/freezer with large unused space. After a weekend test, I was surprised that the power consumption was not much different. The portable unit cycled a lot often than I thought.

My conclusion is that the boat's frig/freezer is actually pretty efficient. So I installed a 200W solar system at a cost not much more than one of these portable frig/freezer units. The portable unit however is excellent for car trip to keep frozen items cold.
 
Last edited:

bsangs

E35-3 - New Jersey
I’m just trying to get a little extra insulation in my fridge. I have a 12-volt SeaFrost BD unit with a plate in the aft icebox and it works very well, but during the warmer months it of course cycles more frequently. I just want to line the interior walls with something that’ll improve the insulation, and (on another thread thanks to @Loren Beach) potentially put some weather stripping around the lid. Just a simple cut a paste job is all I’m looking to do in the interior. What’s the best product for that?
 

boatgeek

Member I
Hi folks, I'm Wondering if anyone with an original icebox in one of our Ericson's has done the quantitative insulation test ala Don Casey -- weighing the amount of lost ice after a day or two in the box? And then using that the estimate the daily load when running the fridge? I may try if I can find some block ice. Any of your O34 owners know if there is a difference between our boats and the proper Ericsons? Thanks!
 

Bolo

Contributing Partner
Awhile back I did post questions about my aging Adler Barbour frig which you can find here ( https://ericsonyachts.org/ie/threads/refrigeration-question.20763/#post-166025 ) which might be worth a look but since this is the "Master Thread" for Ice/Box Refrigeration I decided to post my latest "cold" tale here.

After 33 plus year my old Adler Barbour, in my E32-3, decided it was time to retire. It was never cycling but instead continuously operating and pulling down 6 amps which was a major problem when at anchor. I often had to wake early and run the engine to keep the house batteries from falling below 50% which didn't go well with the "admiral" who cherishes her beauty sleep. Plus the evaporator was sweating so much that I had to pump out the ice box every few days. To get around my failing frig I often bought either a bag or two of cubed ice or one large block and turned the frig off when anchoring. Dockside with the power cord attached to the boat the frig ran constantly and when I checked the condenser fan would only work when I started it spinning with my fingers and then only for a short time. So how to address this problem?

I thought about doing the work myself but instead decided to hire a "pro" since my knowledge and experience of ice box conversions was limited and I just didn't feel confident to do the work properly myself being the first time. But hiring a pro didn't go as well as expected either. I'm not going to use the name of the company here but if you're in the Annapolis area and want to get the name then private message me. I'm not saying that the company was terrible and I would never use them again but some of the mistakes they made were, IMO, amateurish. In other words, they were mistakes I might had done if I had took on the job. Converting an ice box into a frig is after all a simple project when compared to more complex refrigeration on larger boats. So I think when a job comes along that is considered "simple" then, let's say, stupid mistakes are sometimes made because less thought is given to a simple job. In the business I was in (commercial photography) when a client came to me and said, "I have a simple quick job (or shot) for you.", I'd immediately say that there was no such thing as a simple job.

So, the refrigeration technician tested the old Adler Barbour and declared it officially dead. He pumped some refrigerant in and said it just wasn't coming up to where it should be on one of his gauges. As it reads in his invoice for looking at the unit, "We found the condenser fan was not operating and the unit ran for a long period and caused the compressor valves to warp." He told me that the compressor overheated which caused the warping and that fixing it would be much more than a new unit. I was expecting this so it was no surprise.


He next recommend another Adler Barbour (Now owned by Dometic) unit because, in his words, 
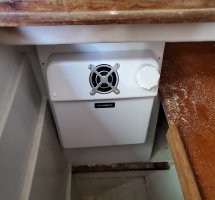
"they're almost bullet proof". Unfortunately my old Adler Barbour wasn't that fortunate so he ordered a new Adler Barbour/Dometic CU-100 Cold Machine, flat plate evaporator ( bent to go around one corner of the ice box) and a thermostat. My old evaporator was the "freezer box" type that came with an ice cube tray. I never like it because it took up a lot of room at the opening to the box and often items got lost under it. Having a flat evaporator opened the space up and it's much easier to see and grab items. About one week after his first visit he installed the new equipment. That day I received a text message that the job was done BUT...when bending the evaporator to fit into the corner of the ice box he cracked it which allowed the refrigerant to 'hisss' out. So another one was ordered which took another five days. Then I was texted that the job was done. I didn't see it until a few days later and here's where the problems started.

The first thing I noticed was that the lid of the ice box wouldn't close all the way on one end, sticking up above the surface of the galley counter almost 1/4". (This seemed like a mistake I would make when doing this the first time.) Second, with the thermostat turned all the way down (or less cool) we were having things freeze up one us like milk, creamer, butter, bottled ice tea, water and the worst of all...my beer! WTF??!! So, this time I called and the frig man, who I'll call Brian, who told me how sorry he was about the lid not closing and how he just didn't understand how he missed that mistake. (Really?) As for the freezing, Brian had no answers but he would come out to the boat ASAP.

So, for his next visit I made sure to be on board. Brian now saw the raised ice box cover and we both could see that it was letting in warmer air that was causing icing on the evaporator adjacent to the opening. He said that he would move the evaporator down right away. "But what about the freezing?", I said. "Is it possible that the thermostat is defective?" He responded by telling me that was unlikely but the problem probably was that the WRONG THERMOSTAT was installed? (Wrong thermostat?!) Evidently there are two different thermostats for the Adler Barbour / Dometic Cold Machine. There is the "refrigerator" one, #4060204 with a temperature range of 38° to 26° AND the "freezer" one, #4060203 with a temperature range of 28° to 12°. Guess which one he had installed. So after three visits, a broken evaporator, the wrong thermostat and about a two weeks of waiting to get the job done I finally have a new operating ice box/refrigeration conversion.

Now, I know you're all wondering what about the cost. Keep in mind that this was done in Annapolis so your location might have higher or lower rates. Even though the vendor I used made some "rookie" mistakes, they do have a very good reputation. The cost breakdown is as follows:

CU-100 compressor. $1,400
Evaporator plate. $1,075
Labor $1,250

Total (w/o tax). $3,725


A few other points:
After the his final visit to the boat he told me that he actually installed a Adler Barbour / Dometic "air/water" cooled unit which is really a CU-200 not the CU-100 (air cooled only) he listed on his invoice. No water cooling was installed it's just that the CU-200 compressor can accommodate water cooling. His story was that he didn't want me to wait too long for refrigeration and he had the CU-200 in stock but didn't charge me for it saying that it's a $200 upgrade. He exaggerated a bit. The CU-200 sell for $1,443 at Defender and $1,586 at Fisheries Supply. He also said that air cooled is fine for the Chesapeake Bay Area and that water cooled is rarely used except for places like the Caribbean Islands and Florida. He also didn't like Cold Plates for the bay and said that they are also best suited for warmer climates.

In the end would I have been better off installing a new frig myself? To be honest I think it's a toss up. I didn't have to squeeze myself into "little boat places" although I still do with other projects. Plus I didn't have the time and, let's say, incentive to do the work myself thinking that for this sort of thing a pro would be better. If I had encounter the thermostat issue I would have thought it was defective and probably would have contacted my supplier to work it out and then in the end find out the I had the wrong thermostat but that would have taken a lot of time and we all have had that experience for one boat thing or another. I make no recommendation for doing an ice box conversion yourself or calling in a "pro". It all depends on your level of experience with working with tools and your confidence level. In the end, no matter what route you choose, you'll learn something.
 

Loren Beach

O34 - Portland, OR
Senior Moderator
Blogs Author
Hi folks, I'm Wondering if anyone with an original icebox in one of our Ericson's has done the quantitative insulation test ala Don Casey -- weighing the amount of lost ice after a day or two in the box? And then using that the estimate the daily load when running the fridge? I may try if I can find some block ice. Any of your O34 owners know if there is a difference between our boats and the proper Ericsons? Thanks!
Thanks for a chuckle! As for being "proper" a good friend with an E-34 refers to our Olson as Ericson's "red headed step child"!! :)
Yup, we do stand out a bit, in old family photos.... !

There are some differences, however, humor aside. The O-34, at 10600# Disp, is a much 'smaller' boat than similar-length Ericson's. Our galley ice box molding is about 3 c.f. if I recall it correctly.
The lessened capacity is, of course, the bad news. The good news is that a minimum sized 12 volt refrigeration conversion will cool it with ease. And with relatively few AmpHours.

As for calculating the efficiency of the factory insulation, I recall reading an article from a sailing magazine, from back in the late 70's/early 80's, about a boat owner that did the calculations of loss of weight of his block ice over several days. He did a 'before' set of measurements with all the ice melting away in a couple days. Then he added solid foam insulation all around the box, about 6 inches thick, IIRC. The change was (truly) Dramatic. He was able to have a measurable weight of block ice for well over a week. I also recall that he did build a new box with sealed/shiny interior, and then put outside layers of foam, about 1" thick, in layers, with all seams overlapped.
My 1988 Olson had factory foamed-in-place insulation around the 3 sides visible, and somewhat thicker on the bottom. By the standards of the times, it was well insulated-- although I have never tried to check the side against the starboard hull side. I
keep imagining cutting an access opening to the left of the oven, where the galley module is glassed to the hull. i might get to that some fine day, hopefully. :(

For us, having cold food (at 40 Degrees F, which is the restaurant-minimum for safety as a bench mark), is a feature that makes a boat a true vacation home.

Oh, and to reiterate again redundantly, be sure to gasket that lid !
 
Last edited:

Prairie Schooner

Jeff & Donna, E35-3 purchased 7/21
I’m just trying to get a little extra insulation in my fridge. I have a 12-volt SeaFrost BD unit with a plate in the aft icebox and it works very well, but during the warmer months it of course cycles more frequently. I just want to line the interior walls with something that’ll improve the insulation, and (on another thread thanks to @Loren Beach) potentially put some weather stripping around the lid. Just a simple cut a paste job is all I’m looking to do in the interior. What’s the best product for that?
Based on Alex's @alexwilliamrussell comment in post #22 I tried mylar bubble wrap for this recent cruise. I didn't have time to line things fully, but even this seemed to make a difference. I used velcro dots in certain spots to hold it to the wall. I think finishing the upper walls and having a sheet as a top layer would make even more difference. I doubt it was more than .25" thick so it hardly took any room and is removable for cleaning. Using some large brown paper to pattern helped a lot.

ice box liner 7-25 5 sm.jpeg
We're still just using ice, no refrigeration. Ice does the trick, but the need to get ice at least every other day definitely shapes/drives our itinerary on a trip. We're inching closer to adding refrigeration.
 

bsangs

E35-3 - New Jersey
Based on Alex's @alexwilliamrussell comment in post #22 I tried mylar bubble wrap for this recent cruise. I didn't have time to line things fully, but even this seemed to make a difference. I used velcro dots in certain spots to hold it to the wall. I think finishing the upper walls and having a sheet as a top layer would make even more difference. I doubt it was more than .25" thick so it hardly took any room and is removable for cleaning. Using some large brown paper to pattern helped a lot.

View attachment 53332
We're still just using ice, no refrigeration. Ice does the trick, but the need to get ice at least every other day definitely shapes/drives our itinerary on a trip. We're inching closer to adding refrigeration.
Nice install, Jeff. Might give this a shot, though the refrigerator plate attached to the starboard wall takes up most of that area. I did add weather stripping around the top edges last summer, and also repurposed a memory foam floor mat that goes on top of the lid, both of which helped tremendously.
 

Bolo

Contributing Partner
Based on Alex's @alexwilliamrussell comment in post #22 I tried mylar bubble wrap for this recent cruise. I didn't have time to line things fully, but even this seemed to make a difference. I used velcro dots in certain spots to hold it to the wall. I think finishing the upper walls and having a sheet as a top layer would make even more difference. I doubt it was more than .25" thick so it hardly took any room and is removable for cleaning. Using some large brown paper to pattern helped a lot.

View attachment 53332
We're still just using ice, no refrigeration. Ice does the trick, but the need to get ice at least every other day definitely shapes/drives our itinerary on a trip. We're inching closer to adding refrigeration.
My only real experience with using ice had been when the old Adler Barbour unit on Vesper decided to call it quits. (See my posting about it above) So the first mate and I had to visit the marina store or at anchor taken the dinghy ashore to buy ice every other day. After having refrigeration it wasn’t fun. Added to that we keep items in the box like creamer, beer, bottled ice tea, etc. and it’s nice to know that they’ll be cold and waiting for us when we go to the boat. The biggest downside to installing refrigeration is battery power so a good insulated box and adequate frig unit is important along with healthy house batteries and a way to monitor their status. Now with the new frig installed in our boat I think that a second (summer) day on the hook will require running the engine to recharge which is something I’d like to avoid so I’m installing some flexible solar panels. Parts are on order now and coming in so more about how that goes later.
 

bsangs

E35-3 - New Jersey
Am planning to re-insulate the lids on my ice boxes. Shouldn't be a very challenging job, just want to make sure I'm using he correct product. The large one is used as a refrigerator, the smaller one used only as an ice box. Wondering what the consensus here is for the next insulation - boards cut to size, or spray foam? After removing the existing insulation, which upon inspection I assume is some very old spray foam, I'm planning to get some Owens Corning closed cell insulation boards (the pink stuff) and cut them to size to fill the cavity. But would spray foam be a better option?
 

Joliba

1988 E38-200 Contributing Member
When we re-insulated our ice box lid at the time we added refrigeration many years ago I tried something different. I purchased sheets of aerogel. I stacked several layers of the aerogel and constructed a custom-sized box of fiberglass and epoxy resin to contain the aerogel. I faired the edges and corners of the box, painted it, then screwed it to the underside of the icebox lid. The”box” was open on the side that is against the underside of the lid and unexposed. The resulting lid insulation is thinner, cleaner, more durable, and more efficient than either foam spray or sheets. But it’s a little project and more expensive.
 

Christian Williams

E381 - Los Angeles
Senior Moderator
Blogs Author
Alas, when arriving yesterday at the boat the "Dometic" refrigerator was not working. Compressor appears dead. I bypassed the circuit breaker just to be sure it wasn't that.

This unit has been on shore power 24/7 for the past eight years. Never flagged offshore either, where it was run only a n hour a day.

I suppose I need a new unit, as this one may be 10 or 20 years old.

But I do wonder, of course, if there is a simple cause for non-operation. A fuse in the unit, perhaps?

1770071872152.png
 

Bolo

Contributing Partner
Alas, when arriving yesterday at the boat the "Dometic" refrigerator was not working. Compressor appears dead. I bypassed the circuit breaker just to be sure it wasn't that.

This unit has been on shore power 24/7 for the past eight years. Never flagged offshore either, where it was run only a n hour a day.

I suppose I need a new unit, as this one may be 10 or 20 years old.

But I do wonder, of course, if there is a simple cause for non-operation. A fuse in the unit, perhaps?

View attachment 54529
Thermostat?
 

Christian Williams

E381 - Los Angeles
Senior Moderator
Blogs Author
Good point. I recall the original owner kept a spare--naturally, it was in the garage and burned up in the fire.

How to test? AI to the rescue.

AI Overview

To test an Adler Barbour thermostat,
use a multimeter to check for continuity across the terminals while adjusting the knob, or bypass it with a jumper wire to see if the compressor starts. A properly functioning thermostat will show continuity (0-1 ohm) at room temperature/cold settings and no continuity when clicked off or placed in a freezer.

Testing Procedure
  1. Preparation: Disconnect the power to the refrigerator. Access the thermostat (usually in a housing inside the icebox).
  2. Physical Inspection: Ensure the capillary tube (sensing bulb) is attached to the evaporator plate. If it's loose, it won't read temperatures correctly.
  3. Click Test (Quick Test): Turn the thermostat knob from the off position to the highest setting. You should hear a distinct "click".
  4. Continuity Test (Multimeter):
    • Set your multimeter to Ohms (
      1770076213256.gif
      Ωcap omega
      ) or continuity mode.
    • Place probes on the two terminals of the thermostat.
    • At room temperature, the meter should read 0-1 ohms (continuity).
    • Turn the knob to the coldest setting, then rotate it to "off." The continuity should break (no reading).
  5. Freezer Test (Detailed):
    • Place the thermostat's sensing bulb in a freezer for 30 minutes.
    • Remove and test for continuity. It should be open (no continuity).
  6. Bypass Test: If you suspect the thermostat is not sending power to the compressor, disconnect the two wires from it and jumper them together. If the refrigerator starts running, the thermostat is likely faulty and needs replacement.
 
Top