The "integral" Cape Horn vane connects the servo-pendulum gear by lines to the ship's quadrant by means of its own quadrant installed on the interior transom. Unlike other servo-pendulum systems, all the key control lines are belowdecks, for elegance. That elegance comes at the price of complication.
Measurement is the first challenge and requirement for ordering. The gear famously requires a hole drilled in the transom, into which is fitted a horizontal stainless tube. Inside the tube is a second tube linking the pendulum oar to a Cape Horn quadrant. The owner's manual is here. An excellent installation video by Sailing Uma is here.
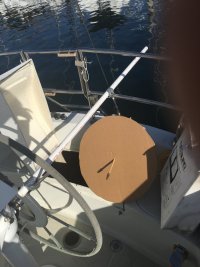
The location of the hole is critical. Luckily, the Ericson 381 has a single large lazarette hatch which a human can actually enter using certain well rehearsed contortions. The hole placement controls the location of the Cape Horn quadrant under the reverse transom, and also the height above the water of the pendulum oar to be attached. The horizontal tube must be level. I lashed a PVC pipe to span cockpit and stern as a waterline reference and hung a plumb bob inside and out. The cardboard disk is a quadrant mockup. Given the variables, certainty was elusive. After several measurements, here's what I ordered:
 ...
...
The unit arrived on schedule six weeks later, with my measurements rendered in stainless steel.

The Ericson 381 stern is less complicated than that of a double-ender, stepped transom, dinghy garage, no-transom or other common designs. Even so, working in there can only be described as difficult, even preposterous, and I did about 12 hours of it. All consideration of the Cape Horn begins with access to the inside of the transom. Drilling was easy with a 3 1/2" hole saw on an extended bit. Start outside, finish inside.
 ...
...
 ...
...

That's where easy stopped. The horizontal tube is supported under the reverse transom by two hefty steel braces. They can be fastened to the overhead deck joint, as Uma did, or to the hull beneath the tube. I chose the hull, to allow the braces and the turning blocks to share the same connection point so that the forces cancel each other out.
How to connect braces and turning blocks to the hull? The answer is a block of hardwood capable of withstanding strong side and lifting forces. I chose 3 1/2" hickory, thick enough to allow for a recessed nut on a sturdy eye bolt to hold the initial turning blocks. Those blocks must line up exactly with the quadrant to prevent chafe.

I usually enjoy this sort of work. I didn't enjoy this at all. The hull is sloped in two directions and my boat has stringers in the way. The blocks must be positioned to correctly align the pull on the quadrant, taking into account the extension factor of the blocks. The feet of the braces must also rest on the blocks. The braces have two inches of adjustment to their length, but the foot brackets adjust in only one plane. If the block is rotated on the hull slope, the bracket feet don't lie flat upon it. To obtain the correct lengths of strut I resorted to one-inch PVC pipe, cut down incrementally until they fit. The fitting was tedious.
The horizontal tube through the transom must be both level and true fore and aft. Mine is only 20" long, half inside and half outside the boat. Alignment is done by eye, since precise measurement is impractical. And you can't see both ends at once. "It is straight now?" you ask your colleague from under the deck. Few friends, including Russ, an aerospace engineer, are willing to go on permanent epoxy record "by eye." And when he did give his opinion, my eye didn't agree. The wood blocks, with eye-bolts attached, are attached permanently to the hull with thickened epoxy.

This requires paint remover to clean the area, following by grinding the hull to bare fiberglass. The blocks slide on the hull slope when bedded into their epoxy. I steadied them with duct tape. When the bedding cured I returned to glass them in for further security. The horizontal tube is now fixed to the blocks. It still wobbles in the transom hole, and will until exterior braces are installed.
The storied elegance of the Cape Horn, in my opinion, derives from its minimal profile. Sailing Uma's installation is a good example of that. But boat design differs, and a look at typical Cape Horn installations shows a lot of competing angles simply because the easiest way to mount the exterior braces is to screw brackets into the transom. That's fine, but makes for a pyramid of tubes that is less than elegant--and elegance is the goal. Better for the eye to keep the braces horizontal by attaching them to the strong Ericson stern pulpit.
The vertical pole which holds the vane is thick-walled stainless. Like the horizontal tube through the transom, it must be drilled for the custom location of its brackets. Russ and I did that on the dock, using the standard stainless-steel drill sequence of nail punch, progressively larger hardened bits, slow bit rotation, heavy pressure and lots of cutting fluid. Despite many measurements, the angles to the stern pulpit came out subtly wrong. To enlarge the holes--the solution to maladjusted brackets--I took the whole rig home to my drill press.

The Ericson pulpit tubing is thinner-walled and easier to drill in the field. I attached the brackets to the pulpit with tapped quarter-inch hex-head bolts. Sheet metal screws are not recommended because stainless galls. It is not necessary to drill through both side of the tube since tapping makes a secure connection.
With all braces on and the horizontal tube absolutely level and straight fore and aft, the horizontal tube can be fiberglassed to the transom on the inside. Awkward and messy, with sanding and grinding of the stainless required. Work fast while bent like Gumby. I am proud that only once did my tub of thickened epoxy get so hot I had to throw it overboard. Shallow trays are better, since a thin layer of West System cooks off much slower.
Now arrived the part I was not looking forward to: the rigging of the control lines that connect the Cape Horn quadrant to the ship's quadrant. Such lines are the heart and soul of self-steering. Continually, 24 hours a day, they transfer the strong force of the pendulum oar to the ship's rudder, keeping on course. Most units do that with visible cockpit lines to a drum on the steering wheel. The Cape Horn control lines are entirely hidden from view. Elegance, don't you know.
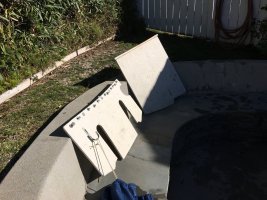
Ericsons, like many boats, use a chain and wire system to connect the wheel to the rudder quadrant. It is necessary to also connect the Cape Horn quadrant to the Ericson quadrant. That means an eye bolt at the mid-point of the quadrant , but of course there's no way to do that on most quadrants. I used the time waiting for the Cape Horn to arrive to make a plate of mahogany that I could bolt under my quadrant to place its new eye-bolt at the recommended radius from the rudder post. The radius was to be 11.5 inches, to match the 11.5" radius of the Cape Horn "Joshua" quadrant. My mockup and finish piece looked like this:
 ...
...

I chose 13/16th Sapele mahogany treated with CPES and with recessed nuts to preclude chafe from lines. I surprised myself by successfully drilling my bronze quadrant for four quarter-inch bolts and installing the span without removing the quadrant.
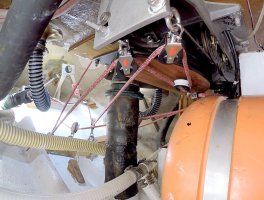
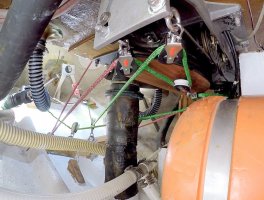
The control lines, with their required purchases and precise angles, are a psychological mobius strip that defy narrative explanation. The photo gives the idea.

The practical problem is finding a place for blocks to create a direct side-to-side pull on the ship's quadrant. I decided to use the strong aluminum box that Yacht Specialties used to house the steering cable sheaves. On the E381 there was just enough access to drill the holes in the aluminum and install eye bolts. For awkward drilling at full arm extension I found that a drill bit on an impact driver worked best.
(continued)
Measurement is the first challenge and requirement for ordering. The gear famously requires a hole drilled in the transom, into which is fitted a horizontal stainless tube. Inside the tube is a second tube linking the pendulum oar to a Cape Horn quadrant. The owner's manual is here. An excellent installation video by Sailing Uma is here.
The location of the hole is critical. Luckily, the Ericson 381 has a single large lazarette hatch which a human can actually enter using certain well rehearsed contortions. The hole placement controls the location of the Cape Horn quadrant under the reverse transom, and also the height above the water of the pendulum oar to be attached. The horizontal tube must be level. I lashed a PVC pipe to span cockpit and stern as a waterline reference and hung a plumb bob inside and out. The cardboard disk is a quadrant mockup. Given the variables, certainty was elusive. After several measurements, here's what I ordered:

The unit arrived on schedule six weeks later, with my measurements rendered in stainless steel.
The Ericson 381 stern is less complicated than that of a double-ender, stepped transom, dinghy garage, no-transom or other common designs. Even so, working in there can only be described as difficult, even preposterous, and I did about 12 hours of it. All consideration of the Cape Horn begins with access to the inside of the transom. Drilling was easy with a 3 1/2" hole saw on an extended bit. Start outside, finish inside.
That's where easy stopped. The horizontal tube is supported under the reverse transom by two hefty steel braces. They can be fastened to the overhead deck joint, as Uma did, or to the hull beneath the tube. I chose the hull, to allow the braces and the turning blocks to share the same connection point so that the forces cancel each other out.
How to connect braces and turning blocks to the hull? The answer is a block of hardwood capable of withstanding strong side and lifting forces. I chose 3 1/2" hickory, thick enough to allow for a recessed nut on a sturdy eye bolt to hold the initial turning blocks. Those blocks must line up exactly with the quadrant to prevent chafe.
I usually enjoy this sort of work. I didn't enjoy this at all. The hull is sloped in two directions and my boat has stringers in the way. The blocks must be positioned to correctly align the pull on the quadrant, taking into account the extension factor of the blocks. The feet of the braces must also rest on the blocks. The braces have two inches of adjustment to their length, but the foot brackets adjust in only one plane. If the block is rotated on the hull slope, the bracket feet don't lie flat upon it. To obtain the correct lengths of strut I resorted to one-inch PVC pipe, cut down incrementally until they fit. The fitting was tedious.
The horizontal tube through the transom must be both level and true fore and aft. Mine is only 20" long, half inside and half outside the boat. Alignment is done by eye, since precise measurement is impractical. And you can't see both ends at once. "It is straight now?" you ask your colleague from under the deck. Few friends, including Russ, an aerospace engineer, are willing to go on permanent epoxy record "by eye." And when he did give his opinion, my eye didn't agree. The wood blocks, with eye-bolts attached, are attached permanently to the hull with thickened epoxy.
This requires paint remover to clean the area, following by grinding the hull to bare fiberglass. The blocks slide on the hull slope when bedded into their epoxy. I steadied them with duct tape. When the bedding cured I returned to glass them in for further security. The horizontal tube is now fixed to the blocks. It still wobbles in the transom hole, and will until exterior braces are installed.
The storied elegance of the Cape Horn, in my opinion, derives from its minimal profile. Sailing Uma's installation is a good example of that. But boat design differs, and a look at typical Cape Horn installations shows a lot of competing angles simply because the easiest way to mount the exterior braces is to screw brackets into the transom. That's fine, but makes for a pyramid of tubes that is less than elegant--and elegance is the goal. Better for the eye to keep the braces horizontal by attaching them to the strong Ericson stern pulpit.
The vertical pole which holds the vane is thick-walled stainless. Like the horizontal tube through the transom, it must be drilled for the custom location of its brackets. Russ and I did that on the dock, using the standard stainless-steel drill sequence of nail punch, progressively larger hardened bits, slow bit rotation, heavy pressure and lots of cutting fluid. Despite many measurements, the angles to the stern pulpit came out subtly wrong. To enlarge the holes--the solution to maladjusted brackets--I took the whole rig home to my drill press.
The Ericson pulpit tubing is thinner-walled and easier to drill in the field. I attached the brackets to the pulpit with tapped quarter-inch hex-head bolts. Sheet metal screws are not recommended because stainless galls. It is not necessary to drill through both side of the tube since tapping makes a secure connection.
With all braces on and the horizontal tube absolutely level and straight fore and aft, the horizontal tube can be fiberglassed to the transom on the inside. Awkward and messy, with sanding and grinding of the stainless required. Work fast while bent like Gumby. I am proud that only once did my tub of thickened epoxy get so hot I had to throw it overboard. Shallow trays are better, since a thin layer of West System cooks off much slower.
Now arrived the part I was not looking forward to: the rigging of the control lines that connect the Cape Horn quadrant to the ship's quadrant. Such lines are the heart and soul of self-steering. Continually, 24 hours a day, they transfer the strong force of the pendulum oar to the ship's rudder, keeping on course. Most units do that with visible cockpit lines to a drum on the steering wheel. The Cape Horn control lines are entirely hidden from view. Elegance, don't you know.
Ericsons, like many boats, use a chain and wire system to connect the wheel to the rudder quadrant. It is necessary to also connect the Cape Horn quadrant to the Ericson quadrant. That means an eye bolt at the mid-point of the quadrant , but of course there's no way to do that on most quadrants. I used the time waiting for the Cape Horn to arrive to make a plate of mahogany that I could bolt under my quadrant to place its new eye-bolt at the recommended radius from the rudder post. The radius was to be 11.5 inches, to match the 11.5" radius of the Cape Horn "Joshua" quadrant. My mockup and finish piece looked like this:
I chose 13/16th Sapele mahogany treated with CPES and with recessed nuts to preclude chafe from lines. I surprised myself by successfully drilling my bronze quadrant for four quarter-inch bolts and installing the span without removing the quadrant.
The control lines, with their required purchases and precise angles, are a psychological mobius strip that defy narrative explanation. The photo gives the idea.

The practical problem is finding a place for blocks to create a direct side-to-side pull on the ship's quadrant. I decided to use the strong aluminum box that Yacht Specialties used to house the steering cable sheaves. On the E381 there was just enough access to drill the holes in the aluminum and install eye bolts. For awkward drilling at full arm extension I found that a drill bit on an impact driver worked best.
(continued)
Last edited:


