Replacing the factory vinyl above shelves in 32-200

Rick R.

Contributing Partner
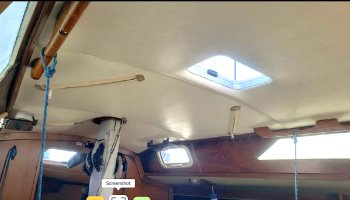
Last year I let our once talented wood guru convince me that he would make and install removable wooden panels to replace the stained off white vinyl above the salon shelves. It sounded like a good idea. Unfortunately, he developed a myriad of personal problems during the job. Fist came a bout of laziness followed by no-shows, delays and truly sloppy work. He said he suffered a heat stroke on another yacht before taking on our job. This led him to much alcohol and outright lying.

I plan to remove his work and go back to the original design with vinyl and zippers. I have sourced the material and am prepared for a life involving staples (old and new).

The factory installation seems to have had the SS chainplate rods go through the pre installed vinyl with teak covers over the holes. Sind I don’t want to remove the rods, I am considering adding hidden Velcro to close up slits required for installation around the rods. Has anyone here faced the replacement of these areas above the shelves and cane lockers? Any ideas are welcome.
 

Hagar2sail

Member III
Blogs Author
Haven’t done anything with them yet but many of the zippers are stuck and vinyl is stretched out from a radar cable resting on it.

Be interested in how this works out for you!
 

Loren Beach

O34 - Portland, OR
Senior Moderator
Blogs Author
The factory installation seems to have had the SS chainplate rods go through the pre installed vinyl with teak covers over the holes. Sind I don’t want to remove the rods, I am considering adding hidden Velcro to close up slits required for installation around the rods. Has anyone here faced the replacement of these areas above the shelves and cane lockers? Any ideas are welcome.
Same way of finishing out the area under the side decks on our boat. I put a few pix of that area in my recent blog. I was able to stretch the vinyl fabric back into place and re-staple, but it was tedious as heck.
I would also like to replace those panels someday. Maybe with a matching formica(r) color with a core backing so it would not sag. It would be nice to have access to the under deck areas by must removing some screws. There would have be several panels, with a teak batten over each seam. Fiddly work.
 

Rick R.

Contributing Partner
Thanks Loren, I’ll take a look at your blog. It’s time I rebed the hardware on the deck above so this redo is timely.
 

Michael Edwards

Member II
I recommend a ‘long nose’ rechargeable battery powered stapler, using stainless steel staples. Also needed is a strong dose of patience.
Sailrite has a neumatic stapler, but my small air compressor was irritating. The manual stapler just wasn’t working (Strong grip and awkard angles). I got the gimp and vinyl from Sailrite. Foam insulation was found locally. Fitting was by cutting oversized , stapling across an edge to establish posisition, stretching out wrinkles as I secured opposing edges. Trimming off the excess with a razor blade. Then the gimp covers it all very nicely. Here is where the long nose is needed to get into the narrow slot of the gimp. Our E32 used teak plywood around the ports. By removing the lower trim, revarnishing it before replacing it; made for attractive results. For those rebuilding the port lights: I fastened the trim rings through the vinyl, then trimmed out the insides.
 

Rick R.

Contributing Partner
I’m guessing that using the gimp might eliminate the need to remove the teak trim board that runs below the ports. Thank you for the info. Did you have any photos of your work in this area?
 

Michael Edwards

Member II
Hey Rick,

I suppose you could do that, but it is much simpler and attractive to remove the trim. For one’ it provides for stretching the fabric and stapling down where it will be out of site. In our case we needed access under the deck as well. That new fabric was replaced and fastened along the same line. This makes sense when underneath looking up. The bungs are easily removed and replaced. So far I have replaced about 75% of of vinyl headliner in AnnDor. And as mentioned before; around the ports, which was very depressing to look at; due to water stains and bleaching. I did post photos last year. I admit that I was feeling insecure at the start, which proved invalid, it just wasn’t that hard to do. I was able to rebed the chain plates, add lighting and speaker wires.
 

Touchrain

Member III
I replaced all the ceiling and under deck vinyl on our E38 20 years ago with laminate (Formica type) and it has held up well. Panels easily removed. I used stained oak rather than teak. I used contact cement to attach laminate to 1/8 inch Luan and then cut to fit. Bosch jig saw with laminate blade works great. Still looks very good.
 

Alan Gomes

Sustaining Partner
I replaced all the ceiling and under deck vinyl on our E38 20 years ago with laminate (Formica type) and it has held up well. Panels easily removed. I used stained oak rather than teak. I used contact cement to attach laminate to 1/8 inch Luan and then cut to fit. Bosch jig saw with laminate blade works great. Still looks very good.
Do you have any pictures you can share?
 

Michael Edwards

Member II
I thought about using laminate as I had a lot of experience with it. I wanted to use the vinyl and foam backing because of the insulation it offers. Actually I purchased wood veneer, but was still concerned that I wouldn’t do a good job of sealing the windows. I was right sadly, and had to redo one window. It leaked between the frame and the hull, where I hadn’t applied enough butyl rubber tape to fill the gap at the end of the frame.
 

Rick R.

Contributing Partner
I replaced all the ceiling and under deck vinyl on our E38 20 years ago with laminate (Formica type) and it has held up well. Panels easily removed. I used stained oak rather than teak. I used contact cement to attach laminate to 1/8 inch Luan and then cut to fit. Bosch jig saw with laminate blade works great. Still looks very good.
 

jav317

Member III
I've used Fiberglass reinforced plastic FRP wall panel. Lowes of Home Depot 4x8 sheets resistant to mold, moisture etc. You can cut it with a razor knife or construction siccors. I've done it on overheads and bulkheads. Its white and one side is smooth and the other is dimpled. The sheets cost about $45 and are easy to work with.
 

Rick R.

Contributing Partner
I am back and considering applying new vinyl above the book shelves (underneath the side decks). Has anyone here been successful in replacing this trim work? If so, how did you get the staple gun inside the tight areas?
 

Loren Beach

O34 - Portland, OR
Senior Moderator
Blogs Author
I am back and considering applying new vinyl above the book shelves (underneath the side decks). Has anyone here been successful in replacing this trim work? If so, how did you get the staple gun inside the tight areas?
When we removed and re-installed all of our deck fittings, I removed rows of staples from the inside edge of the vinyl. This allowed the material to drop down an inch or two so that I could get wrenches onto all the nuts. Tight quarters work but with patience I succeeded. A teak trim covers all of the "rolled over" stapled edge at the bottom of the cabin side teak panel. That trim is attached by #6 bronze screws, about 3/4 inch long, set flush.
Our vinyl panels do have full length zippers, but they are partly jammed up by corrosion of the pulls. Luckily that part is all concealed by the cabinet doors.
There are a couple of pix in this blog entry that shows this part of the deck underside. https://ericsonyachts.org/ie/ubs/gear-removal-progress.786/

And, a picture from a great owner-built new vinyl headliner that replaced the EY headliner.
Note the teak $ trim pieces at the edge of the top and along the bottom of the cabin side teak surface. Those strips conceal the edge of the headliner and all of the staples.
 

Attachments

  • New Headliner w:added zippers O-34.jpg
    New Headliner w:added zippers O-34.jpg
    155.1 KB · Views: 37
Last edited:

Pete the Cat

Member III
FWIW: There were a couple places in the V berth where getting at the stanchion bases was impossible as there were no zippers in the ceiling fabric directly under them. I "solved" this with some very sticky white duct tape bought on Amazon. Very very difficult to see and it has stuck well in the wet (but not leaky) environment there.
 
Top