• Untitled Document

    The 2024-2025 Fund Raising Season has Opened!

    EricsonYachts.org has opened the season for raising funds to support the expenses of the site. If you would like to participate, please see the link below for additional information.

    Thanks so much for your continued support of EricsonYachts.org!

    2024-2025 Fund Raising Info

  • Untitled Document

    Join us on January 24th, 7pm EDT

    for the CBEC Virtual Meeting

    EY.o January Zoom Meeting

    All EYO members and followers are welcome to join the fun and get to know the people you've met online!

    See the link below for login credentials and join us!

    January Meeting Info

    (dismiss this notice by hitting 'X', upper right)

Thru Hulls: Seacock bolted through the hull or ball valve??

I have really been pondering this idea of installing the marelon thru hulls with the epoxy slurry around them to bed them, as well as under the G-10 plates and inside the g10 plates. After which I could shave off the lip and leave them as flush to the body. I guess one thing I wonder is, for the connection from thru hull to Marelon Seacock (which I will bolt into backing plate), do i put 4200 under the base of the seacock or leave it only fastened by the bolts and add maybe some teflon tape to the threads. I would think that if this is supposed to give me the ability to replace a seacock in the water (Forespar units come with external plug =) I would not want an adhesive locking down the seacock.
 

Loren Beach

O34 - Portland, OR
Senior Moderator
Blogs Author
AFAIK most of the vendors -composite or bronze - will want you to attach same-material tail pieces.
Several years ago I have one of our Marelon Series 93 seacock valves replaced and the seacock body stayed in place on the inside of the hull.
 

gabriel

Live free or die hard
I have really been pondering this idea of installing the marelon thru hulls with the epoxy slurry around them to bed them, as well as under the G-10 plates and inside the g10 plates. After which I could shave off the lip and leave them as flush to the body. I guess one thing I wonder is, for the connection from thru hull to Marelon Seacock (which I will bolt into backing plate), do i put 4200 under the base of the seacock or leave it only fastened by the bolts and add maybe some teflon tape to the threads. I would think that if this is supposed to give me the ability to replace a seacock in the water (Forespar units come with external plug =) I would not want an adhesive locking down the seacock.
The interface between seacock and backing plate doesn’t take adhesive, it is held in place with the bolts only (either the ones embedded into backing plate, or thru bolted from the outside), and the clamping force of the thru hull fitting tightened from outside the boat. The bolts are really just to keep it from spinning when you tighten it from the outside.

on bronze fittings there has to be Teflon tape on the thru hull threads or they’ll leak. The first time I did it I didn’t put enough tape and it leaked. I had to undo it and put quite a bit more tape. Probably the trickiest part of the whole project.
 

Pete the Cat

Sustaining Member
I will be an outlier here and just say that I think the Groco three corner bolted through hull fittings are needless overkill. It is true that the marine ball valves and the fittings can spring leaks (I have experienced two pin hole leak situations on deliveries). My view is putting more holes through the laminate is a serious downside to most recreational hulls--considering the thickness of the hull material and the quality of most factory layups--most of these underwater through hull fittings are not located where you are likely to drop an anchor on them--Ericson put plastic and nylon through hull fittings on all the above waterline places where you would be most likely to break them. The Grocos are scaled down from the stuff they make for tugs and commercial craft where the danger from shifting cargo is much greater. I think a nut with hunk of G10 bedded in thickened high density filler works well. I have coated the through hull fitting with mold release wax and set it in the high density filler, then come back the following day, and set the whole thing in 4200 and threaded it back in and tighten things down. This seems a tighter solution than jamming the fitting through a hole and hoping I put enough sealant around it. I also do not use 5200 on anything you might possibly need to take apart and 4200 is quite adequate for through hull fittings. I am looking out for the next guy who has to replace it. Just another point of view.
I want to correct something I said. I have never had a marine ball valve leak (do NOT use the similar looking ones from Home Depot, they are not the same). I have had leaks in the fittings screwed into them and when folks do not pay attention to the thread differences as has been discussed. I think putting more holes in the boat laminate is a drawback. Fewer holes is better and tighter tolerances that the yard does not just goop up with 4200 (or with poor yard discipline, 5200) the better.
 
Ok I will avoid adhering the seacock. Sounds like I can shave off the mushroom and the thru hull body will be fine. Since my thru hulls are mostly astern it will be a late decision.
 

ConchyDug

Member III
unless is changing from one type to the other, which requires either glassing-in or removing material to make way for flange, how would flush ones be more labor intensive?


what you are saying is completely true I agree, but with the cost and effort being virtually the same, why not? what can it hurt?
It's expensive because you have to glass over and fair out the countersunk hole again. The act of removal damages the hull around the hole, usually because it was bedded with 5200. I don't know of any countersinking tools that big so you have to grind it out. Test fit then possibly touch up with thickened epoxy to get it smooth. The nonflush you knock them out and maybe do some glass if you buggered the hole and slap another one on.
 

Loren Beach

O34 - Portland, OR
Senior Moderator
Blogs Author
"Just one more thing" as Steve J used to say...
Something I learned from several local boatyards over the decades is how important labor time is. That's why us owners have clever methods to report - based on hours and hours of work when removing an old stubborn thruhull. It takes some of us years to learn that our personal time is also worth real $. :)

One top notch repairer once told me that in ~90 % of these situations, they just mount up a hole saw that is a smidge larger than the old lip diameter and bore out the old fitting. Ten minutes and done. Whether the hole is ground and faired back with layers of glass and resin or chamfered back and filled in completely, in a few hours it's done and they know they can trust it for strength.
Remember, there is no way, given the potential liability, that they can reuse a bronze fitting that may have any dezincification. A lot of of good fittings may well go into their metal recycle bin, but the alternative is not worth taking a chance on.
Sunk boats and drowned mariners are bad for business.
FWIW, after spending a lot of time working on our boat(s) and occasionally helping with others, I agree completely. I want the work to be strong and done right, and off my Worry Schedule for another 30 years.

In the gray area of reinstalling new-ish fittings, that should be OK after a close inspection, yup I might do that too. Thing is, there is a small amount of risk over reusing a metal deck fitting vs trusting any reused underwater parts or some of the stern gear, where I can't inspect them easily. :(
 
Last edited:

Kenneth K

1985 32-3, Puget Sound
Blogs Author
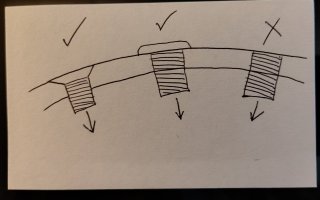
After which I could shave off the lip and leave them as flush to the body.
I wouldn't do this.

Both the mushroom and the flush thru-hulls have a flange that is squeezed against the hull when the seacock is screwed on. If you cut off the flange, there is nothing but epoxy holding a straight (un-flanged) pipe from being pulled through the hull. That's like cutting the head off of a bolt after screwing it in place.

IMG_20250111_122410481_HDR~3.jpg
 

Loren Beach

O34 - Portland, OR
Senior Moderator
Blogs Author
If you cut off the flange, there is nothing but epoxy holding a straight (un-flanged) pipe from being pulled through the hull. That's like cutting the head off of a bolt after screwing it in place.
The diagram seems intuitive, perhaps, But it does not illustrate the inside backing plate and composite sea cock.
Our threaded composite thru hulls are bedded in epoxy mush, and so was the backing plate inside and the base of the sea cock. The yard folks judged it to be more than adequate, and I concur.
If the thruhull head flange had been left on, it might be potentially a smidge stronger yet, but I doubt that the difference is measurable in the real world. Either way would be fine, i.e. both answers are correct.
 

Kenneth K

1985 32-3, Puget Sound
Blogs Author
Either way would be fine, i.e. both answers are correct.
Ultimately, yes. And since labor costs are a real factor in any decision, choosing the more economical alternative may be wise.

But, for the engineering geeks (self included):

An online calculator will tell you that the "clamping force" of a 1.5" threaded thru-hull torqued to 50 ft-lb equals about 2000 pounds. This stretches the thru-hull (like a spring) and holds the assembly in place regardless of any other means of attaching the assembly to the hull. A soft, flexible sealant (like Seka-flex) is usually used to seal the gaps, but this provides no real additional structural support.

Then, people, liking the idea of "more is better," choose to seal the gaps with epoxy instead, which then does add additional structural support. So far, so good.

But, if you cut the mushroom head off the thru-hull after torquing it down, the epoxy bond then has to pick up the 2000 pounds of force that the mushroom head was providing, which then stresses the epoxy to something like 833psi**. The 'bonding lap-strength' of epoxy is reported to be 870-3625 psi (depending on the materials being bonded).

So, while the remarkable properties of epoxy allow you to get away with cutting off the mushroom head, it's probably better engineering practice to either, (A) leave the mushroom head intact to maintain the clamping force, or, (B) bed the thru-hull in liquid epoxy with only minimal torque applied to the threads (thus reducing the stress on the epoxy when the mushroom head is removed).

For the non-geeks;

Yeah, either way works.

**Note: If the hull is 1/2" thick, a 1.5" dia hole provides 2.4 sq inches of "bonding surface" for the epoxy, and 2000lb / 2.4 sq in = 833 psi.
 

windblown

Member III
Blogs Author
Ultimately, yes. And since labor costs are a real factor in any decision, choosing the more economical alternative may be wise.

But, for the engineering geeks (self included):

An online calculator will tell you that the "clamping force" of a 1.5" threaded thru-hull torqued to 50 ft-lb equals about 2000 pounds. This stretches the thru-hull (like a spring) and holds the assembly in place regardless of any other means of attaching the assembly to the hull. A soft, flexible sealant (like Seka-flex) is usually used to seal the gaps, but this provides no real additional structural support.

Then, people, liking the idea of "more is better," choose to seal the gaps with epoxy instead, which then does add additional structural support. So far, so good.

But, if you cut the mushroom head off the thru-hull after torquing it down, the epoxy bond then has to pick up the 2000 pounds of force that the mushroom head was providing, which then stresses the epoxy to something like 833psi**. The 'bonding lap-strength' of epoxy is reported to be 870-3625 psi (depending on the materials being bonded).

So, while the remarkable properties of epoxy allow you to get away with cutting off the mushroom head, it's probably better engineering practice to either, (A) leave the mushroom head intact to maintain the clamping force, or, (B) bed the thru-hull in liquid epoxy with only minimal torque applied to the threads (thus reducing the stress on the epoxy when the mushroom head is removed).

For the non-geeks;

Yeah, either way works.

**Note: If the hull is 1/2" thick, a 1.5" dia hole provides 2.4 sq inches of "bonding surface" for the epoxy, and 2000lb / 2.4 sq in = 833 psi.
Best physics lesson I’ve ever had, Ken!
I’ve known torque was important, but you’ve blown open my mind to significance of variables of length and material and their impact on strength and longevity.
There are so many engineers of many flavors in this community, and it is such a joy to learn the “why” along with the how.

Great geek food for my grey matter,
and now I can proceed either way with my thru-hulls.
 
Top