• Untitled Document

    Join us on March 29rd, 7pm EST

    for the CBEC Virtual Meeting

    All EYO members and followers are welcome to join the fun and get to know the guest speaker!

    See the link below for login credentials and join us!

    March Meeting Info

    (dismiss this notice by hitting 'X', upper right)

What's the most useful modification you've made....

corkhead

Julian Ashton
Improvements

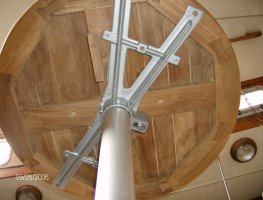
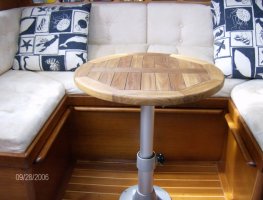
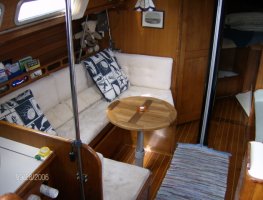
I just did this one, replaced the salon table ( the one which drops down to turn the port couch into a double bed) with a round 24" diameter table. I don't sleep there so I don't need to convert. The new table allows much room to almost walk inside where the couch is. It also opens up the interior space, I love the change. It was so easy just 4 screws.
Molly E35-III
 

Frank Langer

1984 Ericson 30+, Nanaimo, BC
Julian, your round table sounds like an interesting change. Can you post a picture of it, so we can see what effect it has on the cabin space?
Thanks,
Frank.
 

corkhead

Julian Ashton
here's a few pictures. BTW total cost $120. The bracket is the same as the one on the bigger original table, just fits with a 24" diameter
 

Attachments

  • HPIM0096.JPG
    HPIM0096.JPG
    212.5 KB · Views: 220
  • HPIM0095.JPG
    HPIM0095.JPG
    209.1 KB · Views: 220
  • HPIM0092.JPG
    HPIM0092.JPG
    212 KB · Views: 242

therapidone

Member III
Nicely done!

Greetings Corkhead,

Julian, thank you for posting the pics...mod looks great as does the inside of Molly.

Regards,

Ed:egrin:
 

Frank Langer

1984 Ericson 30+, Nanaimo, BC
Julian, it looks great! I wonder how many other owners will decide to copy that, given how lovely it looks!:egrin:

One question, though--what's the purpose of the extra small piece of wood that's visible on the underside of the table?

Thanks again for posting!
Frank.
 

stbdtack

Member III
re: the Harken battcar system. The newer AA system is much lighter than the old A system which was the smallest available. I calculated the AA track for my 38 weighed in at around 8lbs. The strong track is a really good system but I dont think its lighter than the AA track. Also the cars are smaller so the stack height is actually shorter than the old slugs I had. Also you can get "sliders" for the track which are not BB cars and are a lot cheaper ($15.00 discounted) than the battcars. I installed each mounting screw with the supplied locktite and havent seen any screws backing out yet.

I can raise the main to full height by hand.....

The Tides marine system is a good product but the Smaller AA Harken battcar system has worked well for me. :)
 

Glyn Judson

Moderator
Moderator
Timing, timing, timing, Re: The Harken AA Battcar System.

stbdtack, I just read your post about the Harken AA Battcar System and was pleased to see that you feel OK about it. I too looked at the Strong System and opted for the Harken. As I type this, I'm preparing the Harken Battcar hardware to accept alomost five of the AA tracks to the existing track on my mast. I've run into a slight problem in that the slot on the track that was pop rivited to my original Le Fiell mast at the factory is a bit too small to accept the neck width of the Harken supplied slugs. I've spent the last two days off and on in the garage with one slug at a time in my vise, using a 12" file to take the sides down about .004" so they'll fit. That's over 100 slugs and I just finished about 40 of them 30 minutes ago. The next step is to take my new main off and to a sail maker to attach all the sail hardware. Marilyn can hardly raise the new heavier and stiffer main, hense the Battcars. I already have a #754 Harken Hi-Load sheave at the top and Harken blocks at the base leading through Harken deck organizers to the cockpit so with the addition of this latest, I hope the main'll go up like a knife in hot butter. Did you fit the AA tracks to your mast while it was up? Did you start the screws in all the slugs and then go up the mast with Lock-Tite Blue and an electric screwdriver in hand for the final installation? In retrospect, it would have been a lot easier to do this when the mast was down this summer for repainting. But at the time I had no idea that Marilyn wouldn't be able to hoist it. By the way, I clicked on the link to take me to your notes on this thread and all I got was the thread about folding tables and such. Confused in Santa Monica, Glyn, E31 #55, Marina del Rey CA
 

Glyn Judson

Moderator
Moderator
Battcar talk

Ben, Oops, your notes are there now, I guess I was just to speedy before and your notes hadn't made their way to the thread yet. Glyn
 

stbdtack

Member III
Glyn, I feel your pain.....the supplied screws for my track were just a little too long. It was a saturday so instead of seeking out shorter metric flatheads, I ground off about 1/16" from the end of each fastener.

For installation I loaded all the slugs for one section into the slot. I put a drop of loctite into each slug. I put another drop onto each screw and started with the bottom. I lifted the next lugs into place by using a flat piece of plastic(wire tie I think) behind the track to slide them up. The last few screws required standing on the boom. I left the screws loose enough to slide the whole thing up. Good to have a helper as you slide the tracks up and add another section.

Once they were all installed I went up in the chair to verify the hoist height, Then started down and tightened each screw with a Dewalt drill (using the clutch so not to overtighten) I dreaded the job but it wasnt bad at all.

I have all harken sheaves in the masthead as well. At least now i'm only lifting the weight of the sail, not fighting friction. Careful when you drop the sail. It will literally "drop"like a rock:egrin:
 

u079721

Contributing Partner
It may be heavy and expensive - but the Harken system sure does work well. I would raise the main all the way with no problem, and only had to use the winch for the last 3 inches or so. And as mentioned the sail really does drop like a rock, so you may actually have to control the halyard when dropping the main. I got to mount my system with the mast down, so it was tedious, but doable.

I remember one day coming back in from a great afternoon sail single handed, motoring up the river with the main still up, but getting ready to drop the main and turn into the club. Next to me was a Hunter 37 where the skipper was trying to wrestle the sail down and lash it to the boom. After getting the halyard ready to run free and with only one wrap on the winch I went back to the wheel, then turned the boat 90 degrees to port to be head to wind, flipped the single wrap off the winch, and let the sail fall down into the lazy jacks and stack pack cradle in about 3 seconds, and I turned back up river. At that point the skipper of the Hunter called over "Dude that is awesome! I am SO jealous!"
 

Loren Beach

O34 - Portland, OR
Senior Moderator
Blogs Author
A few more...

Speaking of "improvements" that we have made in the last decade...
(and I will skip over some upgrades to existing equipment due to age or wear)
I would put Ventilation at the head of a crowded list. I added two Beckson ventilators to the cabin top, and added a total of seven ventilators to the lower part of lockers and settee fronts throughout the boat interior. I was motivated because one of the reasons we got a deal on the boat was that it was a veritable mold farm throughout all the hidden spaces inside, and getting that pervasive smell out was a high priority. We succeeded, but it took several years.
Also right up there would be the autopilot I installed right after we got the boat -- an Autohelm ("Raymarine" nowadays) A4000S that we still use every time we go out.

Another change that really helps us get underway quicker was replacing the stack of teak hatch boards with one lightweight composite panel -- it stores flat against a bulkhead in our head compartment. Those old boards were 3/4 inch thick and were potential missiles every time we tacked, not to mention all the time spent inserting and removing the whole lot of 'em.

Other little changes that made the interior more livable early at night was a flourescent light fixture over the galley, and for late at night...
:rolleyes: an accumultor into the pressure water system.

Refrigeration might be worth a mention, too. There was a breaker and label on the panel for it, because it was once a factory option. I installed a Frigoboat "keelcooler" system and we just love being able to come down and go for a sail with cold pop/water/ beer in the fridge! :cool:

Of course, one cannot mention the fridge without mentioning the increased house battery bank size-- with two golf cart batteries we can easily go two days at anchor without running the diesel.

Opinion: Ericson Yachts, iMHO, built a quality boat, i.e. a "good foundation" on which to make improvements like this. I have been aboard a lot of other boats in the last 30 years, some lots nicer and some a lot cheaper... and it's just not worth my time on earth to put labor and $$ into "gold plating a cowpie" !
:devil:

my .02 worth,
Loren
 
Last edited:

Frank Langer

1984 Ericson 30+, Nanaimo, BC
Loren, thanks for your post--lots of good ideas! When you installed all those vents, did you consider a solar powered Nicro vent for anywhere on the boat. In retrospect, do you still think you need all the vents you added, or would you do it differently now?
Thanks,
Frank.
 

Loren Beach

O34 - Portland, OR
Senior Moderator
Blogs Author
Hi Frank,
I always admired the simplicity of the unpowered ventilator. I had, over the years, witnessed quite a few powered ones that make noise while running.
Those electric ones cost considerably more, as well.

This topic has been discussed here before and others here have had such good luck with the Nicro powered ones that I have to admit that I was unduly influenced by the few that were failing rather than keeping track of the larger number that quietly work and do not bring attention to themselves!
http://www.ericsonyachts.org/infoexchange/showthread.php?t=3830&referrerid=28

There is one other consideration -- the Beckson design allows tight closure from inside and therefore will resist spray much better than the press-fit Nicro type.

As to interior vents, we may yet add another one or two. Air movement under settees and inside the lower parts of cabinets is a key thing to stop mildew.

Cheers,
Loren
 

Frank Langer

1984 Ericson 30+, Nanaimo, BC
Loren, thanks for your reply. Ventilation is such a critical issue for boats, especially where I sail on the BC coast. I really appreciate your information, and your ongoing helpful suggestions on this site! :egrin:
Frank.
 

corkhead

Julian Ashton
the xtra pieces of teak under the salon table came with the table and are used for the original base. they don't get in the way so I left them in place
 

windjunkee

Member III
Here are the modifications we have made on our 1970 E-32 so far. The majority are performance mods:

1. New sails Ullman kevlar medium #1, #3 and .6 symmetrical spinnaker.
2. Spectra halyards
3. tossed the hank-on system and went with a Tuff Luff
4. new winches -- two primary Harken self tailing and two harken spin sheet non-self tailing, one vang/spin halyard composite winch
5. rudder modification
6. New instruments. B&G H-1000 system, including wind, speed, depth, compass, all integrated, with the tri-function display, analog wind angle and single H-100 digital displays.
7. modified main outhaul.
8. Navtec hydraulic backstay adjustor
9. Simrad W-32 wheel pilot

For performance (besides the amazing difference good sails allow), the best modifications were the instruments and the rudder. For the instruments, the ability to accurately read and display true wind direction has been amazing in detecting and capitalizing on subtle wind shifts. The rudder was modified in such a way that it was narrowed and lengthened, giving us lift up wind and better bite and control off the wind. We have found we can point 2-3 degrees higher simply because of the rudder mods.

Hope that helps.

Jim McCone
Voice of Reason E-32-2 Hull #134
 

Howard Keiper

Moderator
Let's see...:

Sea Quest, E-35-II
1972; #274
Berkeley.

Sports an 'Lectra-San'
Refridge
Pedestal Guard
Manual regulator (alternator)
Super easy engine access scheme
Radar
Wet Exhaust System..


The absolute neatest thing is the engine (A-4) access. I can get my hands on any part of the engine EASILY...and it's totally invisible, too. I like it.

Howard Keiper
 

Frank Langer

1984 Ericson 30+, Nanaimo, BC
Howard, can you post pictures of your engine access system--if not, can you describe it? That's got to be a big improvement which would be of interest to most of us!
Thanks,
Frank.
 

Howard Keiper

Moderator
Yes, I'll get some photos posted later today....hopefully.
The mod doesn't lend itself to easy description but, basically. I noticed that the (wood) engine enclosure is bolted to the raised fiberglass sill surrounding the engine. What I did was to carefully saw the enclosure just under the little book rack, and opposite it just before where the battery compartment begins. This done, you can unbolt the enclosure in one piece and remove it.
The trick is to put it back together. I used 4 sets of "T" bolt assemblies...two of brass, which are external and visible but not obvious, and two which are internal and not seen at all. These are used to firmly draw the sawed off unit back into place. I used the original bolts with nylon wing nuts to secure it...(wing nuts, so I don't need tools to take this thing apart). I installed weather stripping between the sill and the bottom of the replaced enclosure to reduce engine noise. If you do a nice clean saw job with a fine tooth blade, it is very hard to see the cut at all and the dull brass sort of disappears into the shadows.

When you want to get to your water pump or engine mounts in a hurry...or maybe just to admire your A-4, this is for you. It was the need to get to my engine mounts that drove this project.

hk
 

polackrm

Member I
Modifications

On my E-29 I also had little room in the galley, I also had an old pressure alcohol stove, 2 burner, that leaked and flared up at every possible point. I replaced the stove with a new, 2 burner, Origo non pressurized stove. I kept the old cutting board, the new stove came with one, and installed it, hinged, on the forward side of the stove cabinet. Now not only do I have an extra fold up shelf but it is also an extra cutting board that is much easier to use than the floating one that sits on top of my stove. Bob E-29, Pegasus, Port Angeles, WA.
 
Top