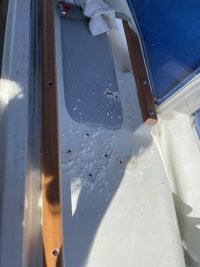
E25+ E25+ deck re-coring

When we bought our E25+, I was certain that there was some wet/rotten core on the starboard side area.
This forum was an amazing source of resources and good folks that help me figure out how to approach this repair, This is why I want to keep adding to this community by documenting how we tackled the rotten core in our boat's deck.

Thanks to @trickdhat that helped me a bunch. thanks again !

When you find a rotten core, there are different paths for you to approach this type of repair.

I first considered using injectadeck, but then, once I read the procedure a couple of times, I realized that it's a super messy and tricky project for having a band-aid type of solution and not really a long-term fix.

I also considered going from the top side, removing the rotten balsa, and using an epoxy resin that create foams as it cures, but it was expensive, and potentially an uncontrollable mess, it was going to be my first time using this product

And lastly I ended up doing the proper long-term repair, but from the inside of the boat. WHy? well, the fiberglass skin the boat has on the top is super thick, and IMHO it will require A LOT of work for that to look good and be solid again. So we went from the inside, with the disadvantage of having gravity playing against us.


First, this is what we could see from inside the boat

IMG_2158.jpeg


I'll be focusing on the starboard side.

1st step was to understand how did the water make it's way in... easy, one of the many POs used silicone to bed the deck fittings against the fiberglass, fiberglass/epoxy releases oils, and the silicone will just not stick.

water was leaking mainly from where a winch was installed in the past, and also every screw of the handrails was also leaking.

we removed all the deck fittings, we covered the holes, and proceed with removing the internal skin to find this, (we warned it's a depressing moment)
67597051412__C9BD47A8-3048-471B-A6DF-846DD0AB3C92.HEIC.jpeg
IMG_4743.HEIC.jpeg
IMG_4747.HEIC.jpeg


We had to let air dry everything for a couple of days and then sanded the surface.
IMG_4887.HEIC.jpeg


This is how it looked after it was completely dry, the 3/4 inch holes, had to be drilled to clean out the rotten wood where the handrails screws go in, look at the diagram here:

img_5030.jpeg

in order for us to replace that rotten wood, we decided to drill 3/4inch holes from the inside out, and use a dowel wetted with epoxy, to fill the voids and remove all the rotten wood.
IMG_2659.HEIC.jpeg


then on the topside, we sanded and used filler to get everything to a clean state.

IMG_4889.HEIC.jpeg
IMG_4904.HEIC.jpeg


After this job was done, we installed the new teak, that now is from plasteak (HDPE)

IMG_4906.HEIC.jpeg


back on the inside of the boat, we used 3/8 balsa core to replace the core.
for gluing that to the top skin, we used epoxy resin ( I personally chose RAKA because is the one I'm used to)

1st you wet everything with epoxy, and then we add a layer of slightly thickened epoxy (with fumed silica or any other structural filler)and
as the last step we glued the balsa core to the top skin, and used a piece of hardboard, covered with packing tape, and two third-hand supports to hold everything in place until the resin sets.
IMG_2665.HEIC.jpeg


We repeated the process until the entire starboard side was re-cored.

IMG_4947.HEIC.jpeg


then every single gap and hole was filled with thickened epoxy (peanut butter consistency)

And finally, we addressed the fiberglassing
we used 1708 fiberglass mat.

1- you sand the surface
2- gap filling
3- wet out the fiberglass mat, and stick it to the new core, we used an overlap of 2 inches, to the existing skin
4- we also decided to use supports as we did for the core, just in case.

rinse repeat until you get everything fiberglassed

IMG_4960.HEIC.jpeg

IMG_5026.HEIC.jpeg


as the very last step, we reinstalled all the deck fittings re-bedding them with 4200.

as next steps we're going with the portside
  • IMG_5022.HEIC.jpeg
    IMG_5022.HEIC.jpeg
    93 KB · Views: 165
  • Like
Reactions: KS Dave and texlan

Blog entry information

Author
gargrag
Views
645
Comments
6
Last update

More entries in Hull, Deck, Keel & Rudder

More entries from gargrag

Top